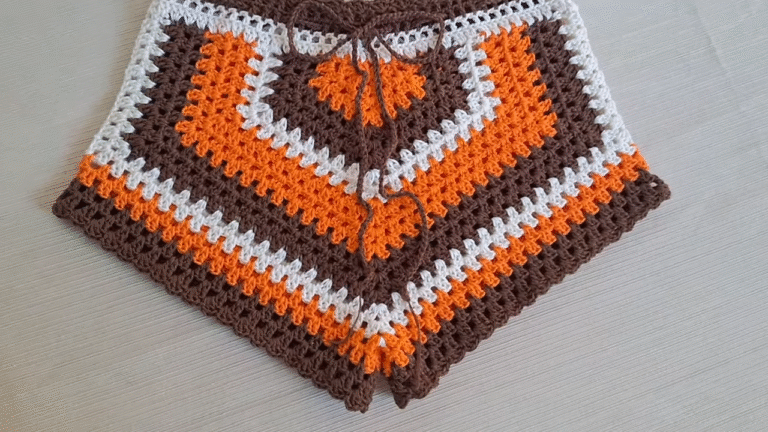
Fearless Crochet Bold Shrug Stylish Top Pattern
Discover the Fearless Crochet Bold Shrug Stylish Top Pattern, beginner-friendly with handmade charm; a quick, gift-worthy layer that styles effortlessly for everyday wear, parties, and thoughtful presents.
Bold and effortlessly handmade, the Fearless Crochet Bold Shrug Stylish Top Pattern turns simple stitches into a statement layer. Beginner-friendly yet polished, it works up quickly and finishes gift-ready, perfect for everyday wear or celebrations.

First, swatch to confirm gauge and note your bust measurement. Next, crochet a single rectangular panel in rhythmic half double crochet for smooth texture and reliable drape. Finally, fold and seam the short edges to form armholes, and add a neat ribbed edging. The result is a flattering, modern shrug that feels as good as it looks.

Fearless Crochet Bold Shrug Stylish Top Pattern
Necessary Materials
- Yarn
- Main Color (bunny): 50 g worsted-weight (Category 4) cotton or acrylic, approx. 100–110 m
- Contrast Color (heart): 15 g worsted weight, approx. 30–35 m
- Accent: 1–2 m pink or peach for nose; a strand of black or dark brown thread for mouth/eyelashes
- Hook
- 2.75 mm for firm stitches (recommended)
- Optional 3.0–3.25 mm for a slightly larger, softer fabric
- Safety Eyes
- 8 mm pair with secure washers (adjust size if using different yarn weights)
- Stuffing
- 30–40 g polyester fiberfill
- Notions
- 2–4 locking stitch markers
- Tapestry needle (size 16–18)
- Scissors
- Straight pins or clips for positioning parts
- Optional blush or fabric paint for cheeks
- Optional keychain ring (25–30 mm), jump ring, and short chain
- Optional ribbon (6–10 mm wide, 20–25 cm length) for a tiny bow
Skill Level
Beginner / Easy. Because the pattern uses basic stitches, continuous rounds, straightforward shaping, and simple seaming, it remains approachable, relaxing, and quick to master.
Making Time (Overview)
Plan 4–6 hours total for a confident beginner. Alternatively, experienced crocheters may finish in about 3–4 hours. If adding accessories or extra embroidery details, allow an additional 30–45 minutes.
Step-by-Step Instructions
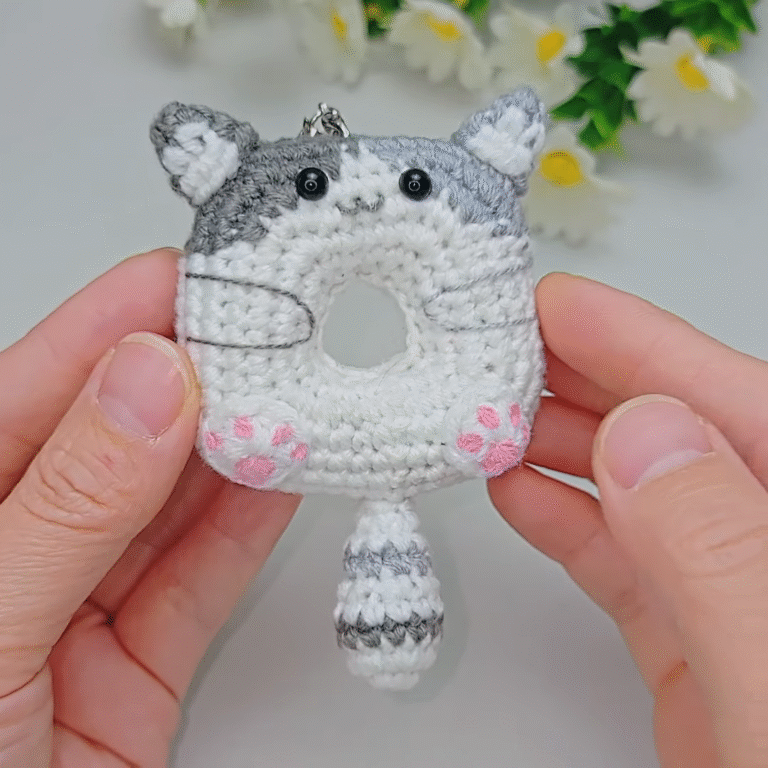
This beginner-focused amigurumi crochet pattern builds a sweet bunny holding a heart. First, the body and head work up in seamless rounds. Next, the arms are attached to hug the heart. Finally, simple details bring the face to life and complete a gift-ready finish. For neat shaping throughout, place a stitch marker at the first stitch of each round, count carefully, and keep tension even.
Body
Making time for this part: 1.5–2 hours
1) Shape the Head
- To begin, make a tight magic ring and work steady increases to form a smooth, round head. Increase each round evenly until reaching approximately 48 stitches. Because consistent counting prevents flat spots, move the stitch marker up at the end of every round. Then continue with several rounds without increasing to build gentle cheek volume. Meanwhile, keep tension even for a dense fabric that holds stuffing well. Finally, lightly stuff—aiming for soft, round fullness rather than a rigid sphere—so the face remains plush and expressive.
2) Form the Body
- Next, continue down from the head without breaking the yarn. Add a gentle sequence of increases to widen the torso slightly, and then work even rounds to develop a tidy oval silhouette. As you go, add stuffing gradually and compress it with your fingers to avoid lumps. Meanwhile, test the sit of the bunny by resting it on a table and shifting stuffing toward the base for better balance. Because the body transitions directly from the head, the seamless join looks polished from every angle.
3) Taper and Close
- After shaping the torso, begin to taper the lower body neatly. Use invisible decreases for a smooth fabric with minimal gapping. While closing, tuck in the final tufts of stuffing so the bunny sits upright without wobbling. Then fasten off with a long tail if a final seam is needed. Finally, use a small drawstring method to close the opening cleanly, and weave in the end securely through several stitches to lock it in place.
Additional Parts
Arms / NECK
- Arms (make 2)
- Making time: 20–30 minutes each
- First, start with a magic ring and increase to 12–14 stitches for a petite, rounded palm. Then work a few even rounds for a plump forearm. Lightly stuff only the wrist-to-midsection area, keeping the shoulder end soft for easy shaping and a natural curve. Next, decrease to close and leave a long tail for sewing. Finally, pinch the shoulder slightly while sewing so the arms angle inward, ready to “hug” the heart securely.
- NECK (optional mini collar or scarf)
- Making time: 10–15 minutes
- For a charming finish, chain enough to circle the neck (approx. 18–22 chains), then work one or two rows of single crochet. As an alternative, create a sweet ruffle by working two single crochet stitches into each chain across. Afterward, tie gently at the side and trim the ends for a tidy bow.
Ears (make 2)
- Making time: 25–35 minutes total
- To start, crochet a slim oval and increase to about 10–12 stitches. Then work several even rows to build length. For a natural taper, slightly decrease near the tip. Do not stuff. Instead, pinch the base and whipstitch to hold shape. For posable ears, mist with steam or water and let them dry pinned on a curved surface. Finally, angle one ear slightly forward for a playful expression.
Tail (pompom or crocheted nub)
- Making time: 10–15 minutes
- Either create a tiny pompom or crochet a small ball: increase to 12 stitches, add one or two rounds even, and decrease to close. Lightly stuff before finishing. Then sew the tail low on the back to improve balance. Consequently, the bunny sits more steadily and looks adorable from behind.
Accessories / Details (if applicable)
- Heart
- Making time: 35–45 minutes
- For a plush 3D heart, begin with two small circles, join them side-by-side, and then shape the point with gradual decreases. Stuff moderately so it remains squishy yet retains a crisp outline. Alternatively, crochet two flat heart panels, whipstitch them together, and lightly stuff before closing. After shaping, steam-block gently with a pressing cloth for smooth edges.
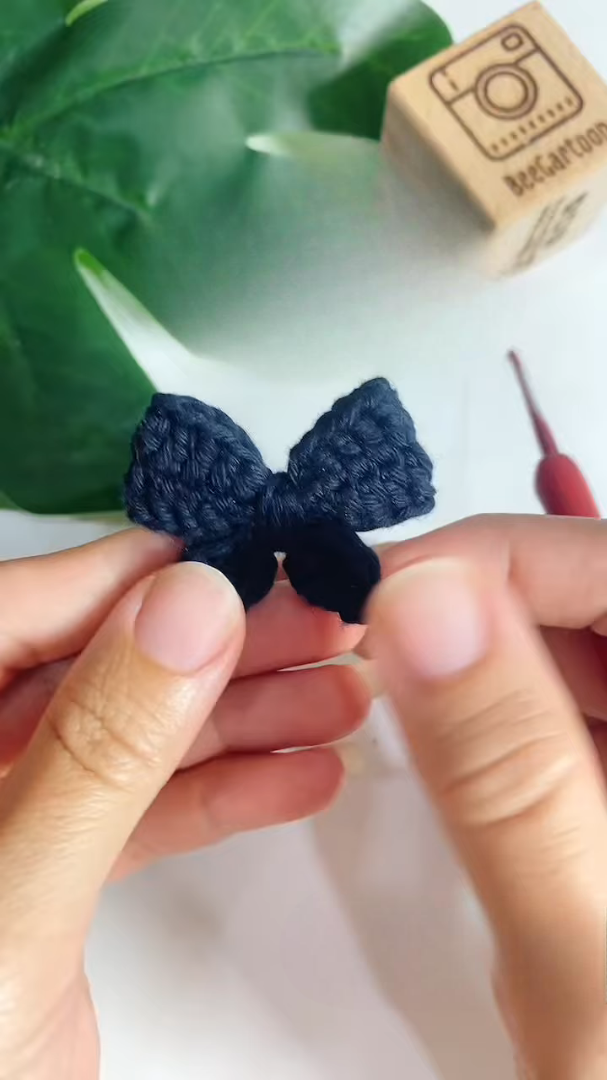
- Bow or Ribbon
- Making time: 5–10 minutes
- For a quick bow, chain 12, work 2 rows of single crochet, then wrap yarn around the center to cinch. Next, stitch it near one ear or at the neck for instant charm.
- Keychain Attachment (optional)
- Making time: 5 minutes
- To convert the bunny into a keychain, sew a sturdy yarn loop to the head’s top center. Then attach a jump ring and keyring. Moreover, reinforce the loop with several passes of a strong thread to withstand daily use.
Face & Assembly
- Eye Placement
- First, pin eye positions 6–7 stitches apart and 2–3 rounds above the fullest part of the cheeks. Because a few millimeters change the mood, check from multiple angles before committing. Once satisfied, attach safety eyes firmly with washers.
- Nose and Mouth
- Next, embroider a tiny triangle nose using pink yarn or floss centered between the eyes and 1–2 rounds below. Then add a soft “V” for the mouth. For added sweetness, stitch short lashes or a gentle smile curve.
- Attaching Ears
- Meanwhile, pin ears symmetrically on the head and secure with small, even whipstitches through both loops. As a styling tweak, tilt one ear forward slightly for a lively, curious look.
- Holding the Heart
- After preparing the heart, position it against the chest. Then pin both arms so they wrap the sides of the heart in a natural hug. Next, sew the heart to the torso with invisible ladder stitches. Finally, stitch the arms at the shoulders and add a discreet tack near each wrist so the hug remains secure.
- Tail and Collar
- To finish the silhouette, sew on the tail low for balance. Then add the collar or scarf and tie it neatly at the side. If desired, softly brush on blush for rosy cheeks.
Beginner-friendly tips:
- First, place locking stitch markers not only at round starts but also to mark eye spacing and the heart’s centerline.
- Next, add stuffing in small tufts and compress gently; this prevents bumps and keeps the shape even.
- Then, practice invisible decreases (front-loop-only of the next two stitches) on a small swatch; smoother decreases instantly improve the finish.
- Finally, pause after each section to count stitches; consistent counts keep shaping symmetrical and stress-free.
Special Features
- Signature Hug Pose: Arms curve to hold the 3D heart securely, capturing a charming “gift-giving” moment.
- Chubby Cheeks: Even rounds and thoughtful stuffing around the face create a friendly, baby-soft expression.
- Seamless Look: Invisible decreases and minimal visible joins produce a smooth, polished fabric.
- Versatile Size: Simple yarn and hook swaps scale the design from keychain mini to cuddly desk plush.
- Expressive Options: Adjustable ear angles, tiny bows, and embroidered lashes personalize every bunny.
Sizing Tips
- Hook Size
- Smaller hook (2.5–2.75 mm) with worsted yarn yields a compact bunny (approx. 11–13 cm tall). Conversely, a larger hook (3.25–3.5 mm) creates a taller, softer plush (approx. 14–17 cm).
- Yarn Weight
- Using sport weight (Category 2) with a 2.25–2.5 mm hook produces a mini keychain. Switching to bulky (Category 5) with a 4.0–4.5 mm hook makes a huggable desk buddy.
- Eye Size
- Scale safety eyes accordingly: 6 mm for minis, 8 mm for medium, and 10–12 mm for larger versions. Keep spacing proportional for a balanced, expressive face.
- Heart Scale
- For a perfect hug, adjust the heart’s increases or decreases evenly so the arms wrap without strain. When uncertain, crochet the heart first and size the body to match.
Finishing Tips for (Crochet Bold Shrug Top)
- Consequently, weave in ends securely through several stitches and tug-test before trimming.
- Therefore, steam-shape ears and heart on low heat using a pressing cloth; never touch a hot iron directly to acrylic.
- Additionally, use ladder stitch for visible joins (like attaching the heart) to achieve nearly invisible seams.
- Moreover, reinforce the keychain loop with multiple passes of strong thread for everyday durability.
- Finally, roll away stray fibers with a lint roller and smooth the fabric with clean hands for a crisp, gift-ready look.
Common Mistakes to Avoid for (Crochet Bold Shrug Top)
- Loose Magic Ring
- If the ring loosens later, the top can open. Tighten the starting loop firmly, and weave the tail through nearby stitches to anchor it.
- Overstuffing the Head
- Too much stuffing stretches the fabric and warps the face. Instead, add small tufts gradually and stop when the cheeks feel softly plump.
- Skipping Stitch Counts
- Miscounts lead to uneven cheeks or a lopsided body. Consequently, mark the first stitch of each round and recount every few rounds.
- Eye Placement Too High or Low
- Eyes set too high appear surprised; too low look sleepy. Therefore, pin positions, double-check from multiple angles, and only then attach.
- Using the Wrong Hook
- An oversized hook leaves gaps between stitches. Choose a hook at least 0.5 mm smaller than the yarn label suggests to maintain firmness.
Variations & Customization Ideas for (Crochet Bold Shrug Top)
- Color Play
- Choose soft pastels for spring, classic grey with a red heart for Valentine’s, or bold brights for birthdays. Speckled yarn adds a playful confetti effect.
- Heart Themes
- Create a striped, ombré, or polka-dot heart. Then add tiny embroidery initials, a date, or a miniature smile for a personalized charm.
- Expressions
- Try closed eyes with lashes, a tiny “o” mouth, or gently blushed cheeks for shyness. Meanwhile, reposition the ears for a different mood.
- Seasonal Accessories
- Add a tiny Santa hat for winter, a pumpkin-orange heart for autumn, or a daisy crown for summer celebrations.
- Size Options
- Make a mini keychain using sport weight and a 2.25–2.5 mm hook, or craft a larger cuddle plush with chunky yarn and a 4.5 mm hook.
- Pose Adjustments
- Angle one arm higher for a dynamic hug, or stitch both wrists together for a tighter clasp around the heart.
Tutor Suggestions for (Crochet Bold Shrug Top)
- First, skim the entire pattern flow before starting so the steps connect naturally.
- Next, place stitch markers at round starts and at quarter points to align increases and decreases symmetrically.
- Meanwhile, practice invisible decreases and neat color changes on a small swatch to build muscle memory.
- Later, rotate the bunny while stuffing; balanced filling helps it sit without tipping.
- Additionally, leave short yarn tails on parts and use a separate strong sewing thread to reinforce joins without bulk.
- Furthermore, take a quick photo of the face before securing parts; a camera view reveals tiny asymmetries early.
- Finally, trust gentle, consistent tension rather than tight pulling; even tension creates smoother stitches and a softer, more lovable amigurumi.
This friendly, beginner-oriented amigurumi crochet pattern turns simple rounds into a heartwarming keepsake. Because the instructions flow step by step from magic ring to final bow, the process stays calm, clear, and confidence-building. With cuddly proportions, a huggable heart, and polished finishing, the bunny becomes a thoughtful present, a cheerful desk companion, or a sweet keychain. Ultimately, the smooth transitions, tidy shaping, and secure assembly produce a charming, gift-ready result that feels handmade, heartfelt, and unmistakably special.