Free Crochet Watering Can With Blooming Flowers Pattern
Brighten your space with this delightful crochet watering can topped with cheerful blooming flowers. A charming handmade decoration that captures the fresh, joyful spirit of a blooming garden.
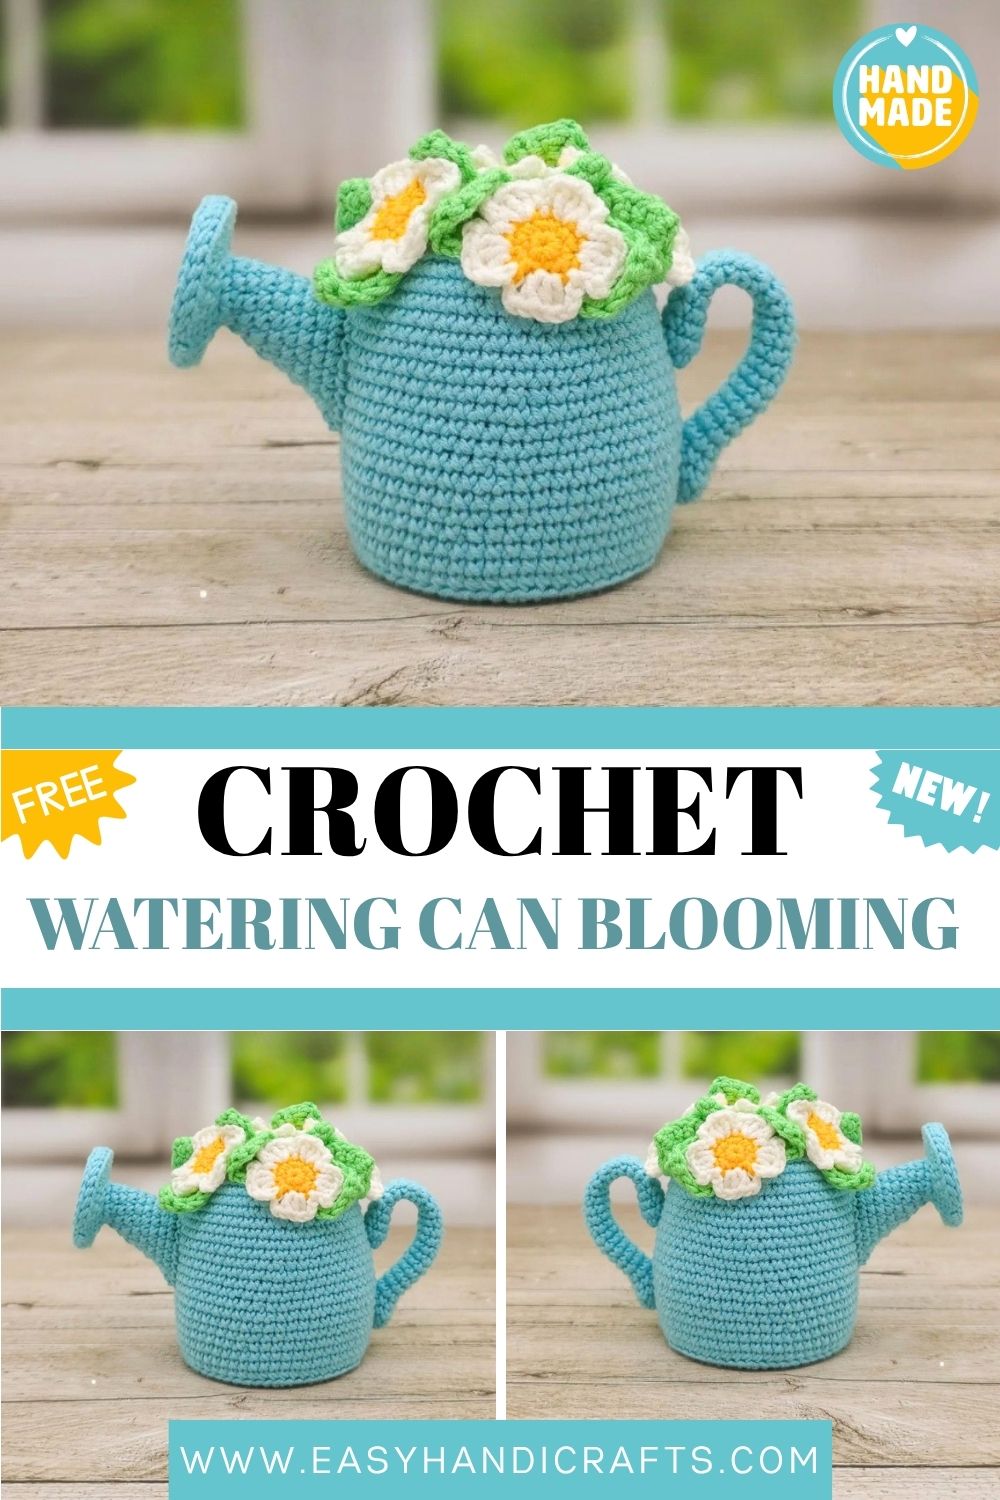
This lovely crochet watering can blends practical charm with garden beauty in one sweet project. Worked in soft blue yarn and finished with white daisies and green leaves, it makes a wonderful shelf accent or thoughtful handmade gift. The pattern is approachable, satisfying, and perfect for spring-inspired crochet enthusiasts.
Why I Think You’ll Enjoy This One
- The Crochet Watering Can daisies on top give it that fresh, picked-this-morning garden look.
- When it is done, you can leave it as pure decoration or let it hold little bits like hooks and scissors.
- It is a quick make, so you can start and finish it over a single cozy weekend.
- Anyone who loves plants or handmade things tends to fall for it, which makes it a fuss-free gift.
Is It Hard to Make?
Not really. I would call it an advanced-beginner project. If you are comfortable with single crochet, increases, decreases, and working in the round, you have everything you need. A bit of practice with small flowers will make the top come together faster.
What to Gather First
I always feel calmer when my supplies are sitting in front of me before I begin. For this one, you will want cotton yarn (I used Gazzal Baby Cotton) in blue, yellow, white, and green. Keep some polyester stuffing nearby, along with a 2.00 mm hook, scissors, a stitch marker, a few pins, and a yarn needle. You will also need a small scrap of cardboard and a little glue, which helps with the base and with setting the flowers on top.
Abbreviations
Everything here uses the usual crochet shorthand. Run your eye over these now and the rounds will read smoothly later.
- Rnd – Round
- MR – Magic Ring
- sc – Single Crochet
- inc – Increase
- dec – Decrease
- ch – Chain Stitch
- BLO – Back Loops Only
- ss – Slip Stitch
- hdc – Half Double Crochet
- dc – Double Crochet
- dtr – Double Treble Crochet
Time to Start
Before you pick up your hook, skim the whole Crochet Watering Can pattern once so you can see how the base, spout, handle, and flowers all connect. Each part is made on its own and joined at the end. And keep that stitch marker close, because the whole thing is worked in a continuous spiral, not in joined rounds.
Main Base (Blue Yarn)
- Rnd 1. 6 sc in MR
- Rnd 2. 6 inc (12)
- Rnd 3. 1 sc, 1 inc repeat 6 times (18)
- Rnd 4. 1 sc, 1 inc, 1 sc repeat 6 times (24)
- Rnd 5. 3 sc, 1 inc repeat 6 times (30)
- Rnd 6. 2 sc, 1 inc, 2 sc repeat 6 times (36)
- Rnd 7. 5 sc, 1 inc repeat 6 times (42)
- Rnd 8. 3 sc, 1 inc, 3 sc repeat 6 times (48)
- Rnd 9. 7 sc, 1 inc repeat 6 times (54)
- Rnd 10. 4 sc, 1 inc, 4 sc repeat 6 times (60)
Here is a good moment to make your base sturdy. Measure the diameter of the circle you have just stitched, then cut a cardboard circle the same size. This keeps the bottom flat so your can stand up properly once it is finished.
Working Up the Sides
- Rnd 11. BLO 60 sc
- Rnds 12-13. 60 sc
- Rnd 14. 18 sc, 1 dec repeat 3 times (57)
- Rnds 15-17. 57 sc
- Rnd 18. 17 sc, 1 dec repeat 3 times (54)
- Rnds 19-21. 54 sc
- Rnd 22. 16 sc, 1 dec repeat 3 times (51)
- Rnds 23-25. 51 sc
- Rnd 26. 15 sc, 1 dec repeat 3 times (48)
- Rnds 27-29. 48 sc
Now drop that cardboard circle into the bottom before you begin closing the piece.
Closing It Up
- Rnd 30. BLO all round: 6 sc, 1 dec repeat 6 times (42)
- Rnd 31. 5 sc, 1 dec repeat 6 times (36)
- Rnd 32. 4 sc, 1 dec repeat 6 times (30)
This is where you add the stuffing, so the body stays firm and round.
- Rnd 33. 3 sc, 1 dec repeat 6 times (24)
- Rnd 34. 2 sc, 1 dec repeat 6 times (18)
- Rnd 35. 1 sc, 1 dec repeat 6 times (12)
- Rnd 36. 6 dec (6)
Close that last little gap and tuck the tail out of sight.
Spout (Blue Yarn)
You will begin with two small matching pieces.
- Rnd 1. 6 sc in MR
- Rnd 2. 6 inc (12)
- Rnd 3. 1 sc, 1 inc repeat 6 times (18)
- Rnd 4. 1 sc, 1 inc, 1 sc repeat 6 times (24)
- Rnd 5. 3 sc, 1 inc repeat 6 times (30)
Fasten off invisibly. Make the second piece the same, except in Round 3 work into the back loops only (BLO).
Joining the Two Pieces
Hold both pieces together with their wrong sides facing in. Attach the blue yarn and work 30 slip stitches (sl st) evenly around, catching both layers as you go. Fasten off and weave the end in neatly.
Next, join the blue yarn into the front loops only of Round 2, and keep going in a spiral.
- Rnd 1. 12 sc
- Rnd 2. 1 inc, 2 sc, 1 dec, 2 sc, 1 dec, 2 sc, 1 inc (12)
- Rnd 3. 1 inc, 10 sc, 1 inc (14)
- Rnd 4. 1 inc, 3 sc, 1 dec, 2 sc, 1 dec, 3 sc, 1 inc (14)
Work one extra sc, then move the marker over to the next stitch. That becomes your new beginning of the round.
Shaping the Tip
- Rnd 5. 1 inc, 12 sc, 1 inc (16)
- Rnd 6. 1 inc, 3 sc, 1 dec, 4 sc, 1 dec, 3 sc, 1 inc (16)
- Rnd 7. 1 inc, 14 sc, 1 inc (18)
Again, add one extra sc and shift the marker to the next stitch as your new round start.
- Rnd 8. 1 inc, 4 sc, 1 dec, 4 sc, 1 dec, 4 sc, 1 inc (18)
- Rnd 9. 1 inc, 16 sc, 1 inc (20)
Tuck in a bit of stuffing, fasten off invisibly, and leave a long tail so you can sew it on later.
The Flowers (Yellow and White Yarn)
- Rnd 1. 6 sc in MR (yellow yarn)
- Rnd 2. 6 inc (12)
Now, swap to white yarn.
- Rnd 3. 3 ch, in the next stitch: 3 dc, 3 ch, in the next stitch 1 s,s repeat from * 5 times.
Cut the yarn and hide the ends. You will want six flowers in total.
The Leaves (Green Yarn)
Chain 9, then start in the 2nd loop from the hook.
- Rnd 1. 1 sc, 1 hdc, 1 dc, 2 dtr, 1 dc, 1 hdc, 1 inc, then down the other side of the foundation chain: 1 hdc, 1 dc, 2 dtr, 1 dc, 1 hdc, 1 sc.
Cut the yarn and weave in the end. Make twelve leaves, then glue or stitch two of them behind each flower.
Pulling It All Together
The handle is made of blue.
- Rnd 1. 8 sc in MR
- Rnds 2-25. 8 sc (24 rounds)
Leave the handle empty (no stuffing) and close it off. Stitch the spout in place between Rounds 17 and 26. Across from it, fix the handle between Rounds 16 and 23. Finally, glue your leafy flowers across the top, setting one in the center and arranging the other five around it.
Ways to Make It Yours
- Try a new color: Pink, sage, or a soft buttery yellow body looks every bit as sweet as the blue.
- Pick different blooms: Roses, sunflowers, or little tulips work just as nicely as daisies.
- Size it up: Grab chunkier yarn and a bigger hook for an oversized can that holds utensils or yarn cakes.
- Give it a job: Add a felt lining inside and tuck in a couple of faux succulents.
- Match the season: A few tiny berries feel autumnal, and a thin ribbon bow looks festive for the holidays.
Things Worth Watching Out For
- Loose stitches: Work too loosely and the stuffing peeks through, so keep your tension nice and snug.
- Slipping count: A missed stitch can leave the can leaning, so glance at your totals as you go.
- A floppy spout: Too little stuffing makes it droop, so add just enough to keep its shape.
- Overcrowded flowers: Too many blooms look cluttered, so leave a little space between each one.
- A wobbly handle: Sew it on loosely and it sags, so make sure both ends are fixed firmly.
A Few Finishing Touches
- Weave all your tails deep inside the can so the outside stays clean.
- Stuff the body just enough to stand tall, without letting it bulge or lose its curve.
- Place the flowers and leaves first, pin them, and only sew once you like the look.
- Secure the spout and handle well so the whole piece feels solid in the hand.
- Gently shape each petal with your fingers for a softer, more natural bloom.
Lovely Gift Ideas
- A thoughtful little Crochet Watering Can gift for a gardener, a plant lover, or anyone who likes greenery indoors.
- A Mother’s Day surprise that keeps its color long after fresh flowers would have wilted.
- A warm housewarming present to cheer up a friend’s new kitchen or windowsill.
- A handmade spring or Easter touch that slips right into seasonal decor.
- A sweet addition to a crafter’s shelf, especially paired with a small bundle of yarn.