Free Crochet Clam & Pearl Amigurumi Pattern for Seasonal Cheer
Sea-inspired little treasures often turn out to be the most adorable crochet projects. This free Crochet Clam & Pearl amigurumi is easy for beginners, irresistibly charming, and a perfect choice for seasonal gifts or beautiful display pieces.
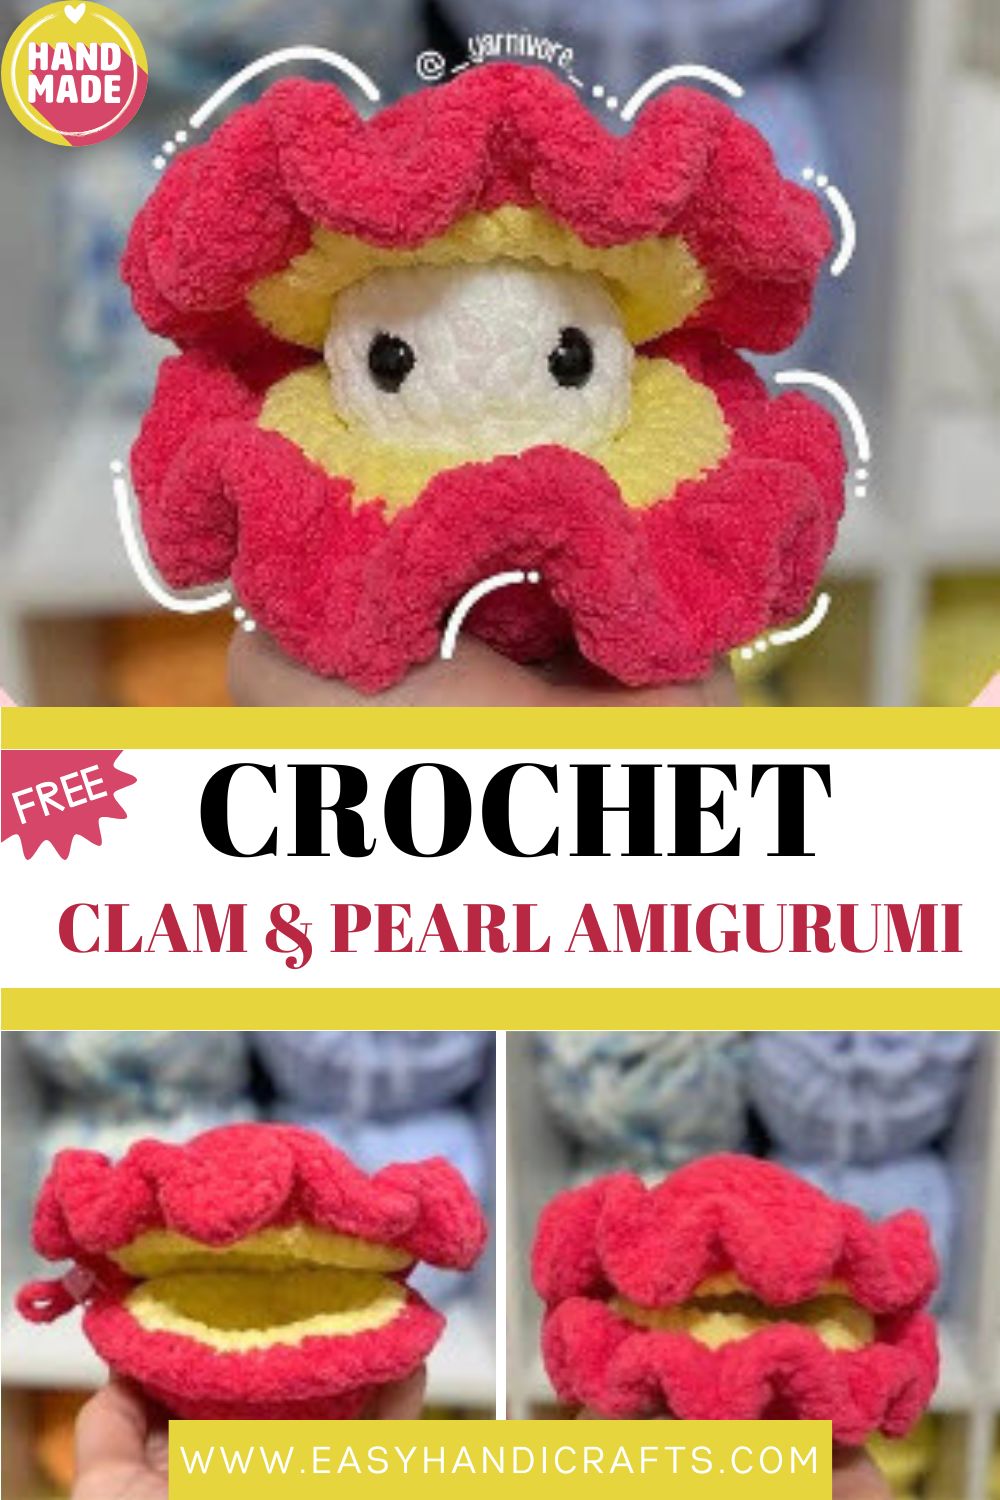
What if a tiny crochet shell opened up to reveal a smiling pearl inside? That’s the little charm that makes this free Crochet Clam & Pearl amigurumi pattern so special. It explains every step in an easy, simple way, so nothing feels difficult as you make it. Whether you crochet just for fun or want to prepare a sweet gift for someone, this little sea friend instantly wins your heart.
Why You’ll Love This Clam and Pearl
If you have wanted a small, satisfying make that finishes in an afternoon, this is the one. The clam opens to reveal a smiling pearl, and the whole thing comes together with stitches you already know. It is the kind of project that makes people smile the moment they see it, which is exactly what makes it such a lovely handmade gift.
Pattern Overview
Before you grab your hook, here is a quick look at what this makes involves:
- What it is: A small crochet clam shell that opens to show a cute pearl with safety eyes resting inside.
- Construction: The pearl is a simple stuffed ball. The shell is made from an inner piece and an outer piece joined back-to-back, with a wavy edge worked across the front.
- Time needed: Most crocheters can finish the full clam and pearl in two to three hours.
- Size: Using bulky blanket yarn and a 5mm hook, you get a soft, chunky clam that fits nicely in one hand.
- Best for: Shelf decor, party favors, seasonal gifts, and cute little keepsakes for anyone who loves the sea.
- Pearl option: You can sew the pearl in place or leave it loose so the clam can open and close.
Skill Level
This pattern is perfect for confident beginners. If you can work a magic ring, single crochet, increases, and decreases, you already have every skill needed to finish this clam.
Materials You’ll Need
Gathering everything first makes the whole process smoother. Here is the full list:
- Yarn: Bernat Blanket Yarn in White, Buttercup, and Think Pink
- Hook: 5mm crochet hook
- Safety eyes: 11mm
- Stuffing for the pearl
- Scissors
- Stitch marker to track the start of each round
A small amount of each color is all you need, so this is a great way to use up leftover blanket yarn from past projects.
Stitch Abbreviations (US Terms)
This Free Crochet Clam & Pearl pattern uses standard US crochet terms. Keep this list handy as you work:
- MR: Magic Ring
- St: Stitch
- Inc: Increase
- Dec: Decrease
- Sc: Single Crochet
- HDC: Half Double Crochet
- Sist: Slip Stitch
- FO: Fasten Off
- ( … ) x: Repeat what is inside the parentheses the number of times shown
- * *: Work everything between the asterisks into one stitch
The Pattern
Work in continuous spiral rounds and use your stitch marker so you always know where each round begins.
Pearl
- R1: 8 sc in MR (8)
- R2: Inc x8 (16)
- R3: Inc, (sc, Inc) x7, sc (24)
- R4 to R6: 24 sc (24) for 3 rounds
- Place the safety eyes between R5 and R6, set 3 stitches apart.
- R7: Dec, (sc, Dec) x7, sc (16)
- R8: Dec x8 (8)
- Add stuffing, then FO and sew the opening closed.
Inner Shell (Make 2)
- R1: 8 sc in MR (8)
- R2: Inc x8 (16)
- R3: 16 sc (16)
- R4: Inc, (sc, Inc) x7, sc (24)
- R5: 24 sc (24)
- R6: Inc, (2 sc, Inc) x7, 2 sc (32)
- R7: 32 sc (32)
- R8: Inc, (3 sc, Inc) x7, 3 sc (40)
- FO and leave a short tail.
Outer Shell (Make 2)
- R1: 8 sc in MR (8)
- R2: Inc x8 (16)
- R3: 16 sc (16)
- R4: Inc, (sc, Inc) x7, sc (24)
- R5: 24 sc (24)
- R6: Inc, (2 sc, Inc) x7, 2 sc (32)
- R7: 32 sc (32)
- R8: Inc, (3 sc, Inc) x7, 3 sc (40)
- Do not FO. You will connect the inner and outer shells in R9. Place the two different-colored shells back to back.
- R9: Going through both the outer and inner shells, work 40 sc (40). FO on the first shell and leave a short tail. Do not FO on the second shell, you will use it to connect the pieces and make the wavy front.
Continuing the Shell
- R10: Going through both the top and bottom parts of the shell, work 15 sc. Now, going through the top shell only, work *3 hdc* x25. (Before turning the shell over, you can add a strip between the top and bottom shells to stop a gap from forming.) Now turn the shell over and crochet through the bottom shell only, working *3 hdc* x25. Sist into the top and bottom of the shell. FO and weave the remaining tail into the shell.
You can sew the pearl into the clam if you like. I prefer to keep mine removable so the clam can open and close.
Special Techniques to Know
A few small techniques give this clam its charming finished look. Here is what to watch for:
- Back-to-back joining: When you connect the inner and outer shells, hold them with the wrong sides facing each other. Working through both layers at once is what gives the shell its neat, closed edge.
- Two-color shells: Using one color for the inner shell and another for the outer creates that lovely peek of contrast along the rim.
- The wavy edge: The *3 hdc* worked into single stitches is what creates the ruffled, scalloped look of a real clam shell. Keep these stitches loose enough to fan out naturally.
- Removable pearl: Leaving the pearl loose adds a fun, playful element, since the clam can open to show its hidden treasure.
Assembly Step by Step
Once all your pieces are made, putting the clam together is quick. Follow this order:
- Finish the pearl first. Stuff it firmly so it holds a round shape, then close the gap and weave in the tail.
- Pair your shells. Match one inner shell with one outer shell, wrong sides together, ready to join.
- Join in R9. Work through both layers so the edges lock together cleanly.
- Add the wavy front in R10. This is what shapes the open clam and gives it that signature ruffle.
- Place the pearl inside the finished shell. Sew it down for a fixed look or leave it loose for a fun, openable clam.
- Weave in all loose tails so nothing peeks out and the finish looks tidy.
Common Mistakes to Avoid
Even simple patterns have a few easy traps. Keep these in mind and your clam will turn out great:
- Losing your round start. Blanket yarn hides stitches, so always move your stitch marker as you go.
- Fastening off too early. Remember not to FO the second shell in R9, or you will not be able to finish the connecting round.
- Spacing the eyes wrong. Set the safety eyes between R5 and R6, exactly 3 stitches apart, before you start decreasing.
- Pulling the hdc stitches too tight. The wavy edge needs a little room to ruffle, so keep those stitches relaxed.
- Understuffing the pearl. A soft, floppy pearl loses its cute round shape, so stuff it nicely and fully.
- Skipping the slip stitch tip. Adding a strip between the layers really does help close any gap along the front.
Important Remarks
A few final notes will help you get the best results from this make:
- Yarn matters. Bernat Blanket Yarn gives that plush, chunky finish, but any super bulky yarn with a 5mm hook will work.
- Color freedom. White, Buttercup, and Think Pink are only suggestions. Swap in any shades you love for a totally custom clam.
- Safety first. If this clam is for a baby or very young child, skip the safety eyes and embroider them instead.
- Tension is personal. Your finished size may vary slightly depending on how tight or loose you crochet, and that is perfectly fine.
- Make a set. These work up fast, so a little group of clams in different colors makes a charming gift bundle.
Final Thoughts
This free crochet clam and pearl amigurumi is proof that the cutest makes are often the simplest. With just a few colors of blanket yarn and the stitches you already know, you can create a soft little treasure that fits any season. Try it for yourself, share it with a friend who loves the ocean, and watch how quickly this happy clam becomes a favorite.