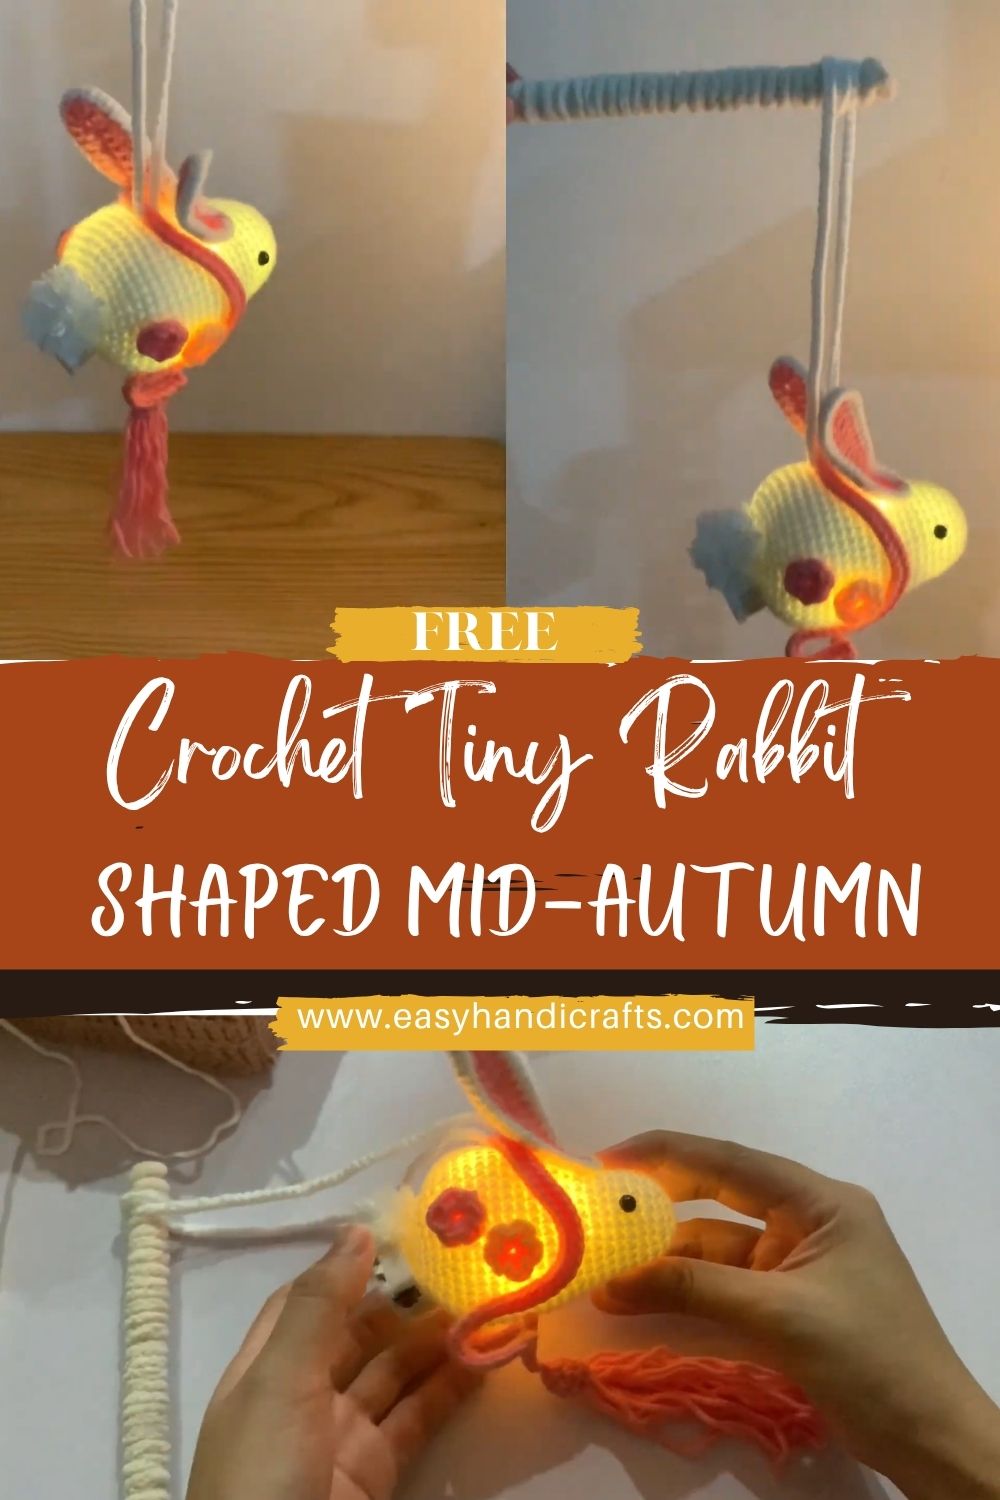
Blissful Crochet Rabbit-Shaped Mid-Autumn Amigurumi Pattern Step-by-Step
Artistic stitches, a big charm, and a bunny that can hang anywhere make such a cozy combo. Crochet tiny rabbit cuteness shows up fast, and the small size keeps the whole project light, fun, and satisfying.
Home shelves, doorknobs, nursery hooks, and seasonal branches look extra charming with crochet hanging decor. A bunny amigurumi pattern like this stays simple and soothing, making a beginner crochet project that still feels special and finished. Cute crochet bunny vibes included.
Small crochet decor items are trending because stash yarn turns into something useful fast. Tiny makes feel less intimidating, and quick projects fit into busy days. Hanging ornaments also adds personality without taking up space, so a small bunny becomes an easy way to refresh a room for spring, Easter, baby showers, or everyday cozy decor.
A miniature rabbit works as a hanging decoration, a festive piece, or a thoughtful gift topper. Decorative surface details add texture without complicated shaping, and the tassel tail gives a playful finish. Optional LED light adds a warm lantern-style glow, perfect for evening ambiance, reading nooks, or a nursery night-light look, while still keeping the bunny light and easy to hang.
Materials Needed
- Light-colored yarn (yellow or cream for body): 25 g DK or worsted weight
- Pink or red yarn (decorative details): 5 g
- Black yarn (facial features): 2 g (or black embroidery floss)
- Crochet hook: 3.0 mm to 3.5 mm (use smaller for tighter stitches)
- Stuffing (light): 10 to 15 g polyester fiberfill
- Tools: yarn needle, stitch marker, scissors
- Cord or yarn for hanging: 30 cm (adjust for preferred drop length)
- Optional LED light or fairy light: 1 mini battery LED tealight or 1 small removable LED
- Optional tassel yarn: 20 cm strand bundle (same color as body or contrasting)
Finished size: about 10 cm tall, not including the hanging cord.
Abbreviations
- MR: magic ring
- sc: single crochet
- inc: increase (2 sc in one stitch)
- dec: decrease (single crochet 2 together)
- sl st: slip stitch
- ch: chain
Skill Level
Beginner / Easy Beginner
Basic rounds, simple increases and decreases, and small add-on parts make the project approachable. Decorative lines are optional and forgiving.
Estimated Time
- Total time: 1.5 to 2.5 hours
- Body: 40 to 60 minutes
- Ears (2): 20 to 30 minutes
- Assembly + face + details: 30 to 60 minutes
Important Notes Before Starting
- Work in rounds using a stitch marker.
- Keep stitches tight so stuffing and optional light do not show through.
- Do not overstuff so the rabbit stays soft and hangs nicely.
- Plan a small space for adding a light before fully closing the body.
- Attach parts securely, especially the hanging cord.
Step-by-Step Pattern
Body (Soft oval shape)
- Round 1: MR, 6 sc (6)
- Round 2: inc x6 (12)
- Round 3: (sc, inc) x6 (18)
- Round 4: (2 sc, inc) x6 (24)
- Round 5: (3 sc, inc) x6 (30)
Next, build an oval look by adding a little height.
- Rounds 6 to 9: sc around (30)
Then start gently narrowing the top.
- Round 10: (3 sc, dec) x6 (24)
- Round 11: sc around (24)
- Round 12: (2 sc, dec) x6 (18)
Leave a small space for inserting light (optional)
10. Round 13: (sc, dec) x6 (12)
At this point, lightly stuff the body and decide on the light.
Stuff lightly
11. Add stuffing a little at a time, keeping the body squishy and oval.
- Round 14: dec x6 (6)
- Fasten off and close the opening.
Optional opening idea: prefer a removable LED? Instead of closing fully, stop at 12 stitches, slip stitch, and fasten off, then use a simple drawstring closure with yarn. That keeps the light easy to remove.
Ears (Make 2, long and narrow)
First, make slim ears that curve softly when attached.
- Round 1: MR, 4 sc (4)
- Round 2: (sc, inc) x2 (6)
- Rounds 3 to 8: sc around (6)
- Round 9: (2 sc, inc) x2 (8)
- Round 10: sc around (8)
- Flatten the base and close with 4 sc through both layers.
- Fasten off, leave a long tail for sewing.
Attach evenly onto.p
Pin both ears on top of the body, spacing them evenly. Angle slightly outward for a sweeter look.
Tail (Tassel style or tiny ball)
Choose one option.
Option A: Tassel tail (cozy and decorative)
- Wrap yarn around two fingers 8 to 10 times.
- Slide off, tie tightly at the top with a separate strand.
- Trim the bottom evenly to form a mini tassel.
- Stitch to the lower back of the body.
Option B: Tiny crochet ball
- MR, 6 sc (6)
- inc x6 (12)
- sc around (12)
- dec x6 (6)
- Lightly stuff, close, and sew on.
Facial Details (Minimal and cute)
- Add small round eyes using either:
- Embroidery: two small black stitched dots, or
- Tiny safety eyes: 4 to 6 mm, set wide for a gentle expression
- Embroider a tiny nose with pink yarn (one small triangle or one vertical stitch).
- Add a short mouth line beneath the nose.
Keep the face simple. A calm expression matches the cozy hanging decor style.
Decorative Lines and Details (Surface accents)
First, choose a simple design that feels tidy.
- With pink or red yarn, stitch 2 to 4 short lines on the body using straight-stitch embroidery.
- Add a tiny heart, little dots, or a small stit “hed “”atch” effect near the belly.
- Optional surface crochet: attach yarn with a sl st, then make a short line of sl st across 3 to 5 stitches, fasten off, and weave ends.
Small details show up best on light yarn, so keep them neat and spaced.
Hanging Cord (Strong and secure)
- Cut 30 cm of cord or yarn.
- Fold in half, form a loop, and knot securely.
- Stitch the knot area to the top of the body between the ears.
- After that, reinforce with a few extra stitches through the same spot.
Ensure a secure knot
Double-knot the loop and test with a gentle tug before hanging.
Light Insertion (Optional, lantern-style glow)
- Choose a cool-touch LED only. Avoid anything that heats up.
- Place the LED inside before final closing, or use the drawstring opening method for easy removal.
- Keep the switch accessible, either near the opening or by placing the light so it can be pressed through the yarn.
- For fairy lights, use only a very small section and keep the battery pack outside the bunny.
Keep it removable if needed
Removable is best for battery changes and cleaning.
Assembly
- Sew ears on top, then check from the front to make sure both sides match.
- Attach the tassel tail to the lower back.
- Add facial features, then decorative lines.
- Stitch hanging cord securely between ears or slightly behind them.
- Finally, test hang the bunny and adjust ear angles if needed.
Check the balance for hanging
A centered cord keeps the rabbit facing forward instead of tilting.
Finishing Touches
- Shape the body with your hands to smooth the oval curve.
- Adjust stuffing by pressing gently, especially around the sides.
- Weave in yarn ends neatly and trim close.
- Check hanging strength one last time with a soft tug.
Tips for Beginners
- Use tight stitches for a clean look and better hold.
- Work slowly and count rounds to keep the shape even.
- Keep symmetry by pinning ears before sewing.
Common Mistakes
- Loose stitches that show stuffing or the LED shape
- Uneven ears because of missed rounds or uneven placement
- Overstuffing makes the body stiff and hard to hang nicely
- Weak hanging cord that is knotted only once or stitched too lightly
Customization Ideas
- Try different bunny colors: blush pink, soft gray, mint, or classic white.
- Add a tiny scarf, bow, or mini flower near one ear.
- Change light color to warm white, pastel, or soft multicolor.
- Make a festive decoration set for spring, winter, or birthdays with matching details.
- Create a theme: moon bunny, strawberry bunny, or sleepy bunny with embroidered eyelids.
Conclusion
A Crochet Tiny Rabbit Amigurumi makes a sweet little statement, even in the smallest spaces. Long ears, a tassel tail, and a few decorative stitches give the ornament a cozy, handmade charm.
Try the optional glow for a lantern-style look, then play with colors and details until the bunny feels just right. Enjoy turning a simple beginner-level crochet project into a cute bunny decor piece you’ll want to hang up all year.