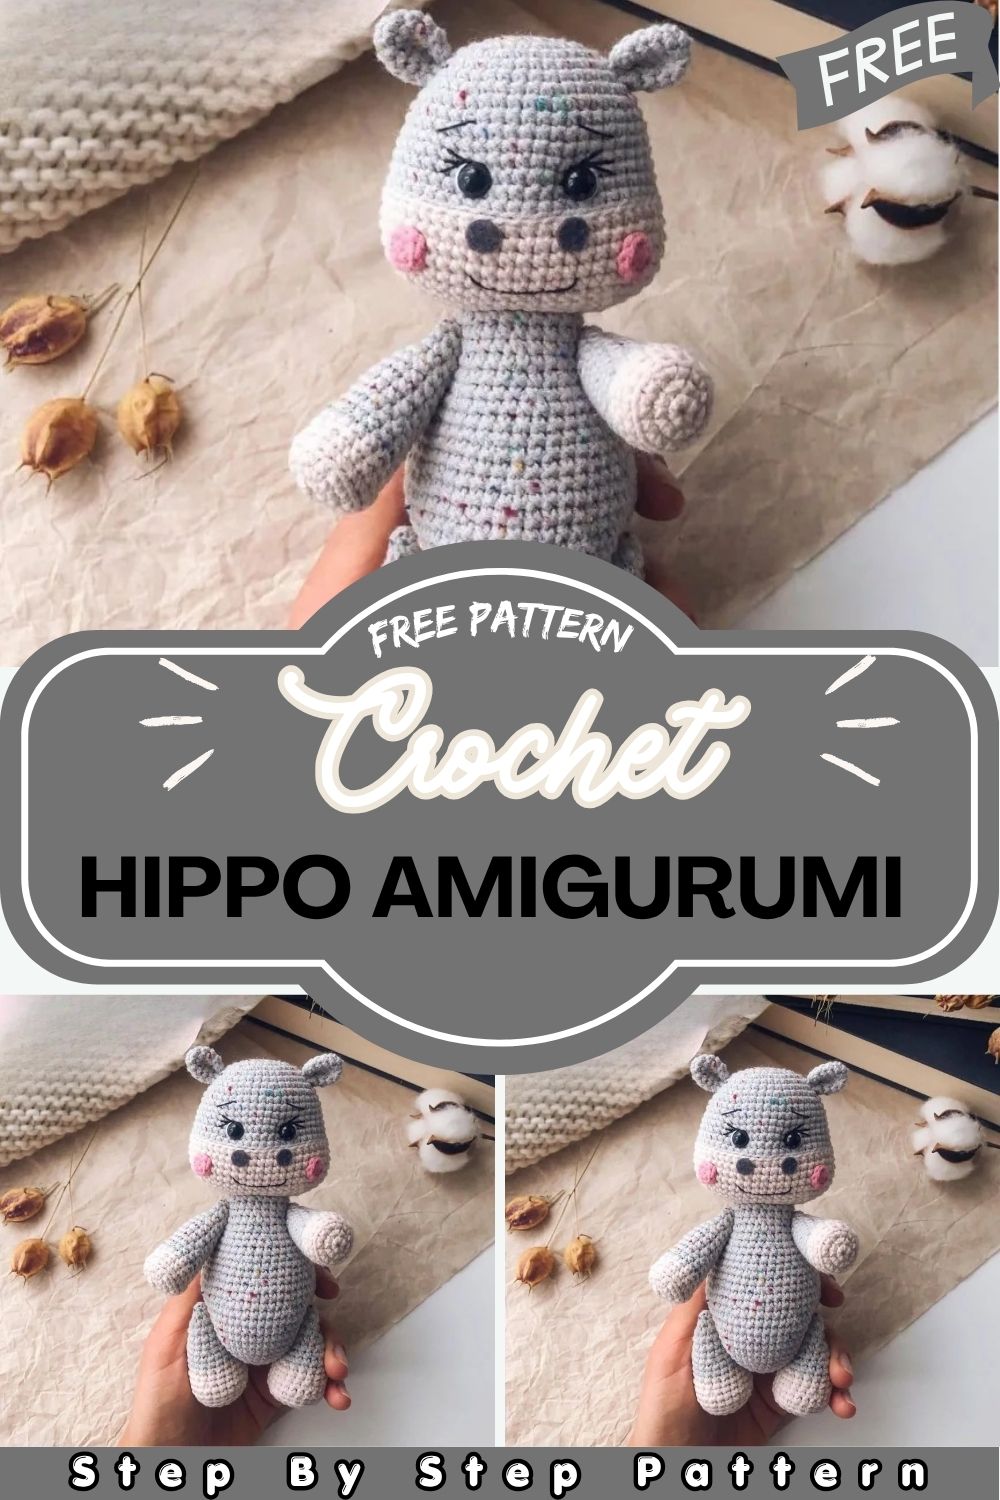
Super Crochet Hippopotamus Amigurumi Pattern for Beginners
Skill Level
This Crochet Hippopotamus Amigurumi pattern works wonderfully for beginners who feel ready to try a multi-part toy. You only need single crochet, increases, decreases, plus a few simple back loop rounds.
Abbreviations
Keep this quick key beside you while stitching. These short forms show up in every part.
- MR – Magic Ring
- sc – Single Crochet
- inc – Increase
- dec – Decrease
- sl st – Slip Stitch
- BLO – Back Loops Only
- st – Stitch
Gather These Supplies
Let’s be real, half the battle is having everything ready first. This list keeps it manageable.
- Grey yarn (main body color)
- Beige yarn (muzzle, hands, and feet)
- White and black embroidery thread
- Matching crochet hook
- 8mm safety eyes
- Small felt pieces (for cheeks)
- Stuffing
- Yarn needle and scissors
- Buttons (optional, for movable joints)
Grey and beige give that classic hippo look. Still, feel free to pick softer pastels if you want a dreamier version.
How The Hippo Takes Shape
Quick heads up before you start hooking. Understanding the build order saves you confusion later on.
- You crochet six main parts, the head, body, two ears, cheeks, arms, and legs.
- The head and body each start from a magic ring and grow outward.
- Color changes add a beige muzzle, plus beige hands and feet on the limbs.
- Back loop rounds create clean ridges that shape the snout and paws.
- You stuff the head and body firmly, then sew everything together at the end.
- Optional button joints let the arms and legs swing freely.
For real, once you see how the pieces stack up, the sewing stage feels totally doable.
Techniques That Bring It To Life
A few small skills give this hippo its charm. Nail these and the rest flows smoothly.
- Back loops only: Working into back loops creates a neat ridge. This shapes the muzzle, hands, and feet beautifully.
- Color changing: You switch from beige to grey on the limbs for a two tone look. Change cleanly to keep edges tidy.
- Shaped decreases: Certain rounds place decreases unevenly to sculpt the snout. Follow the exact stitch order written.
- Joining ridges: One head round works back loops from two rows together. This locks the muzzle shape in place.
- Embroidered face: Black thread forms the mouth, brows, and lashes for a gentle expression.
Here’s a tip, mark your first stitch each round so your spiral never drifts off track.
Crochet Hippopotamus Amigurumi Pattern Instructions
Time to crochet. Work each part below, then set them aside for assembly.
Head
- 8 sc in MR
- inc x8 (16 st)
- (1 sc, inc) x8 (24 st)
- (2 sc, inc) x8 (32 st)
- (3 sc, inc) x8 (40 st)
- 40 sc
- 40 sc
- (4 sc, inc) x8 (48 st)
- 48 sc
- 48 sc
- 48 sc
- 48 sc
- 48 sc
- (7 sc, inc) x6 (54 st)
- 54 sc
- 54 sc
Change color to beige
- BLO, 54 sl st
- Working back loops from rows 17 and 18 together, 54 sc
- 54 sc
- 54 sc
- 54 sc
- 54 sc
- (dec, 4 sc) x3, 9 sc, (dec, 4 sc) x3, 9 sc (48 st)
- (dec, 3 sc) x3, 9 sc, (dec, 3 sc) x3, 9 sc (42 st)
- (dec, 2 sc) x3, 9 sc, (dec, 2 sc) x3, 9 sc (36 st)
- (dec, 1 sc) x3, 9 sc, (dec, 1 sc) x3, 9 sc (30 st)
- dec x3, 9 sc, dec x3, 9 sc (24 st)
Fasten off and leave a long tail for sewing. Insert the safety eyes and stuff the head. Sew the opening closed, then hide the yarn end inside.
Body
- 6 sc in MR
- inc x6 (12 st)
- (1 sc, inc) x6 (18 st)
- (2 sc, inc) x6 (24 st)
- (3 sc, inc) x6 (30 st)
- (4 sc, inc) x6 (36 st)
- (5 sc, inc) x6 (42 st)
- (6 sc, inc) x6 (48 st)
- (7 sc, inc) x6 (54 st) 10-14. 54 sc (5 rows)
- (7 sc, dec) x6 (48 st)
- 48 sc
- 48 sc
- (6 sc, dec) x6 (42 st)
- 42 sc
- 42 sc
- (5 sc, dec) x6 (36 st)
- 36 sc
- 36 sc
- (4 sc, dec) x6 (30 st)
- 30 sc
- 30 sc
- (3 sc, dec) x6 (24 st)
- 24 sc
- 24 sc
Fasten off and leave a long tail for sewing.
Ears (make 2)
- 6 sc in MR
- inc x6 (12 st)
- 12 sc
- 12 sc
- 12 sc
- (1 sc, dec) x4 (8 st)
Fasten off and leave a long tail for sewing.
Cheeks
- 8 sc in MR
Make a sl st in the first sc to close the ring. Fasten off and leave a long tail for sewing.
Arms (make 2)
Start with beige color.
- 6 sc in MR
- inc x6 (12 st)
- (1 sc, inc) x6 (18 st)
- BLO, 18 sc
- 18 sc
- (7 sc, dec) x2 (16 st)
Change color to grey
- 16 sc
- 16 sc
- (6 sc, dec) x2 (14 st)
- 14 sc
- 14 sc
- 14 sc
- (5 sc, dec) x2 (12 st)
- 12 sc
- 12 sc
- 12 sc
- 12 sc
- dec x6 (6 st)
Fasten off, close the opening, and hide the yarn end inside the arm.
Legs (make 2)
Start with beige color.
- 6 sc in MR
- inc x6 (12 st)
- (1 sc, inc) x6 (18 st)
- (2 sc, inc) x6 (24 st)
- BLO, 24 sc
- 24 sc
- 24 sc
- (10 sc, dec) x2 (22 st)
- 22 sc
Change color to grey
- (9 sc, dec) x2 (20 st)
- 20 sc
- 20 sc
- (8 sc, dec) x2 (18 st)
- 18 sc
- 18 sc
- 18 sc
- (1 sc, dec) x6 (12 st)
- dec x6 (6 st)
Fasten off, close the opening, and hide the yarn end inside the leg.
Mistakes That Trip People Up
Look, even simple amigurumi has a few traps. Avoid these and your hippo turns out clean.
- Messy color changes: Switching colors sloppily leaves loose bumps. Pull your strands snug for a smooth join.
- Wrong decrease order: The shaped snout relies on exact stitch placement. Skipping the order distorts the face.
- Loose stuffing: A softly stuffed head looks saggy. Pack it firmly for that round, bouncy shape.
- Skipping back loops: Missing the BLO rounds removes the ridges. Those ridges define the muzzle and paws.
- Uneven eye placement: Eyes set off the noted rounds change the expression. Stick to the assembly spacing.
Fun fact, slowing down on the snout rounds makes the biggest difference in the final look.
Bringing The Pieces Together
Now the rewarding part begins. With every piece finished, you assemble your hippo step by step.
- Place the eyes: Set the 8mm eyes 8 stitches apart, between rows 13 and 14.
- Attach the ears: Sew the ears about 12 stitches apart on top of the head.
- Add the cheeks: Cut two small felt circles, roughly 7 to 8mm, then glue them on. Sew the crochet cheeks in place too.
- Detail the face: Add two small white stitches beside the eyes. Embroider the mouth, brows, and lashes with black thread.
- Join the body: Sew the head securely onto the body.
- Add the limbs: Sew on the arms and legs, or use button joints for movement.
That covers it. Take your time aligning each piece for a balanced, friendly face.
Helpful Things To Remember
Before you wrap up, hold onto these reminders. They keep your Crochet Hippopotamus Amigurumi looking polished.
- Match your hook to your yarn so no stuffing peeks through.
- Keep your tension even so both arms and legs stay equal.
- Use button joints if you want poseable, swinging limbs.
- Swap grey and beige for pastels to create a custom version.
- Stuff the head and body firmly, but leave the limbs lightly filled.
- Tiny parts mean this toy needs supervision around young children.
For real, even tension across the limbs is what makes the finished hippo look professional.
Final Thoughts
And there you have it, one chubby Crochet Hippopotamus Amigurumi ready to cuddle. This pattern proves beginners can build a detailed, multi part toy with confidence. You practice color changes, back loops, and shaped decreases along the way, all in gentle doses. Each finished piece feels like a small win, and the assembly ties it together beautifully. Display yours on a shelf, gift it to a friend, or start a whole crochet zoo next. Happy crocheting, and enjoy your adorable new grey companion.