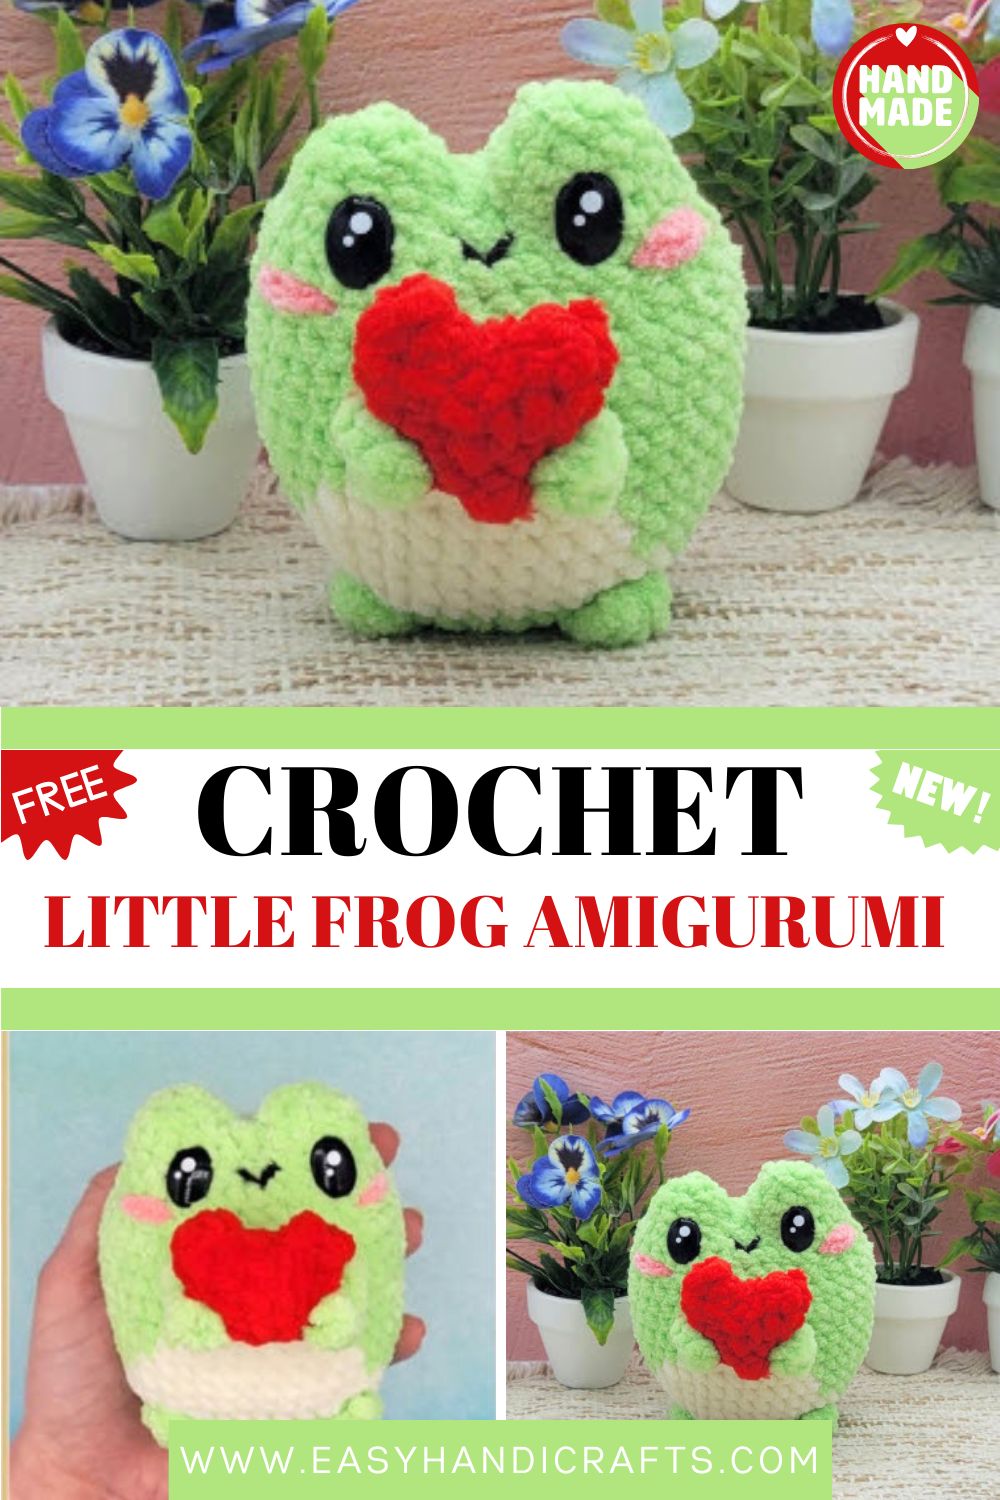
Crochet Little Frog Amigurumi Pattern Will Steal Your Heart
Ready for one of the most adorable crochet projects around? This Crochet Little Frog Amigurumi sits hugging its tiny heart, and honestly, it looks incredibly charming. It’s quick to make, soft, and surprisingly squishy, while this free pattern also proves perfect to give as a gift. Once it’s finished, it becomes one of those heart-winning things truly no exaggeration.
Frogs are having a real moment in the crochet world right now, and ngl, this one Crochet Little Frog Amigurumi might be my favorite. He’s chunky, round, and clutching a little red heart as he means it. The puff-stitch detailing adds texture without much fuss, and the weight 6 yarn means he grows fast. Beginners can absolutely pull this off. Trust me on that.
Pattern Overview
- Unlike most amigurumi, this frog starts from an oval base you chain 6 and work down both sides which gives him that wide, sitting-down shape right from the start.
- There are only four pieces to track: the body, the sculpted eye humps, two arms, and a heart. Nice and manageable.
- Puff stitches on round 5 create those bumpy ridges across his back. That’s the signature froggy texture.
- The eyes aren’t separate balls. You shape them straight out of the body as little “humps,” which keeps everything seamless and clever.
- A red heart gets built from two joined halves, then cradled right into his arms. It’s the detail that ties the whole thing together.
- Color stays simple: green for the body, ivory for the belly, red for the heart, and a touch of pink for the blush.
Skill Level
I’d call this an advanced-beginner pattern. The shaping and color changes are gentle, but the puff stitches and eye humps take some patience. Stick with it you’ve got this.
Materials
- Yarn: Premier Chunky Parfait (weight 6) in green, ivory, red, and a little pink
- Hook: 4 mm
- 16 mm kawaii safety eyes
- Stuffing
- Tapestry needle
- Stitch markers
- Scissors
Abbreviations
- R: round
- ch: chain
- st: stitch
- sc: single crochet
- dc: double crochet
- 6 dc ps: 6 double crochet puff stitch
- inc: increase
- dec: decrease
- F.o.: fasten off
This Crochet Little Frog Amigurumi pattern is written using US crochet terms.
Special Techniques
A couple of techniques carry this whole design, so let’s break them down before you start:
- 6 dc puff stitch (6 dc ps): This is the star of the show. Yarn over, insert your hook into the next stitch, and pull up a loop. Then yarn over through the first two loops only. Repeat that five more times into the same stitch until you’ve got seven loops sitting on your hook, then yarn over and pull through all seven. The result is a fat little bump.
- Working both sides of a chain: Round 1 runs down one side of the starting chain and back up the other, so your base comes out oval instead of round.
- Sculpted eye humps: Rather than attaching pre-made eyes, you isolate 12 stitches with markers, work them in the round, then cinch and sew each one closed around a safety eye.
- Stuff as you go: This matters most around the eye humps and the heart tips. Once they close up, there’s no going back to add more.
The Pattern
Color note: Green is your main color. Ivory comes in for the belly sections during the color-change rounds. Keep both yarns handy.
Body (begin with green yarn)
- R1: ch 6. Starting from the 2nd ch from the hook: 4 sc, inc. On the other side of the chain: 4 sc, inc. (12)
- R2: (sc, inc) x6 (18)
- R3: (2 sc, inc) x6 (24)
- R4: (3 sc, inc) x6 (30)
- R5: 3 sc, 6 dc ps, inc, 4 sc, inc, 6 dc ps, 3 sc, inc, (4 sc, inc) x3 (36)
- R6: 2 sc, 3 sc, inc, 5 sc, inc, 4 sc, sc, inc, (5 sc, inc) x3 (42)
- R7: 3 sc, 15 sc, 24 sc (42)
- R8: 5 sc, 12 sc, 25 sc (42)
- R9: 5 sc, 11 sc, 26 sc (42)
- R10: 6 sc, 9 sc, 27 sc (42)
- R11: 7 sc, 6 sc, 29 sc (42)
- R12–13: 8 sc, 4 sc, 30 sc (42)
- R14: 42 sc (42)
- R15: (5 sc, dec) x6 (36)
- R16: (4 sc, dec) x6 (30)
- R17: 30 sc (30)
- R18: (3 sc, dec) x6 (24)
Stuff about four-fifths of your frog at this point.
Body Continued Shaping the Eye Humps
Placing Your Stitch Markers
Do not fasten off. Now you’ll create the eye “humps.” Count 5 stitches backward from your most recent stitch (the last stitch of round 18) and place a stitch marker in stitch number 1. Then count 7 stitches forward starting from the next stitch, and place a marker in the 7th stitch.
Squeeze the top of the frog so the two marked stitches line up. This should be the halfway point between each eye hump. Adjust the markers if needed so they sit dead center. Either way, you’ll end up with 12 stitches making up round 19.
Working the First Hump
Crochet Little Frog Amigurumi into both marked stitches. Insert your hook back into your yarn; the very next stitch is the first stitch of round 19. (Remove the markers as you work past them.)
- R19–20: 12 sc (12)
Adding the Face
Create a small “v”-shaped mouth at the halfway point, 2 stitches wide, on round 18. Insert a safety eye between rounds 18 and 19, about 2–3 stitches away from the closest corner of the mouth. Embroider blush with pink yarn a couple of stitches wide between rounds 15 and 16. Stuff the eye area and keep stuffing as you go.
- R21: (sc, dec) x4 (8)
F.o. and leave a long tail for sewing.
Closing the First Hump
Weave the tail through the front loops of round 21, go around all 8 front loops, then through the first two again to fully close the hole. Pull tight, sew the eye hump shut, and hide the tail inside the eye.
Making the Second Hump
Now re-attach your yarn, leaving a few-inch starting tail (you’ll use it later to sew the gap between the two humps). Starting with the furthest-right stitch on the front of the frog, repeat rounds 19–21 to build the second eye hump insert the second eye, add the blush, and close it the same way.
Add a little extra stuffing into each eye if needed, then sew the middle section between the two humps closed. Stitching front-to-back several times here helps flatten the face nicely.
Arms (make 2, use green yarn)
- R1: ch 2, complete 4 sc in the 2nd ch from the hook (4)
- R2: (sc, inc) x2 (6)
- R3: ch 1 and crochet the arm closed with 3 sc (3)
F.o. and leave a long tail. Sew each arm sticking straight up on the front, across rounds 11–13, about 6 stitches apart.
Heart (use red yarn)
- R1: ch 2, complete 4 sc in the 2nd ch from the hook (4)
- R2: (sc, inc) x2 (6)
Place a marker in the first stitch of round 2. F.o. and leave a few-inch tail. This is Piece 1, set it aside. Make a second piece the same way through rounds 1–2, mark the first stitch of round 2, but don’t fasten off Piece 2.
- R3: With your hook still in the last stitch of Piece 2, also insert it into the marked stitch on Piece 1. This is your first stitch of round 3. Work 6 sc around Piece 1, then insert into the marked stitch on Piece 2 and work 6 sc around Piece 2 (12)
Use the long tail to sew the top of the heart closed. Stuff the tips, and continue stuffing as you go.
- R4: (2 sc, dec) x3 (9)
- R5: (sc, dec) x3 (6)
- R6: dec x3
F.o. and leave a long tail. Use it to sew the heart cradled across both arms.
Assembly
Here’s the order that comes together cleanest:
- Once the body is stuffed to about four-fifths, shape and close both eye humps one at a time, popping a safety eye into each before you cinch it shut.
- Add the little “v” mouth, two stitches wide, on round 18 at the center point.
- Embroider pink blush a couple of stitches wide between rounds 15 and 16, under each eye.
- Sew the gap between the two humps closed, going front-to-back a few times to flatten the face slightly.
- Attach the arms standing straight up on the front, across rounds 11–13, roughly 6 stitches apart.
- Build the heart from its two joined halves, stuff the tips, close the top, then nestle and sew it across both arms so he looks like he’s hugging it.
Common Mistakes
A few spots tend to catch people out, so watch for these:
- Skipping the stuffing before the eye humps close. You can’t reach back in once it’s sewn shut, so pack it first.
- Misplacing the hump markers. If they aren’t at the halfway point, the eyes come out lopsided. Slide them around until they line up.
- Pulling the puff stitches too tight. They’re meant to pop. Keep your tension loose so they actually bulge out.
- Sewing the arms too low or too far apart. Rounds 11–13, about 6 stitches apart, keep the heart sitting right.
- Cutting your tails too short. The humps, heart, and arms all need long tails for closing and sewing. Be generous.
- Building the heart as one piece. It’s two separate halves joined on round 3 read that part twice before you start.
- Over-flattening the face. A few front-to-back stitches are plenty. Too many and he looks squished.
Important Remarks
- Yarn used is Premier Chunky Parfait (weight 6) with a 4 mm hook. That combo gives tight, plush stitches that hide the stuffing.
- The eyes are 16 mm kawaii safety eyes. Swap the size if you want a different expression, but keep them between rounds 18 and 19.
- Want a bigger frog? Go up a hook size and a heavier yarn just buy extra so you don’t run short halfway through.
- Because of the safety eyes, he’s best as decor or a gift for older kids, not a baby toy.
- And honestly, the heart is optional. Skip it and you’ve still got an adorable plain frog.
Conclusion
And there he is one chunky Crochet Little Frog Amigurumi with a heart he refuses to put down. To be fair, the eye humps look intimidating at first, but they’re really just patience plus a couple of stitch markers. Once you’ve made one, you’ll want a whole pond of them. He’s the kind of man people grab off the shelf and won’t give back. So pick your greens, grab that 4 mm hook, and start. You’ll be hooked pun fully intended.