Spring Crochet Amigurumi Bouquet | Handmade Kawaii Plush Decor & Easter Gift
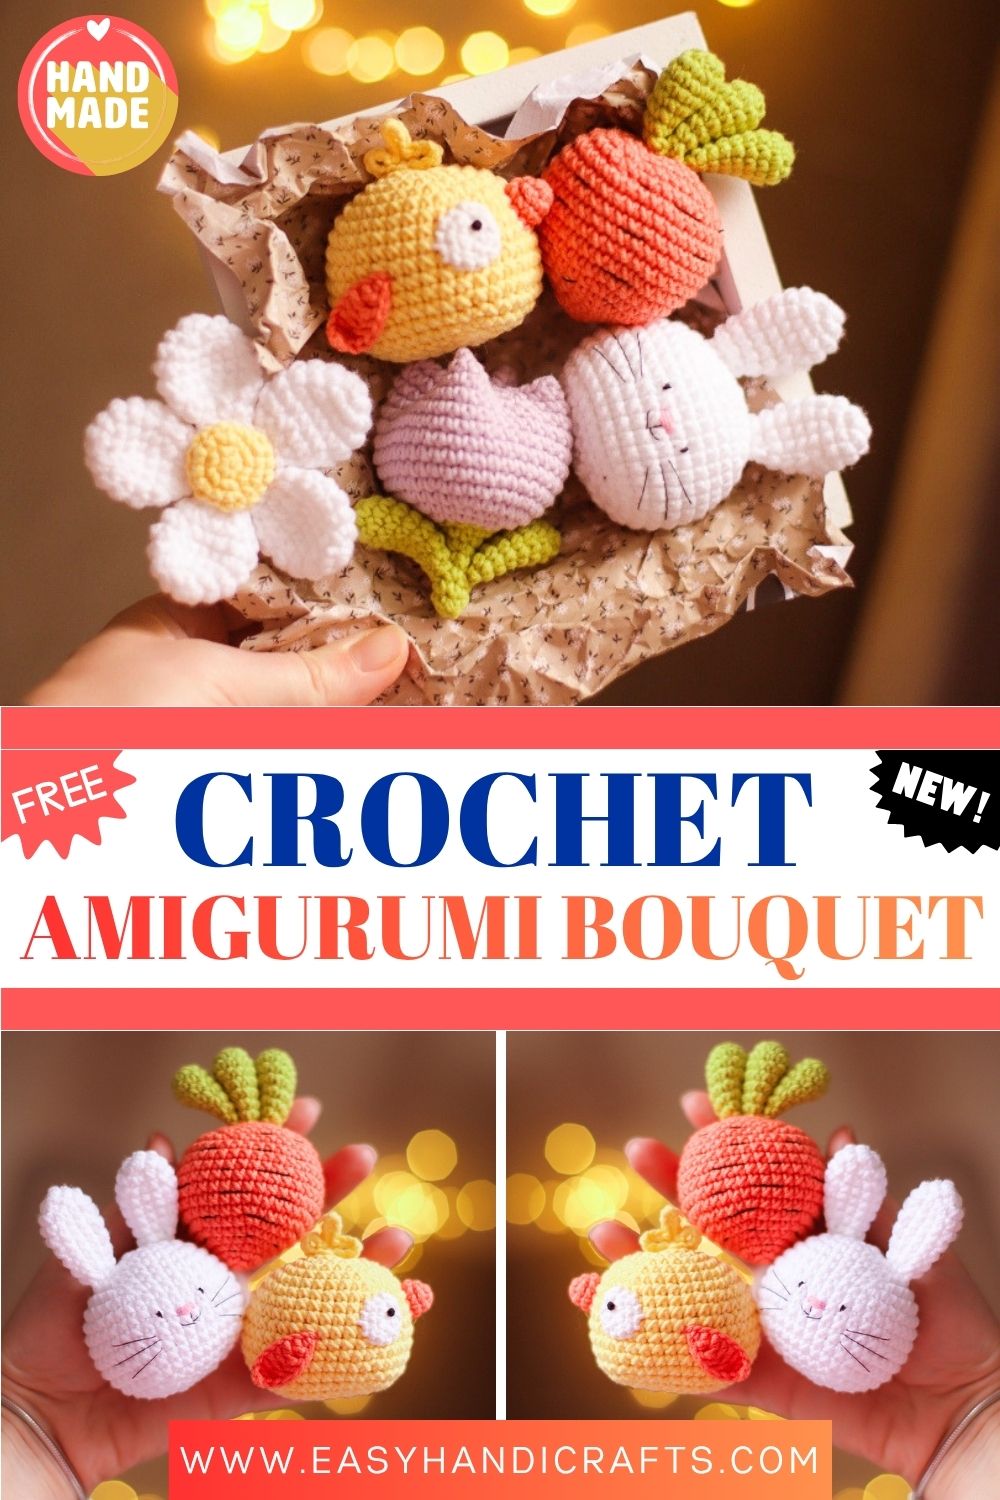
A tiny bouquet filled with handmade happiness, this adorable crochet amigurumi set brings together a sweet bunny, cheerful chick, blooming tulip, daisy flower, and tiny carrot in the cutest spring-inspired arrangement. Soft, cozy, and full of charm, it makes the perfect handmade gift or whimsical decor piece.
If you have been searching for a crochet project that feels truly special, this spring amigurumi bouquet is exactly what you need. Not only does it bring together a lilac flower, a bright carrot, a fluffy white bunny, a cheerful chamomile, and an adorable little chicken into one stunning arrangement, but it also works up beautifully with just a 2mm hook and Yarn Art Jeans. Furthermore, because each piece is small and self-contained, you can work through them one by one without ever feeling overwhelmed. Whether you want a unique Easter gift, a handmade home decoration, or simply a fun spring project, this bouquet delivers all of that and more. So gather your yarn, pick up your hook, and let’s build something truly beautiful together.
Skill Level
This pattern suits confident beginners and intermediate crafters perfectly. As long as you can single crochet, increase, decrease, work a magic ring, and manage simple shaping, you already have every skill this charming spring bouquet needs from start to finish.
Materials
- Yarn Art Jeans in White, Yellow, Green, Orange, and Lilac
- 2.0mm crochet hook
- Black sewing thread for face details
- Polyester fiberfill or holofiber for stuffing
- Scissors
- Large eye needle for sewing pieces together
Abbreviations
- MR: magic ring
- SC: single crochet
- DC: double crochet
- TC: treble crochet
- CH: chain stitch
- INC: increase — 2 stitches in one stitch
- DEC: decrease — 2 stitches together
- SLST: slip stitch
- T: times (number of repeats)
Pattern Notes
- All instructions follow US crochet terminology.
- Work in a continuous spiral throughout and avoid joining rounds unless the pattern states otherwise.
- Always use a stitch marker to track the beginning of each round.
- Each character in this bouquet is worked separately and assembled at the end.
- Stuff each piece lightly and evenly as you go for the best final shape.
Pattern: Flower (in Lilac)
- Rnd 1: 6SC in MR [6]
- Rnd 2: (INC) x6 [12]
- Rnd 3: (1SC, INC) x6 [18]
- Rnd 4: (2SC, INC) x6 [24]
- Rnd 5: (3SC, INC) x6 [30]
- Rnd 6: (4SC, INC) x6 [36]
- Rnd 7: (8SC, INC) x4 [40]
- Rnd 8–15: 40SC, 8 rounds [40]
- Fill lightly, then shape the piece into a flower form. Refer to the photo for guidance on shaping.
Flower Stem (in Green)
- Rnd 1: 6SC in MR [6]
- Rnd 2–5: 6SC, 4 rounds [6]
- Rnd 6: (INC) x6 [12]
- Rnd 7: 12SC — leave a long tail for sewing.
Leaves — Make 5 (3 for Carrot, 2 for Tulip)
- Rnd 1: 6SC in MR [6]
- Rnd 2: (INC) x6 [12]
- Rnd 3: DEC, 10SC [11]
- Rnd 4: DEC, 9SC [10]
- Rnd 5: DEC, 8SC [9]
- Rnd 6: DEC, 7SC [8]
- Rnd 7: DEC, 6SC [7]
- Rnd 8: DEC, 5SC [6] — leave a long tail for sewing.
Carrot (in Orange)
- Rnd 1: 6SC in MR [6]
- Rnd 2: (INC) x6 [12]
- Rnd 3: 12SC [12]
- Rnd 4: (1SC, INC) x6 [18]
- Rnd 5: (2SC, INC) x6 [24]
- Rnd 6: (3SC, INC) x6 [30]
- Rnd 7: (4SC, INC) x6 [36]
- Rnd 8–14: 36SC, 7 rounds [36]
- Rnd 15: 3SC, (2SC, DEC) x3, 6SC, (2SC, DEC) x3, 3SC [30]
- Rnd 16: 3SC, (1SC, DEC) x3, 6SC, (1SC, DEC) x3, 3SC [24]
- Rnd 17: (2SC, DEC) x6 [18]
- Rnd 18: (1SC, DEC) x6 [12]
- Rnd 19: (DEC) x6 [6] — sew the hole closed. Attach 3 green leaves to the top.
Pattern: Bunny (in White)
- Rnd 1: 6SC in MR [6]
- Rnd 2: (INC) x6 [12]
- Rnd 3: (3SC, 3 INC) x2 [18]
- Rnd 4: 3SC, (1SC, INC) x3, 3SC, (1SC, INC) x3 [24]
- Rnd 5: 3SC, (2SC, INC) x3, 3SC, (2SC, INC) x3 [30]
- Rnd 6: 3SC, (3SC, INC) x3, 3SC, (3SC, INC) x3 [36]
- Rnd 7–13: 36SC, 7 rounds [36]
- Rnd 14: 3SC, (3SC, DEC) x3, 3SC, (3SC, DEC) x3 [30]
- Rnd 15: 3SC, (2SC, DEC) x3, 3SC, (2SC, DEC) x3 [24]
- Rnd 16: 3SC, (1SC, DEC) x3, 3SC, (1SC, DEC) x3 [18]
- Rnd 17: (1SC, DEC) x6 [12]
- Rnd 18: (DEC) x6 [6] — sew the hole closed.
- Embroider a pink nose between rounds 10 and 11. Then add eyes and moustache with black thread.
Ears — Make 2:
- Rnd 1: 6SC in MR [6]
- Rnd 2: (INC) x6 [12]
- Rnd 3–4: 12SC [12]
- Rnd 5: DEC, 10SC [11]
- Rnd 6: DEC, 9SC [10]
- Rnd 7: DEC, 8SC [9]
- Rnd 8: DEC, 7SC [8]
- Rnd 9: Fold in half and SC 4 across. Leave a long tail for sewing onto the head.
Pattern: Chamomile
Centre (in Yellow):
- Rnd 1: 6SC in MR [6]
- Rnd 2: (INC) x6 [12]
- Rnd 3: (1SC, INC) x6 [18]
- Rnd 4–5: 18SC [18]
- Rnd 6: (1SC, DEC) x6 [12]
- Rnd 7: (DEC) x6 [6] — sew the hole closed.
Petals Make 7 (in White):
- Rnd 1: 6SC in MR [6]
- Rnd 2: (INC) x6 [12]
- Rnd 3: (2SC, INC) x4 [16]
- Rnd 4–6: 16SC [16]
- Rnd 7: (2SC, DEC) x4 [12]
- Rnd 8: (1SC, DEC) x4 [8]
- Rnd 9: Fold in half and SC 4 across. Leave a long tail for sewing around the yellow centre.
Pattern: Chicken (in Yellow)
- Rnd 1: 6SC in MR [6]
- Rnd 2: (INC) x6 [12]
- Rnd 3: (3SC, 3 INC) x2 [18]
- Rnd 4: 3SC, (1SC, INC) x3, 3SC, (1SC, INC) x3 [24]
- Rnd 5: 3SC, (2SC, INC) x3, 3SC, (2SC, INC) x3 [30]
- Rnd 6: 3SC, (3SC, INC) x3, 3SC, (3SC, INC) x3 [36]
- Rnd 7–13: 36SC, 7 rounds [36]
- Rnd 14: 3SC, (3SC, DEC) x3, 3SC, (3SC, DEC) x3 [30]
- Rnd 15: 3SC, (2SC, DEC) x3, 3SC, (2SC, DEC) x3 [24]
- Rnd 16: 3SC, (1SC, DEC) x3, 3SC, (1SC, DEC) x3 [18]
- Rnd 17: (1SC, DEC) x6 [12]
- Rnd 18: (DEC) x6 [6] — sew the hole closed.
Beak (in Orange):
- Rnd 1: 6SC in MR [6]
- Rnd 2: (INC) x6 [12]
- Rnd 3: 12SC — leave a long tail for sewing onto the face.
Wings Make 2 (in Orange):
- CH9, work from the second loop from the hook: 1SC, 1DC, 4TC, 1DC, 1SC. Leave a long tail for sewing between rounds 16 and 17.
Eyes Make 2 (in White):
- Rnd 1: 6SC in MR [6]
- Rnd 2: (INC) x6 [12] — leave a long tail for sewing onto the face.
Hair:
- CH7, SLST into the first loop. CH10, SLST into the first loop. CH7, SLST into the first loop. Leave a long tail for sewing onto the top of the head.
Common Mistakes to Avoid
- Losing track of rounds across multiple pieces — This bouquet involves several individual characters worked one after the other. Therefore, always finish marking and counting one piece completely before starting the next.
- Skipping the stitch marker — Because every piece in this pattern works in a continuous spiral, losing your place without a marker is easy. As a result, always mark the first stitch of every round without exception.
- Over-stuffing small pieces — Pieces like the flower stem, leaves, and ears need only a light amount of fiberfill. In contrast, too much stuffing distorts their shape and makes sewing them together much harder.
- Placing the bunny face details without a guide — The pink nose sits between rounds 10 and 11, and the eyes and moustache follow from there. So, mark those rows before embroidering to keep everything centred and symmetrical.
- Misplacing the chicken wings — The wings attach between rounds 16 and 17. Sewing them too high or too low changes the whole silhouette of the chicken. Always count the rows before pinning.
- Rushing the chamomile petal assembly — Attaching seven petals evenly around the yellow centre takes patience. Instead of sewing them all at once, pin each petal in place first and check the spacing before committing to any stitches.
Finishing Tips
- First, weave in all yarn ends securely after each piece is complete. Working with a 2mm hook and fine yarn means loose ends are more visible, so take extra care at every join and colour change.
- Next, when shaping the lilac flower, refer closely to the photo guide. The shaping happens by hand after light stuffing, and getting it right makes the whole bouquet look significantly more polished.
- Additionally, embroider the bunny’s facial features with a steady hand and thin black thread. A light pencil or erasable fabric marker can help you mark the positions before you commit to the embroidery.
- After assembling the chamomile, check that all seven petals fan out evenly. If any petal looks crowded or uneven, gently reposition it and resew before moving on.
- As a final step, arrange all the finished pieces together before sewing anything into a bouquet formation. Laying them out first lets you find the most pleasing composition before making any permanent decisions.
Customization & Variations
- Change the colour palette — While lilac, orange, yellow, white, and green give a classic spring feel, this bouquet also looks stunning in pastel pink, mint, and lavender for a softer, more romantic arrangement.
- Add more characters — The bunny and chicken bodies share the same base construction. Therefore, you can easily swap colours and details to add a duckling, a lamb, or any other spring character to the bouquet.
- Make it an Easter basket display — Instead of arranging the pieces as a bouquet, nestle them inside a small wicker basket filled with shredded paper for a charming Easter centrepiece.
- Create individual keychains — Use the same patterns but attach a small keychain ring to each finished character for a set of adorable spring bag charms that work perfectly as Easter gifts.
- Personalise the bunny — Embroider a tiny initial or name onto the bunny’s belly using a contrasting colour of thread. This small touch turns a sweet plush into a truly custom keepsake.
- Try different flower varieties — Swap the chamomile petals for a different shape or colour to create a sunflower, a daisy, or a tulip variation that gives the bouquet a completely fresh look.
- Make a larger display version — Scale up by using Yarn Art Jeans Plus or a similar bulkier yarn with a larger hook. The same patterns work beautifully at a bigger scale for shelf displays and home decor.
Gifting Ideas
- Easter gift — This bouquet makes one of the most thoughtful and original Easter gifts imaginable. Unlike chocolate or plastic toys, a handmade amigurumi bouquet is something people genuinely keep and display for years.
- Spring home decor gift — For anyone who loves decorating their home with seasonal touches, a handmade amigurumi bouquet adds warmth and personality to any shelf, mantle, or table display.
- New baby gift — The soft colours, gentle shapes, and safe materials make this bouquet a wonderful welcome gift for a new baby. It doubles as both a nursery decoration and a collection of soft toys.
- Teacher appreciation gift — A handmade spring bouquet on a teacher’s desk is a far more memorable and personal gift than anything bought in a shop. It shows real effort and genuine creativity.
- Mother’s Day gift — Instead of real flowers that fade, give a handmade bouquet that lasts forever. Every piece is made with care, and that kind of thoughtfulness is something a mother will always remember.
- Craft fair bestseller — Spring and Easter-themed amigurumi consistently attracts attention at craft fairs. Because the individual pieces work up efficiently, producing a full bouquet for display is entirely manageable.
- Treat yourself — Sometimes the best reason to make something beautiful is simply that you want it. Display this bouquet on your own shelf and enjoy the happiness that a little handmade spring brings every single day.
Conclusion
This spring crochet amigurumi bouquet is far more than just a collection of small plush pieces it is a celebration of the season, worked stitch by stitch with colour, care, and creativity. From the soft lilac flower and the cheerful little carrot to the fluffy white bunny, the delicate chamomile, and the adorable yellow chicken, every character in this bouquet brings its own personality and charm to the finished arrangement.
Whether you are making it as an Easter gift, a spring home decoration, or simply a joyful project to work through on a quiet afternoon, this pattern rewards you with a result that feels genuinely special. Not only does each piece come together quickly on its own, but the assembled bouquet also creates a display that looks impressive, detailed, and completely handmade in the very best way.
So pick up your Yarn Art Jeans, choose your favourite spring colours, and get started one piece at a time. Your very own handmade spring bouquet is closer than you think. Happy crocheting!