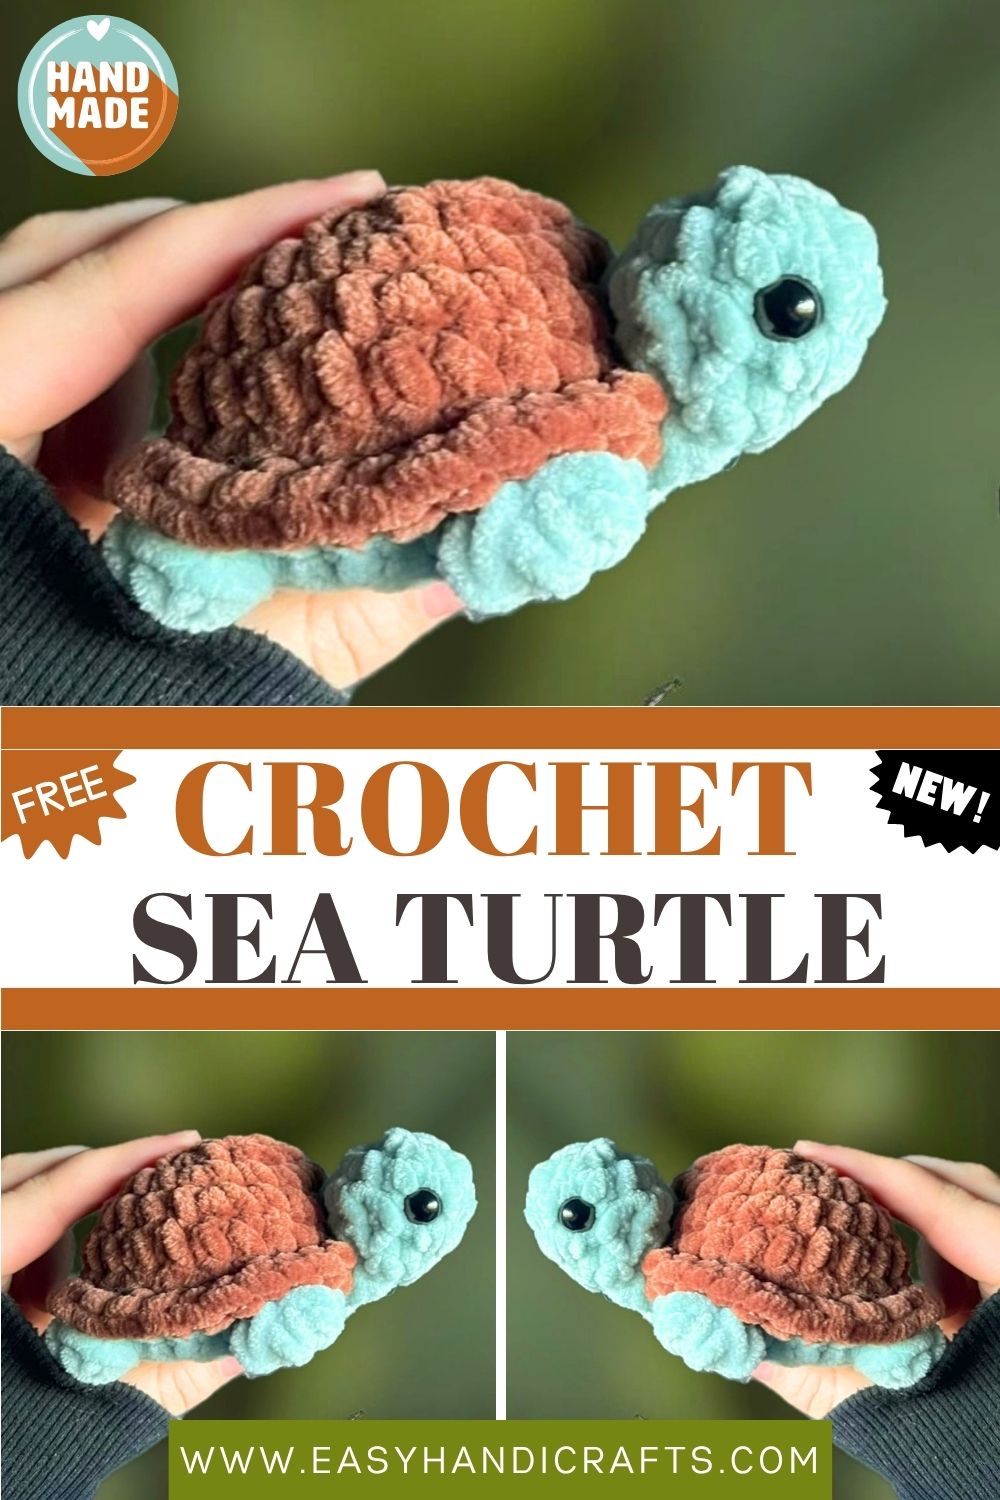
Crochet Sea Turtle Amigurumi Gift for Kids & Adults
A chunky, squishy sea turtle you can crochet in an afternoon, this adorable amigurumi brings ocean magic right into your hands.
If you have been looking for a crochet project that is both satisfying to make and impossible to put down, this sea turtle amigurumi is exactly what you need. Designed with a beautiful two-colour shell and a chunky body, this little turtle is beginner-friendly, fast to work up, and full of personality from the very first round. Whether you want a sweet plush toy, a thoughtful handmade gift, or a fun weekend project, this pattern delivers all of that and more. Grab your teal and brown yarn, pick up your 4.5mm hook, and let’s get started.
Skill Level
This pattern works perfectly for beginners and improvers alike. As long as you can single crochet, increase, decrease, and start a magic ring, you already have every skill this charming little sea turtle requires.
Materials
- Size 6 (super bulky) yarn in Body Colour and Shell Colour
- 4.5mm crochet hook
- 2x 10mm safety eyes
- Polyester fiberfill for stuffing
- Stitch marker
- Blunt darning needle
- Keychain hardware
Abbreviations
- R: round
- MR: magic ring
- SC: single crochet
- INC: increase
- DEC: decrease
- DC: double crochet
- BBL: bobble (5 unfinished DC)
- F/O: finish off
- ST: stitch
- SLST: slip stitch
Pattern: Shell & Body (in Shell Colour)
- R1: MR6 [6]
- R2: INC x6 [12]
- R3: (SC, INC) x6 [18]
- R4: (2SC, INC) x6 [24]
- R5–6: SC around (2 rounds) [24]
- R7 works in two parts. First, R7(1): FLO (INC, 3SC) x6 [30] — slip stitch into the first stitch of the round and fasten off Shell Colour. Then switch to Body Colour and attach yarn to the BLO of R7 where the round ended.
- R7(2): BLO (5SC, BBL) x4 [24]
- R8: (2SC, DEC) x6 [18]
- R9: (1SC, DEC) x6 [12] — Slip stitch and fasten off with a short tail. Stuff firmly, then sew the hole closed.
Pattern: Head (in Body Colour)
- R1: MR6 [6]
- R2: INC x6 [12]
- R3–4: SC around (2 rounds) [12]
- Place eyes between rows 3 and 4, keeping 3 visible stitches apart. Place the stitch marker on the side of the head. Stuff the head firmly.
- R5: DEC x6 [6]
- R6: Fold in half and SC 3 across, working through both sides of the round.
- R7: CH1, flip work, SC 3 across. Fasten off with a long tail for sewing.
Assembly
First, choose which side of the body you want to attach the head to. Most makers choose the side where the body colour joins, as it neatly covers any inconsistencies from the colour change.
Next, align the bottom of the neck with R8 of the body. This is the first row of body colour. Position it evenly between your two BBL stitches, then sew straight across to secure the neck in place.
After that, pull your yarn tail up through the body and bring it out between rows 4 and 5 of the shell, centred between the BBL stitches. Then use your darning needle to thread the yarn through the back of the head between rows 3 and 4, centred to the eyes. Finally, thread the yarn back through the same stitch on the shell it came out of and pull tight. Slip stitch on the underside of the body to secure everything. This step holds the head upright and gives the turtle its charming, lifelike pose.
Common Mistakes to Avoid
- Missing the two-part R7 — Row 7 splits into two sections, worked in different colours and different loops. Read it carefully before you begin. Rushing through this step causes the shell to look uneven.
- Skipping the stitch marker — Always mark the start of each round. Since this pattern works in a continuous spiral, losing track of your rounds is easy without one.
- Placing eyes at the wrong time — Position the safety eyes between rows 3 and 4 of the head before you close it up. After stuffing, moving them becomes nearly impossible.
- Under-stuffing the body and head — Both pieces need firm, generous stuffing to hold their shapes well. Therefore, add more fiberfill than you think necessary before closing up.
- Loose head attachment — The two-step assembly process is what keeps the head upright. So, follow both sewing steps carefully and pull the yarn tight at each stage.
- Confusing FLO and BLO in R7 — The first part of R7 works into the front loops only, while the second part works into the back loops only. Mixing these up will flatten the shell completely.
Finishing Tips
- First, weave in all yarn ends securely with your darning needle. Pay extra attention to the colour change point in R7, as loose ends there can unravel the shell edge over time.
- Next, check the shell edge after fastening off Shell Colour. If any gaps appear between the FLO stitches, use your needle to ease them closed before moving on.
- Additionally, when stuffing the head, shape it gently with your fingers as you go. A well-shaped head gives the turtle far more character and personality.
- After assembly, give the head a gentle tug in all directions to confirm it sits firmly. If it wobbles, go back and reinforce the sewing stitch before finishing.
- Finally, if you plan to gift this turtle, run a lint roller over the finished piece. Super bulky yarn can collect fluff during the making process, and a quick roll makes it look freshly made.
Customization & Variations
- Switch the colour combination — Teal and brown is a classic ocean pairing, but this pattern also looks stunning in green and cream, navy and tan, or even purple and grey for a more fantasy-inspired turtle.
- Add texture to the shell — Try using a slightly different yarn texture for the shell colour, such as a soft chenille or a slightly sparkly yarn, to make the shell stand out even more.
- Make a keychain version — Use medium-weight yarn with a smaller hook to create a miniature turtle. Then attach keychain hardware to the top for a sweet bag charm or gift tag.
- Embroider a smile — Use a short length of dark yarn to stitch a tiny curved smile just below the eyes. It instantly transforms the turtle’s expression into something even more lovable.
- Create a whole ocean scene — Crochet several turtles in different sizes and colours. Display them together on a shelf or gift them as a set for a complete ocean-themed collection.
- Seasonal colour swaps — Try red and gold for an autumn turtle, white and silver for a winter edition, or bright coral and yellow for a fun summer version.
- Add a name tag — Embroider a small initial or name onto the shell using contrasting yarn. This personal touch makes the turtle feel like a truly one-of-a-kind, custom gift.
Gifting Ideas
- Children’s birthday gift — This turtle makes a wonderful plush toy for kids of all ages. It is soft, chunky, and sturdy enough to handle enthusiastic play without falling apart.
- Ocean lover’s gift — For anyone who loves the sea, marine life, or ocean conservation, a handmade sea turtle is a thoughtful and meaningful present they will genuinely treasure.
- Baby shower gift — Pair the turtle with a soft ocean-themed blanket or a set of baby clothes for a sweet, coordinated handmade gift that new parents will adore.
- Teacher appreciation — Choose colours that match the teacher’s personality or classroom theme. Add a handwritten note, a nd you have a gift that feels truly personal and heartfelt.
- Holiday stocking stuffer — A mini version of this turtle, made with lighter yarn and a smaller hook, tucks perfectly into a Christmas stocking or a small gift bag.
- Fundraiser or craft fair item — This pattern works up quickly, which makes it ideal for producing multiples. Handmade amigurumi sells beautifully at craft fairs and online shops.
- Self-gift — Sometimes you simply deserve something beautiful that you made with your own hands. Keep one for yourself, display it proudly, and enjoy the satisfaction of a finished piece.
Conclusion
This chunky sea turtle amigurumi is more than just a crochet project it is a little piece of ocean magic you can hold in your hands. From the beautiful two-colour shell to the upright, character-filled head, every detail of this pattern comes together to create something genuinely special.
Whether you are a beginner picking up a hook for the first time or an experienced maker looking for a quick and rewarding project, this turtle delivers a result worth showing off. The two-part shell construction might look tricky at first glance, but once you work through it, the technique clicks instantly, and the results are stunning.
So choose your colours, set up your hook, and enjoy every round. Then, when your turtle is complete, share your finished creation and inspire someone else to pick up their hook, too. Happy crocheting!