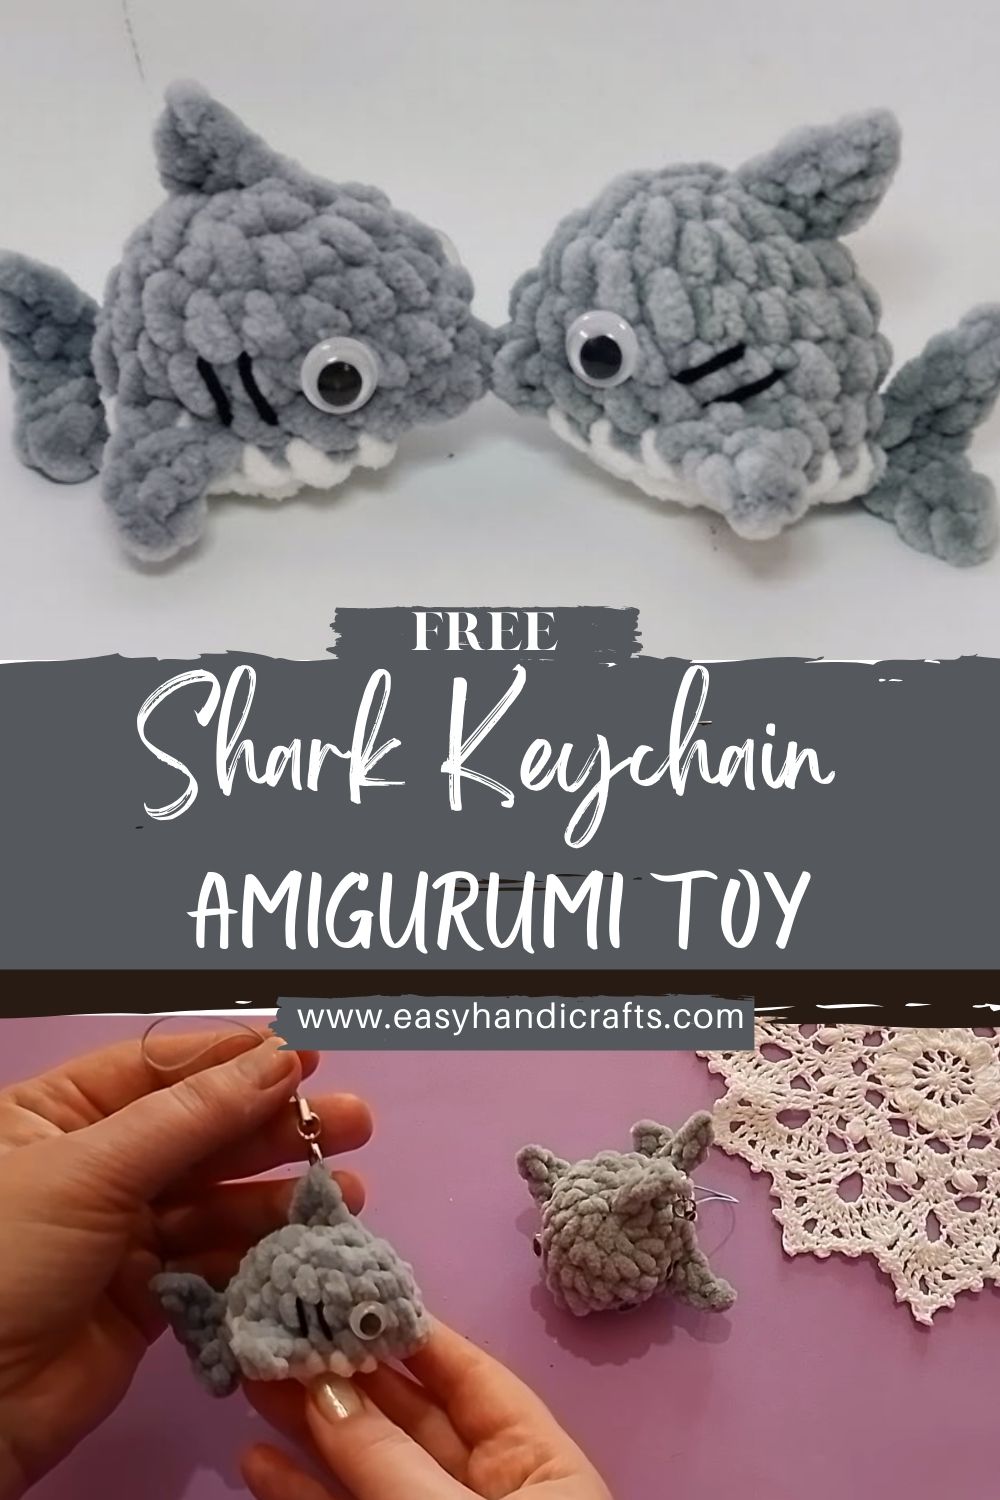
Cute Crochet Shark Keychain Amigurumi Pattern Toy
This cute crochet shark is a tiny, soft sea buddy with a rounded body, a white belly, and a sweet expression. The amigurumi shark pattern is beginner-friendly and can be made into a handmade gift, plush toy, nursery decor, desk accessory, or keychain.
Crochet sea animals are always crowd-pleasers, and a crocheted cute shark is especially fun because it’s the perfect mix of goofy and adorable. Instead of a “scary” shark vibe, this design focuses on a chubby, cuddly shape, a bright white belly, side fins that look like little flippers, and big, cute eyes that make it instantly friendly.
This plush amigurumi is designed to look extra soft and huggable, especially when made with velvet or chenille yarn for a smooth, squishy finish. Don’t worry if you’re a beginner: the shaping is simple, the parts are assembled, and the Assembly is minimal.
In this article, you’ll learn everything you need to make your own amigurumi shark pattern from start to finish: materials, abbreviations, full step-by-step rounds with stitch counts, stuffing guidance, assembly placement, and finishing touches like embroidered gills (and an optional tiny smile).
Extra Section: Quick Pattern Summary
- Project: Crochet Cute Shark (plush amigurumi)
- Skill level: Beginner-friendly (confident beginner for plush yarn)
- Yarn type: Velvet/chenille (plush) or worsted/DK (smooth stitch definition)
- Finished size: ~4–6 in (10–15 cm), depending on yarn/hook
- Construction style: Minimal-sew (fins and tail sewn on; belly is a separate panel sewn on for clean contrast)
Materials Needed
Yarn colour suggestions:
- Main colour (choose one): light grey, blue grey, or pastel blue
- White (belly)
- Black (embroidery details: gills, mouth; also for embroidered eyes if needed)
Tools & notions:
- Crochet hook:
- Plush/chenille yarn: 4.0–5.0 mm (go smaller for tighter stitches)
- Worsted/DK yarn: 2.75–3.5 mm
- Fiberfill/stuffing
- Stitch marker (highly recommended)
- Yarn needle (tapestry needle)
- Safety eyes or googly eyes (8–12 mm, depending on size)
- SciAssemblies for Assembly (helps symmetry a lot)
- Optional keychain hardware (jump ring + keychain clasp)
- Optional blush (powder blush, pastel chalk, or pink embroidery)
Abbreviations
- MR = Magic Ring
- sc = single crochet
- inc = increase (2 sc in same st)
- dec = decrease (use invisible decrease if possible)
- sl st = slip stitch
- ch = chain
- st/sts = stitch/stitches
- FO = fasten off
Finished Size
Approx. 4–6 in (10–15 cm) long/tall depending on yarn type, hook size, and tension. Plush yarn usually makes the shark larger and softer, while cotton/worsted makes it smaller with sharper stitch definition.
Pattern Overview
This shark is made from:
- Body (rounded capsule shape)
- Belly panel (white oval sewn to the underside/front for a crisp contrast)
- Top fin (small dorsal fin)
- Side fins (2) (cute flippers)
- Tail fin (simple, not too large—keeps it chubby)
- Face details (eyes + embroidered gills, optional smile)
- Optional decorative touches (blush, accessories, keychain loop)
Sewing level: Minimal-sew. The body is one piece; the fins, tail, and belly panel are sewn on.
Step-by-Step Crochet Pattern
Notes Before You Start
- Work in continuous rounds (spiral).
- Use a stitch marker in the first stitch of each round.
- For plush yarn: keep tension firm and count carefully (stitches can be harder to see).
A. Body Pattern (Main Colour)
Rounded front → chubby middle → tapered back.
R1: MR, 6 sc (6)
R2: inc x6 (12)
R3: (sc, inc) x6 (18)
R4: (2 sc, inc) x6 (24)
R5: (3 sc, inc) x6 (30)
R6: (4 sc, inc) x6 (36)
R7–R11: sc around (36) for 5 rounds
- Shaping note: These even rounds create that plush “marshmallow” middle.
R12: (4 sc, dec) x6 (30)
R13: sc around (30)
R14: (3 sc, dec) x6 (24)
R15: sc around (24)
R16: (2 sc, dec) x6 (18)
Begin stuffing now. Focus on rounding the nose/front and keeping the body smooth.
R17: sc around (18)
R18: (sc, dec) x6 (12)
Add more stuffing—firm but not stretched.
R19: sc around (12)
R20: dec x6 (6)
FO, close the opening, weaving in the end.
Body tip: If your shark looks too skinny, add 1–2 more rounds at R7–R11 (36 sts) before decreasing.
B. Belly Section (White Belly Panel – Separate Piece)
This method is beginner-friendly and provides a clean, cute belly contrast without any tricky colour changes.
Make 1 belly panel in white, shaped like a rounded oval.
Ch 6
Work around the chain (oval):
- Starting in 2nd ch from hook: 4 sc, 3 sc in last ch.
- On the other side of the chain: 3 sc, 2 sc in last ch. (12)
- inc, 3 sc, inc x3, 3 sc, inc x2 (18)
- sc, inc, 3 sc, (sc, inc) x3, 3 sc, (sc, inc) x2 (24)
FO, leave a long tail for sewing.
Placement note: Pin the belly panel centred on the front underside of the shark (more toward the “face” than the tail), then sew around the edge with small whip stitches.
C. Top Fin Pattern (Dorsal Fin – Main Color)
Small and upright, like a cute little triangle with a rounded base.
R1: MR, 4 sc (4)
R2: (sc, inc) x2 (6)
R3: sc around (6)
R4: (2 sc, inc) x2 (8)
R5: sc around (8)
R6: (3 sc, inc) x2 (10)
R7: sc around (10)
FO, leave a long tail.
Fin shaping: Do not stuff. Flatten it slightly.
Ideal placement: On top of the body, about halfway between the eye area and the Assembly (see Assembly).
D. Side Fins Pattern (Make 2 – Main Colour)
Small, slightly curved “flippers.”
R1: MR, 5 sc (5)
R2: inc x5 (10)
R3: sc around (10)
R4: (3 sc, dec) x2 (8)
R5: sc around (8)
FO, leave a long tail.
Fin note: Lightly flatten; no stuffing needed.
Attach symmetrically: one on each side, slightly forward of the body’s centre.
E. Tail Fin Pattern (Main Colour)
Cute, simple tail that won’t overpower the chubby body.
Tail Fin (standard):
R1: MR, 6 sc (6)
R2: (sc, inc) x3 (9)
R3: sc around (9)
R4: (2 sc, inc) x3 (12)
R5: sc around (12)
FO, leave a long tail. Flatten (no stuffing).
Optional simplified tail (extra beginner-friendly):
- Ch 5, sc in 2nd ch from hook and across (4)
- Ch 1, turn, dec, 2 sc (3)
- FO, sew to back (this makes a small flat tail)
Placement: Sew the tail at the very back,k where the body closes, centred.
Facial Details (Cute, Not Scary!)
Eye Placement
- Place eyes on the front half of the body (near the “nose”), roughly aligned with the widest part of the face.
- A good starting point: position eyes so they sit about 6–8 sts apart (adjust based on yarn and eye size).
- For maximum cuteness: place the eyes slightly lower and a bit wider than you think.
Embroidered Gill Lines (Black Yarn)
- On each side of the body, embroider 2–3 short curved lines behind and slightly below the eye area.
- Keep them small and neat—tiny details read “cute” instantly.
Optional Smile/Mouth
- Add a small curved smile with black thread, centred below the eyes.
- Avoid sharp-toothed details if you want an extra-sweet look.
Optional Blush
- Dab blush beneath each eye, or stitch tiny pink lines/dots for cheeks.
Assembly Instructions (Step-by-Step)
- Pin the belly panel to the underside/front of the body. Make sure it’s centred.
- Sew the elastic panel down with small, even stitches around the edge.
- Attach the top fin:
- Pin it on top of the body.
- Sew along the base; keep it upright.
- Attach side fins (2):
- Pin one fin on each side, evenly spaced and level.
- Sew securely with tight stitches.
- Attach tail fin:
- Pin to the back of the body (centred).
- Sew firmly—this area gets tugged if used as a keychain.
- Add eyes (if not already):
- Insert safety eyes and secure washers before final closing (if using safety eyes, it’s easiest to place them before the body is fully closed; if already closed, sew on felt/crochet eyes).
- Embroider gills and an optional smile.
- Final symmetry check:
- Look from the front, top, and both sides before tightening and weaving ends.
Stuffing Tips
- Don’t overstuff: Overstuffing can stretch stitches and make the belly panel pucker.
- Keep it rounded and smooth: Add stuffing in small pieces and massage the shape as you go.
- Stuff the nose/front carefully: This is what makes the shark look plush and “baby-cute.”
- Avoid lumps: Tease the stuffing apart before inserting; push it evenly to the sides rather than forming a tight ball. Customisation Ideas
- Pastel shark: pastel blue body + bright white belly
- Mini shark keychain: thinner yarn + smaller hook, add hardware loop
- Sleepy eyes shark: embroider curved closed eyes instead of safety eyes
- Smiling shark: add a tiny curved mouth (no teeth for extra sweetness)
- Striped or spotted shark: surface crochet stripes or add small embroidered spots
- Baby shark set: make 3 sizes (mini/regular/jumbo) in a matching palette
- Whale shark inspired: dark blue with tiny white dot embroidery
- Accessories: bow, tiny scarf, sailor hat vibe, heart applique
- Jumbo plush shark: blanket yarn + larger hook (keep tight stitches!)
Beginner Tips
- Count stitches every round (especially with plush yarn—it hides stitches).
- Use a stitch marker and move it each round.
- Choose plush yarn carefully: chenille/velvet looks amazing, but can be tricky to frog (undo).
- Working with chenille/velvet: go more slowly; feel the stitches with your fingers, count often.
- Use a tighter tension (or a smaller hook) to prevent holes and stuffing show-through.
- Alternatives to safety eyes (kid-safe): embroidered eyes, felt eyes sewn on tightly, or crocheted eye circles.
- Sew parts evenly: pin first, then stitch, which prevents crooked fins and “tilted” faces.
Common Mistakes to Avoid
- Uneven stuffing: makes the shark bumpy; add small pieces and shape as you go.
- Losing stitch count: leads to odd shaping; recount and use a marker.
- Loose stitches with plush yarn: cause gaps; size down the hook and tighten the tension.
- Fins placed unevenly: always pin and measure visually from multiple angles.
- Tail too big/small: Keep the tail smaller than the body width for a chubby look.
- Eyes too high/far apart: can look surprised; place slightly lower and test with pins.
- Poor body shaping: if it looks long and thin, add more even rounds in the middle section.
Who Is This Pattern For
This crochet cute shark pattern is great for:
- Beginners who want a simple, adorable sea animal
- Sea animal lovers and shark fans
- Amigurumi fans who enjoy quick projects
- Handmade gift makers (birthdays, baby showers, holidays)
- Small crochet business owners (great market item, especially as keychains)
- Nursery decor creators (soft ocean theme)
- Plush toy makers who love velvet/chenille textures
SEO Keywords
- Crochet a cute shark
- Crochet shark pattern
- Amigurumi shark tutorial
- beginner shark crochet pattern
- cute crochet sea animal
- plush crochet shark
- easy crochet shark pattern
- handmade shark amigurumi
- Step-by-step Crochet Shark
Conclusion
A crochet cute shark doesn’t have to be fierce in plush amigurumi form; it becomes a sweet, squishy little ocean friend you’ll want to make in every colour. Try pastel palettes, add sleepy eyes or blush cheeks, or scale it down into a keychain companion. Whether you’re making a gift, a nursery decor piece, or a desk buddy, this amigurumi shark pattern is a fun, beginner-friendly project that’s easy to personalise and impossible not to love.