Cute Crochet Egg Bunny Doll Beginners Amigurumi Pattern
This crochet bunny egg amigurumi pattern is the kind of project that instantly makes your basket décor feel more magical. If you love Easter bunny crochet tutorials and soft pastel makes, this cute egg bunny crochet doll is quick, beginner-friendly, and seriously giftable.
Crafters love the crochet bunny egg amigurumi trend for one simple reason: it’s the perfect mix of “fast to finish” and “impossible not to smile at.” Egg shapes work up quickly, look adorable in any colour, and are ideal for seasonal décor, especially for spring and Easter.
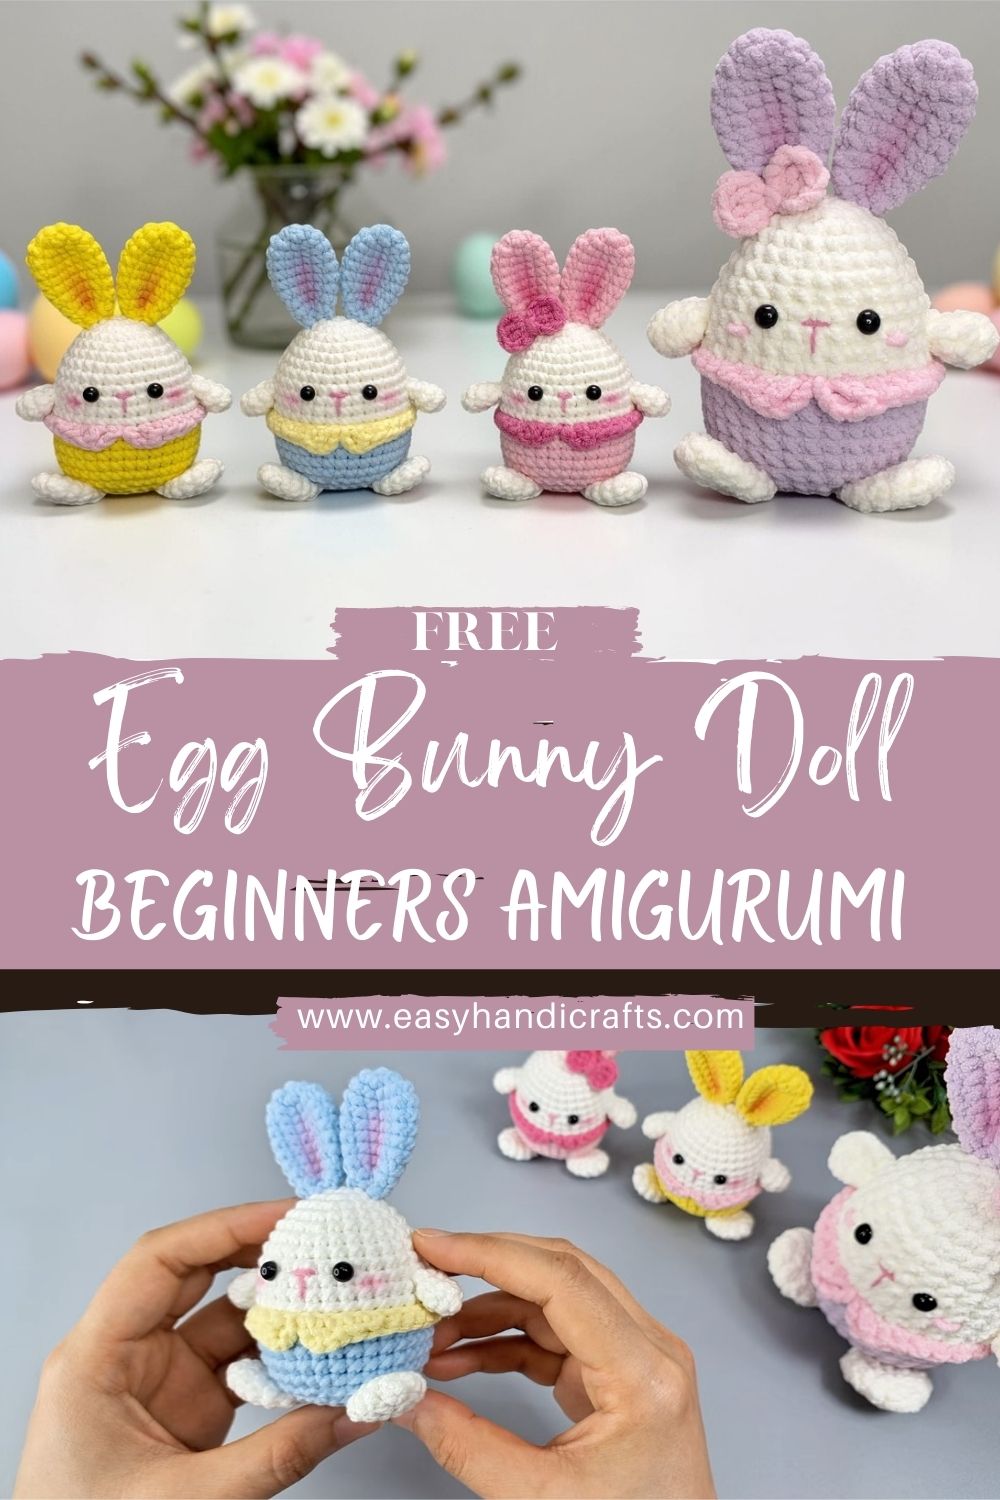
What makes this design extra charming is the combination of a classic rounded egg body with sweet bunny features: long upright ears, tiny arms and feet, and a simple embroidered face with pink blush cheeks. Add a decorative ruffle/frill detail around the body like a little dress hem or a cracked eggshell edge,ge and you get a premium, boutique-style amigurumi that still stays beginner-friendly.
This pattern is perfect for Easter table décor, gift baskets, nursery shelves, teacher gifts, and even handmade selling (they’re small, quick, and cute in sets). Best ofaall: it’s a great project for beginners because it uses basic amigurumi shaping and minimal pattern yyet et it still looks polished and “complete.”
Materials Needed
- Pastel yarn colours (amigurumi-friendly): white, yellow, blue, pink, purple
- Use one main pastel colour for the body (or make a rainbow set).
- Crochet hook: 2.5 mm–3.5 mm (use a smaller hook than the yarn label suggests for tight stitches)
- Fiberfill stuffing
- Safety eyes (or embroidered eyes as an alternative)
- Black embroidery thread (nose/mouth + optional eyes)
- Pink yarn or blush (for cheeks; felt circles also work)
- Yarn needle (tapestry needle)
- Stitch marker
- Scissors
- Pins (for assembly and symmetrical placement)
Optional: a tiny bit of white felt for eye highlights, and a soft makeup brush if using powdered blush.
Stitch Abbreviations
- MR – Magic Ring (adjustable loop to start crocheting in the round)
- sc – single crochet
- inc – increase (2 sc in the same stitch)
- dec – decrease (single crochet decrease; invisible decrease recommended)
- sl st – slip stitch
- ch – chain
- BLO / FLO back loop only / front loop only (optional; used for cleaner edging or attaching the ruffle)
Finished Bunny Description
Your finished bunny will be a sweet, egg-shaped amigurumi with a soft, rounded silhouette and a plush, springy feel. The tall, upright ears give it an instantly recognisable bunny look, while the tiny arms and feet keep it compact and “chibi-cute.”
TheFacee is minimal and adorable: black safety eyes, a small embroidered nose and a little mouth, plus pink blush cheeks that make it look warm and friendly. Around the body sits a decorative ruffle/frill detail, like a tiny dress hem or an eggshell edge, adding movement and texture without complicating the build.
It’s especially charming in pastel variations, such as yellow, baby blue, soft pink, lavender, and creamy white,e making it perfect for Easter displays and gift sets.
Step-by-Step Crochet Pattern
Pattern Notes (Read First)
- Work in a continuous spiral (do not join rounds) unless noted.
- Use a stitch marker to mark the first stitch of each round.
- Keep stitches tight and even so stuffing doesn’t show.
- Final size depends on yarn and hook; with DK/light worsted and a 2.75–3.25 mm hook, it’s typically palm-sized.
A) Body (Egg Shape)
What you’re making: One main egg-shaped body (fast, sturdy, beginner-friendly).
Shape: Round at the bottom, slightly narrower at the top—like a classic egg.
Use your chosen pastel colour.
R1: MR, 6 sc (6)
R2: inc around (12)
R3: (sc, inc) around (18)
R4: (2 sc, inc) around (24)
R5: (3 sc, inc) around (30)
R6: (4 sc, inc) around (36)
R7–R11: sc around (36)
(This builds the “full” middle of the egg.)
R12: (4 sc, dec) around (30)
R13: sc around (30)
R14: (3 sc, dec) around (24)
R15: sc around (24)
R16: (2 sc, dec) around (18)
Stuffing stage: Start stuffing here. Push stuffing outward to keep the egg smooth and rounded, especially at the sides and base.
R17: (sc, dec) around (12)
Add a bit more stuffing—firm but not stretched.
R18: dec around (6)
Fasten off, close the open end, and weave in ends.
How it should look: A smooth egg shape that sits nicely once the feet are attached.
B) Ruffle / Frill Detail (Decorative Edge)
What you’re making: A frilly band that wraps around the body like a tiny dress hem or cracked eggshell trim.
Shape: A ruffle strip made by crocheting into chains (easy and satisfying).
Use white (classic) or a coordinating pastel.
Ruffle Strip:
- ch 42–54 (adjust depending on your body width; you want it to reach around the belly area with slight stretch).
- In 2nd ch from hook: sc across (one sc per chain).
- Ruffle row: ch 1, turn, work (inc in each stitch) across or (sc, inc) across for a softer ruffle.
- More increases = frillier, “dressier” ruffle.
- Fasten off, leave a long tail for sewing.
How it should look: A gently wavy strip. If it’s too curly, reduce it. If it’s too flat, add more increases.
Alternative method (optional, cleaner look): If you crocheted a BLO round on the body, you can attach the ruffle directly into those loops. This is optional; sewing works great for beginners.
C) Ears (Long Upright)
Make 2 in the same pastel yarn (or white for a classic bunny look).
What you’re making: Tall ears that stand upright and frame the face.
Shape: Long ovals that you fold slightly at the base.
R1: MR, 6 sc (6)
R2: (sc, inc) around (9)
R3: sc around (9)
R4: (2 sc, inc) around (12)
R5–R10: sc around (12)
Fasten off, leave a long tail.
No stuffing needed.
Flatten the ear; you can pinch the base slightly so it curves upward naturally.
How it should look: Slim and tall, with upright ears that make the bunny instantly recognisable.
D) Arms (Tiny)
Make 2 in body colour.
What you’re making: Small “nubs” that add cuteness without complexity.
R1: MR, 6 sc (6)
R2: sc around (6)
R3: sc around (6)
Fasten off, leave a tail.
Do not stuff; flatten slightly.
E) Legs / Feet (Tiny)
Make 2 in body colour or a matching pastel shade.
What you’re making: Little feet that help the egg bunny sit and look complete.
R1: MR, 6 sc (6)
R2: (sc, inc) around (9)
R3: sc around (9)
Fasten off, leave a long tail.
Lightly stuff (optional) and flatten.
F) Face (Eyes, Nose, Cheeks)
This is where the personality arrives. Take your time here.
Eyes
- Place safety eyes between Rounds 10 and 12 (roughly), about 6–8 stitches apart, depending on how wide you want the expression.
- If embroidering eyes instead:s titch small vertical ovals or cute sleepy lines using black embroidery thread.
Tip: Pin the ears on temporarily first; sometimes, ear placement changes where the “cutest” eye placement is.
Nose + Mouth (Black Embroidery Thread)
- Embroider a tiny nose (a small “V” or triangle) centred below the eyes.
- Add a short vertical stitch down and a tiny curved smile on one or both sides.
Keep it simple; small details look sweeter on tiny faces.
Pink Blush Cheeks
- Add blush under the eyes using:
- small pink embroidered circles, or
- tiny felt circles, or
- a dusting of cosmetic blush applied lightly with a brush (test first).
G) Assembly (Overview)
You’ll attach: ears → ruffle → arms → feet → finalFacee touches.
Pin everything first for symmetry and that “premium finished” look.
Assembly Instructions
Eye Placement
- Decide the front of the body (the smoothest side).
- Insert safety eyes (or mark eye positions for embroidery) before final shaping.
- Confirm the spacing by holding the ears in place, and adjust if needed.
Attaching Ears Symmetrically
- Pin the ears to the top of the egg, slightly back from the centre.
- Sew each ear in a curved line around the base.
- Make sure both ears match in height and angle.
Sewing Arms and Legs Evenly
- Arms: Attach to the sides, slightly below the ace area roughly around the widest part of the egg.
- Feet: Attach near the lower front so the bunny can sit upright. Keep them evenly spaced.
Attaching the Ruffle Neatly
- Wrap the ruffle around the bod,y around the lower-middle area (where you want the “dress hem/eggshell trim”).
- Pin the band in place, then sew the ends together first.
- Stitch the ruffle to the body with small hidden stitches, catching only the inner edge so the frill stays free and wavy.
Shapinthe Faceee + Finishing Touches
- After sewing, gently squeeze the body to settle stuffing into a smooth egg shape.
- Add blush and final embroidery last so you can place it perfectly under the finished eye position.
Finishing Tips
- Keep stitches tight and even (use a smaller hook if you see gaps).
- Avoid overstuffing it, as it can stretch stitches and make the egg look lumpy.
- Align parts carefully: pin everything and check from the front, sides, and top.
- Hide yarn ends by weaving them through several inner stitches before trimming.
- Shape the body with your hands for a smooth, rounded egg look before declaring it finished.
Beginner Tips
- Use stitch markers every round so you don’t lose track.
- Count stitches at the end of each round, especially during increase/decrease sections.
- Practice the magic ring once or twice on scrap yarn if it’s new to you.
- Pin parts before sewing. Thiss is the easiest way to improve symmetry.
- Work slowly during assembly; the cutest amigurumi are usually the ones assembled with patience.
Customization Ideas
- Make mini keychains by using thinner yarn and adding a small top loop.
- Create a full pastel set: yellow, blue, pink, purple, and white for Easter basket décor.
- Add a tiny bow, flower crown, or a mini felt carrot.
- Change facial expressions: sleepy eyes, a tiny tooth, or a surprised “o” mouth.
- Use velvet/chenille yarn for extra plush texture (use larger eyes and simplify details).Make larger or smaller versionss bychanging the yarnn thickness and hook size.
Why You’ll Love This Pattern
This bunny egg is quick and easy, perfectly on-theme for Easter, and beginner-friendly, yet still charming enough to feel like a special, handmade collectable. It’s highly giftable, adorable in every pastel shade, and looks beautiful when displayed in bowls, baskets, tiered trays, or spring centrepieces.
Conclusion
A cute crochet bunny egg amigurumi is one of those projects that feels joyful from start to finish, fast to make, easy to personalise, and perfect for spring decorating. Choose your favourite pastel, take your time with the Face and ruffle, and enjoy creating a tiny bunny that looks right at home in any Easter setup.