Crochet Purple Monster Doll Amigurumi Pattern
If you’ve been searching for a purple crochet monster amigurumi pattern with tons of personality, this Gengar crochet tutorial is for you. It’s a cute Pokémon-inspired crochet doll that’s compact, collectable, and designed to look expressive without being complicated.
This purple crochet monster amigurumi is adorable because it balances simple shapes with bold details—so it comes together quickly, but still looks “character-like” the moment you add the face. The rounded body keeps things beginner-friendly, while the pointed ears, spiky back protrusions, and wide white grin give you that classic playful “mischief monster” vibe (perfect for fans of Gengar-style designs).
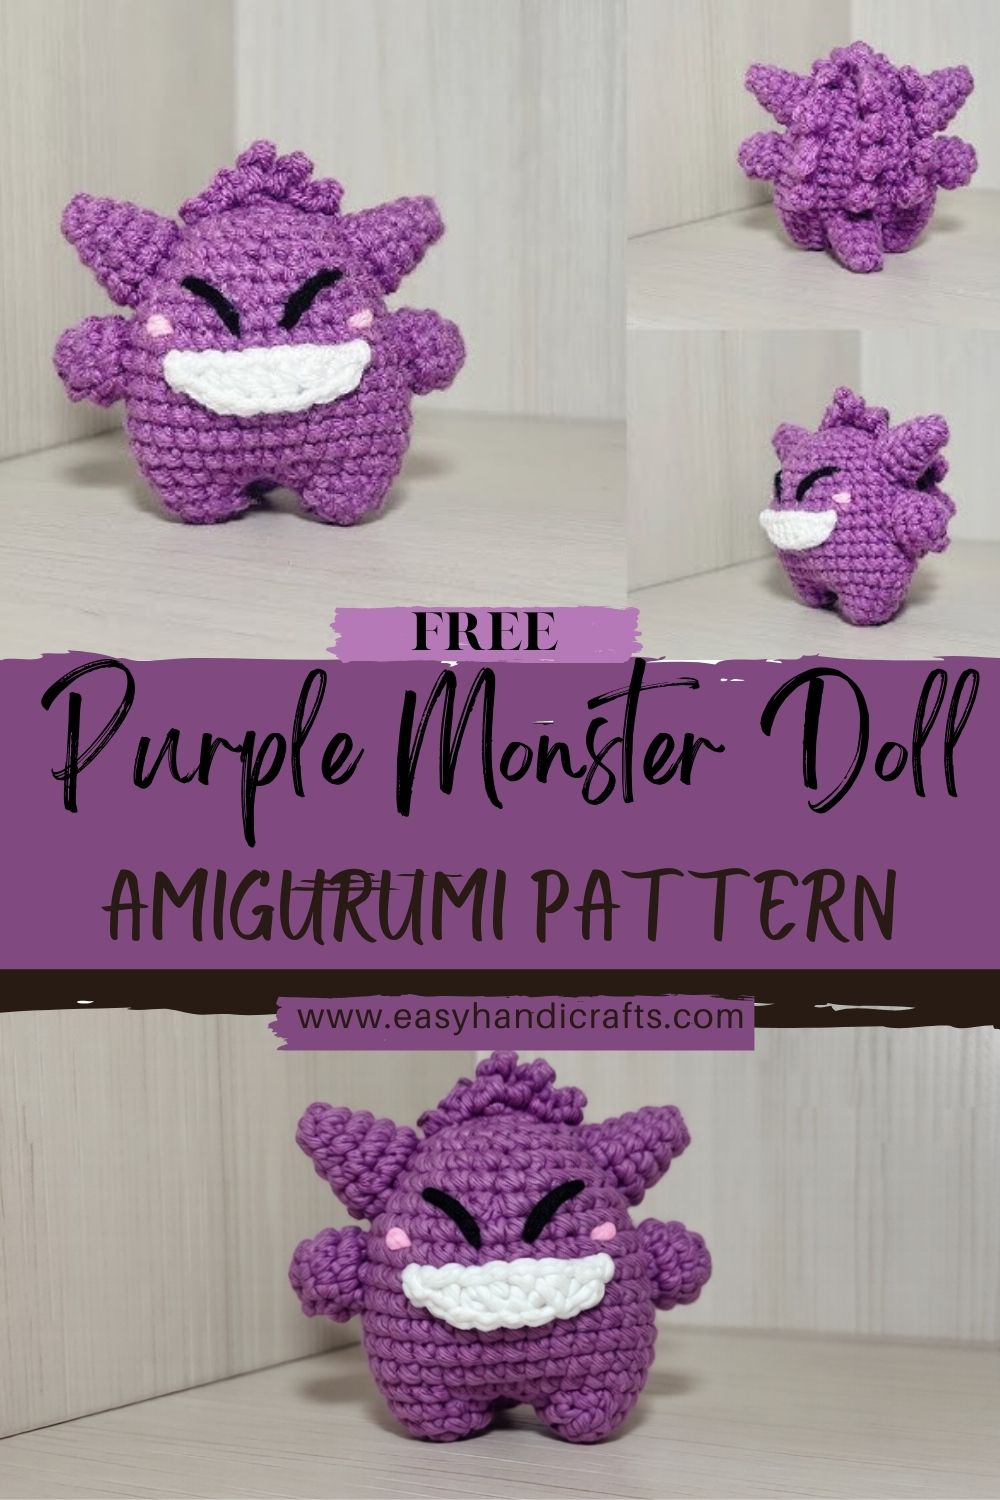
Visually, you’ll create a plump purple body with tiny legs and short arms, then bring it to life with a big white smile, curved embroidered eyes, and soft pink cheek accents. If you love cute monster plushies, game-inspired amigurumi, or pocket-sized collectables, this project hits that sweet spot: fast to crochet, fun to assemble, and extremely giftable. It also makes a great desk buddy, shelf mascot, or craft fair item because it’s small, recognizable, and easy to make in batches.
Materials Needed
Here’s what you’ll need for a clean, sturdy amigurumi finish:
- Purple yarn (recommended: 4-ply cotton yarn)
- White yarn (for the smile/mouth piece)
- Black embroidery thread (eyes + optional mouth outline)
- Pink yarn or pink felt (cheeks)
- Crochet hook (recommended: 3.00 mm)
- Fiberfill stuffing
- Tapestry needle (yarn needle)
- Stitch marker
- Scissors
- Glue (optional) (helpful if using felt cheeks or tiny details)
- Pins for assembly (straight pins or sewing clips)
Optional extras (nice-to-haves): a small brush or blunt tool to shape the stuffing, and a bit of scrap yarn for practice embroidery.
. Stitch Abbreviations (Simple Guide)
- MR – Magic Ring (adjustable loop to start crocheting in the round)
- sc – single crochet
- inc – increase (2 sc in the same stitch)
- dec – decrease (combine 2 stitches into 1; invisible decrease recommended)
- sl st – slip stitch (join or move without adding height)
- ch – chain
- BLO / FLO – back loop only / front loop only (used sometimes for shaping edges; optional here)
Finished Doll Description
Your finished doll will look like a tiny, collectable purple monster with a rounded plush body and a confident, cheeky attitude. At the top sit two pointed ears, slightly angled outward to create that iconic silhouette. The short arms stick out just enough to look playful, while the small legs help the character sit upright like a little desk guardian.
The face is where the charm really shows: a wide white smile stretches across the front, giving the character its friendly-mischief vibe. Above it, curved embroidered eyes (like happy, squinty crescents) make it look cute rather than scary. Add pink cheek accents for extra sweetness. On the back, multiple spiky protrusions create texture and give the doll that “monster” feel from every angle—especially when viewed from the side or on display.
Step-by-Step Crochet Pattern
Pattern Notes (Quick + Helpful)
- Work in continuous rounds (spiral) unless stated otherwise.
- Use a stitch marker to mark the first stitch of each round.
- Keep stitches tight to prevent stuffing from showing through.
- This pattern is written in a classic amigurumi style, sized for 4-ply cotton + 3.00 mm hook.
- Final size varies by tension, but expect a small palm-sized figure.
A) Head and Body (Purple Yarn)
What you’re making: One main piece that forms the head and body together (simple, sturdy, and beginner-friendly).
Shape: A round “bean-ball” that’s slightly wider in the middle.
Round 1: MR, 6 sc (6)
Round 2: inc around (12)
Round 3: (sc, inc) around (18)
Round 4: (2 sc, inc) around (24)
Round 5: (3 sc, inc) around (30)
Round 6: (4 sc, inc) around (36)
Rounds 7–12: sc around (36)
Round 13: (4 sc, dec) around (30)
Round 14: sc around (30)
Round 15: (3 sc, dec) around (24)
Round 16: (2 sc, dec) around (18)
Stuffing tip: Start stuffing firmly here. Keep the body round, and push stuffing into the sides so the surface stays smooth.
Round 17: (sc, dec) around (12)
Add a little more stuffing, especially at the base, so it sits nicely.
Round 18: dec around (6)
Fasten off, close the hole, and weave in the end.
How it contributes to the final look: This simple, rounded base is what makes the character feel cute and compact, perfect for a “collectable” style.
B) Arms (Make 2, Purple Yarn)
What you’re making: Two short arms, with small details that add character without extra complexity.
Shape: Tiny tubes, lightly stuffed or left unstuffed for a softer look.
Round 1: MR, 6 sc (6)
Rounds 2–4: sc around (6)
Lightly stuff (optional), flatten the opening.
Fasten off, leave a long tail for sewing.
Guidance: If you want “stubby cute” arms, keep them short (3 rounds). If you want slightly longer arms, add 1–2 extra rounds.
C) Legs (Make 2, Purple Yarn)
What you’re making: Two small legs/feet that help it sit.
Shape: Little rounded nubs.
Round 1: MR, 6 sc (6)
Round 2: (sc, inc) around (9)
Rounds 3–4: sc around (9)
Lightly stuff, flatten.
Fasten off, leave a long tail.
How it contributes: The tiny legs give the doll that squat, chibi-like stance that looks especially cute on a shelf or desk.
D) Ears (Make 2, Purple Yarn)
What you’re making: Two pointed ears to create the recognizable monster silhouette.
Shape: Small cones/triangles.
Round 1: MR, 4 sc (4)
Round 2: (sc, inc) around (6)
Round 3: sc around (6)
Round 4: (2 sc, inc) around (8)
Round 5: sc around (8)
Fasten off, leave a long tail.
Tip: Don’t overstuff ears. Most of the time, ears look better unstuffed or with just a pinch of stuffing at the base.
E) Back Spikes (Make 5–7, Purple Yarn)
What you’re making: A row (or cluster) of spiky protrusions that gives the back texture and that classic “monster” outline.
Shape: Small cones, similar to tiny ears.
Small Spike (make several):
- Round 1: MR, 4 sc (4)
- Round 2: (sc, inc) around (6)
- Round 3: sc around (6)
Fasten off, leave a sewing tail.
Make a mix of sizes (optional but cute):
For 1–2 slightly larger spikes, add:
- Round 4: (2 sc, inc) around (8)
- Round 5: sc around (8)
Placement note: Spikes look best arranged from the upper back down to the lower back, centred, with the largest near the middle.
F) Smile / Mouth Piece (White Yarn)
What you’re making: A big white grin that becomes the focal point of the character.
Shape: A curved oval/crescent-like patch.
Row 1: ch 11
Starting in 2nd ch from hook: sc 10 (10)
Row 2: ch 1, turn, inc, sc 8, inc (12)
Row 3: ch 1, turn, sc 12 (12)
Fasten off, leave a long tail for sewing.
How it contributes: The oversized smile is what makes the doll read as playful and friendly, even with simple eyes.
Optional “teeth” detail:
Use purple yarn or black thread to stitch a few short vertical lines on the smile to suggest teeth segments. Keep it subtle and evenly spaced.
G) Face Details (Embroidery + Cheeks)
Curved Eyes (Black Embroidery Thread)
What you’re making: Two curved “happy” eyes.
- Thread black embroidery thread on a needle.
- Stitch two curved lines above the smile, angled slightly upward on the outer ends (like gentle crescents).
- Repeat a second pass over the same line for bolder eyes.
Beginner tip: Practice the curve on scrap fabric/yarn first; it helps a lot.
Pink Cheeks (Pink Yarn or Felt)
Option 1: Felt cheeks (fast + clean)
- Cut two small ovals/circles of pink felt.
- Glue or sew them on under/near the eyes, spaced evenly.
Option 2: Tiny crocheted cheeks (soft look)
Make 2: MR, 6 sc, sl st to close. Fasten off and sew on.
H) Assembly (Overview Before Sewing)
Before stitching anything permanently:
- Use pins to test the placement of ears, arms, legs, smile, and spikes.
- Step back and look at it from the front and the side; small adjustments can make a big difference in expression.
Assembly Instructions (Placement + Polished Details)
Ears Placement
- Pin ears on the top of the head, spaced evenly left and right.
- Angle them slightly outward for a playful look.
- Sew around the base of each ear with small, neat stitches.
Attach Arms and Legs Evenly
- Legs: Place on the lower front underside so the doll can sit. Sew firmly.
- Arms: Place on the sides, slightly below the body’s widest point. Make sure they match the height on both sides.
Sew the White Smile
- Centre the smile on the front of the body.
- Pin it first, then sew around the edge with white yarn (or use a matching sewing thread).
- Shape it gently as you sew, so it curves naturally. This is what makes it look expressive rather than flat.
Embroider the Curved Eyes Neatly
- Position eyes above the smile, leaving enough space so the face doesn’t feel crowded.
- Keep both curves similar in length and angle.
- Knot securely inside the body, then weave the ends through the stuffing area to hide them.
Place the Pink Cheek Details
- Cheeks look best slightly outward from the smile, under the eyes.
- Keep them symmetrical. If using felt, a tiny dot of glue is enough to avoid oversaturating the yarn.
Attach Back Spikes Symmetrically
- Arrange spikes down the centre of the back.
- Start with one in the upper centre, then add the next just below it, building a neat line.
- Mix sizes for a more “designed” look (largest near the middle, smaller near top/bottom).
Final Shaping
- Roll the doll gently between your hands to smooth the stuffing.
- Press lightly at the base to help it sit.
- Adjust ear angles and spike direction before stitches are fully tightened.
Finishing Tips
- Keep stitch tension even for a smooth, premium amigurumi surface.
- Do not overstuff, as overstuffing stretches stitches and can distort the smile area.
- Pin all parts before sewing (especially the smile and eyes).
- Check symmetry from multiple angles before final attachment.
- Hide yarn ends by weaving them through several stitches inside the body, then trimming.
- Take your time shaping the smile; a clean curve is what gives the character its signature expression.
Beginner Tips
- Use a stitch marker every round so you never lose your place.
- Count stitches at the end of each round—most shaping issues come from missed increases/decreases.
- Crochet tightly to prevent fiberfill from showing through.
- Assemble slowly: the “cute” factor often comes from careful placement.
- If embroidery feels intimidating, practice the curved eyes on a scrap piece first (even 2 minutes of practice helps).
Customization Ideas
- Mini keychain version: use thinner yarn and a smaller hook; add a loop on top for a keyring.
- Plush desk ornament: use plush/velvet yarn for a softer, squishier look (embroider larger eyes so they’re visible).
- Change the expression: turn eyes into open ovals, add tiny eyebrows, or make a winky eye.
- Extra blush or freckles: add small pink stitches instead of felt circles.
- Accessories: a tiny bow, a mini scarf, or a little “spooky” cape.
- Different sizes for a gift set: make a small, medium, and large version using different yarn weights.
Why Crafters Will Love This Pattern
This pattern is cute and instantly recognizable as a playful monster style, but it’s still satisfying because you get to build personality through the face, smile shaping, and those spiky back details. It’s fun for fans of game-inspired amigurumi, highly giftable, visually striking on display, and practical for craft fairs because it works up quickly and looks great in multiple colourways.
Conclusion
This purple crochet monster amigurumi pattern is a joyful make: simple construction, big personality, and lots of room to add your own twist. Whether you’re crocheting it as a collectable, a handmade gift, or a desk buddy, take your time with the face and assembly and enjoy watching that mischievous smile come to life stitch by stitch.