Chubby Crochet Penguin Amigurumi | Handmade Grey & Orange Bird Plush Gift
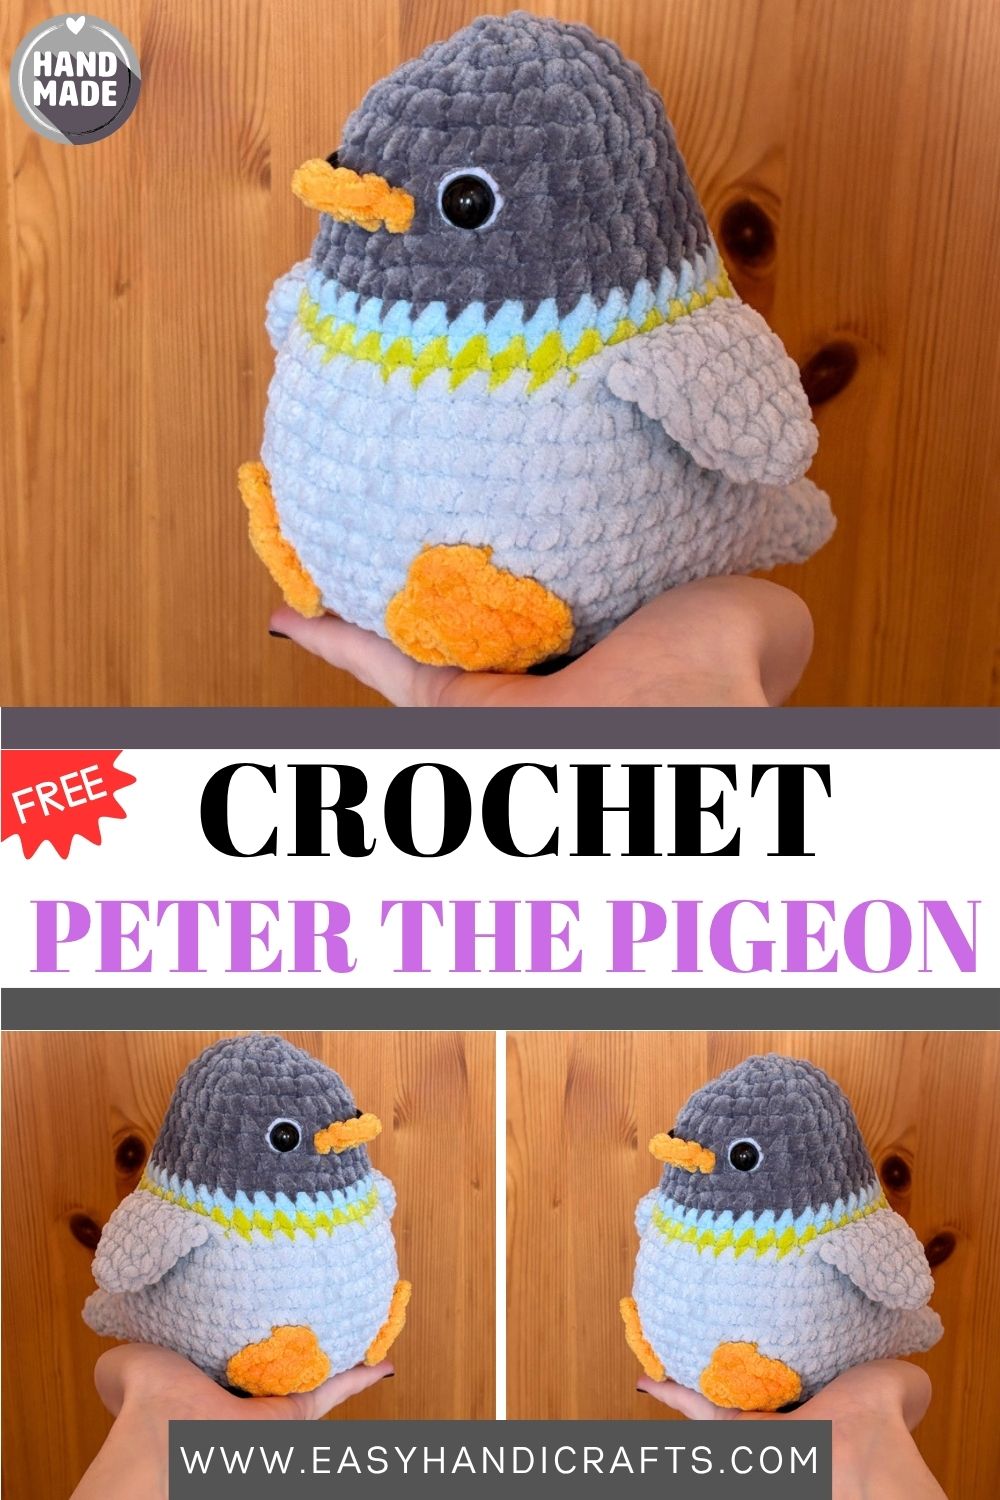
He’s round. He’s grey. He has the most perfect little orange beak and feet, and that zigzag band around his middle like he got dressed up for something important. This handmade crochet penguin is chunky, realistic, and lives in one hand but takes up a lot more space in your heart.
Penguins have always been among the most beloved animals in the world of amigurumi, and this chubby grey and orange version is about to become your new favorite project. Unlike most penguin patterns, this one builds the beak directly into the body during construction rather than sewing it on separately afterward. This creates a seamless, professional finish that looks clean and intentional from every angle. Furthermore, the color stripe sequence dark grey body, blue band, green band, then light grey gives this penguin a distinctly modern and playful look that sets it apart from classic black and white designs. In addition, the flat folded wings, the decorative feet worked in slip stitch and double crochet, and the gently tapered tail all contribute to a finished piece that feels genuinely detailed and well-crafted. The white felt eye backing adds a soft highlight that elevates the face from cute to completely irresistible. Whether you are making this penguin as a gift, a keepsake, or simply because you cannot resist a squishy, round bird, this pattern delivers a finished result that is around 14 cm tall and absolutely full of personality.
Skill Level
Intermediate. Single crochet in continuous rounds is the foundation throughout. Additionally, color changes, a beak integration technique, and decorative foot construction introduce satisfying new skills at a comfortable pace.
Materials You Will Need
Yarn:
- Dark grey for the head and upper body
- Light grey for the lower body, wings, and tail
- Blue for the color band
- Green for the color band
- Orange for the beak and feet
Other Supplies:
- Crochet hook — 5mm
- Safety eyes — 12mm
- White felt circles — 14mm diameter for eye backing
- Scissors
- Stuffing
- Stitch marker
- Sewing needle
- Ami-Sticks or similar positioning tools (optional but helpful)
Abbreviations
- MR — Magic Ring
- SC — Single Crochet
- INC — Increase (2 sc in same stitch)
- DEC — Decrease (invisible)
- SLST — Slip Stitch
- CH — Chain
- DC — Double Crochet
- F.O. — Fasten Off
Pattern: Beak
Using orange yarn
R1: 6 sc in MR (6)
Fasten off. Do not slip stitch into the first stitch. The beak will be crocheted directly onto the body during R8 construction.
Pattern: Wings — Make 2
Using light grey yarn
R1: 6 sc in MR (6) R2: (sc, inc) x3 (9) R3: (2sc, inc) x3 (12) R4–5: sc around for 2 rounds (12)
Fold the wing in half and work 6 sc along the top edge through both layers to close it flat. Fasten off and leave a long tail for sewing.
Pattern: Feet — Make 2
Using orange yarn
R1: 8 sc in MR (8)
R2: (slst in next stitch, ch1, dc in next stitch, ch1, slst in same stitch) x3, slst x2
Fasten off and leave a long tail for sewing. The slip stitch and double crochet sequence creates three small pointed toes that give the feet their distinctive webbed bird appearance.
Pattern: Tail
Using light grey yarn
R1: 4 sc in MR (4) R2: (sc, inc) x2 (6) R3: (2sc, inc) x2 (8) R4: (3sc, inc) x2 (10) R5: (4sc, inc) x2 (12) R6: (5sc, inc) x2 (14) R7: (6sc, inc) x2 (16)
Fasten off and leave a long tail for sewing.
Pattern: Body
Starting with dark grey yarn
R1: 6 sc in MR (6) R2: inc x6 (12) R3: (sc, inc) x6 (18) R4: (2sc, inc) x6 (24) R5: (3sc, inc) x6 (30) R6–7: sc around for 2 rounds (30)
R8: 14 sc, then work 3 sc through both the body and beak together, then 13 sc (30)
How to join the beak on R8: Insert your hook through the beak and the body simultaneously for each of the 3 joining stitches.
R9: (4sc, inc) x6 (36) R10: sc around (36)
Add safety eyes between R7 and R8, 2 stitches away from the beak on both sides. Place white felt circles behind each eye before locking the backing in place for a soft highlight effect.
Switch to blue yarn. R11: sc around (36)
Switch to green yarn. R12: sc around (36)
Switch to light grey yarn. R13: (5sc, inc) x6 (42) R14: (6sc, inc) x6 (48) R15–20: sc around for 6 rounds (48) R21: (6sc, dec) x6 (42) R22: (5sc, dec) x6 (36) R23: (4sc, dec) x6 (30)
Begin stuffing firmly at this point. Continue adding stuffing gradually through the remaining rounds.
R24: (3sc, dec) x6 (24) R25: (2sc, dec) x6 (18) R26: (sc, dec) x6 (12) R27: dec x6 (6)
Fasten off, weave in ends, and close the hole securely.
Assembly
Sew the wings just below R12, one stitch away from the eye on each side.
Sew the feet between R18–21 in line with the eyes. Attach the top point of each foot at R18 and the bottom part at R21 for a natural sitting position.
Sew the tail between R18–21 at the center back of the body.
Customization and Variation Ideas
- First, swap the blue and green color bands for any two colors you love. Mustard yellow and rust orange create a warm autumn palette that feels completely different from the original.
- Additionally, use a pastel color scheme throughout soft lavender body with pink and mint bands for a dreamy kawaii penguin variation that photographs beautifully.
- Moreover, add a tiny crocheted bow or hat on top of the head using scrap yarn. A small beanie hat worked in the round fits perfectly and adds enormous personality.
- Furthermore, try making the feet slightly larger by starting with 10 sc in the magic ring instead of 8. Bigger feet give the penguin an even more comical and endearing silhouette.
- Also, use variegated yarn for the light grey lower body section. The subtle color shifts through the decreasing rounds create a beautiful textured effect without any extra work.
- Finally, make a family set in three sizes using different yarn weights — bulky for a large parent penguin, worsted for a medium, and fingering weight for a tiny baby. All three use the same pattern at different scales.
Common Mistakes to Avoid
- First, fastening off the beak incorrectly: Do not slip stitch before fastening off the beak. The open edge needs to remain free for the body integration technique on R8.
- Additionally, misplacing the beak join on R8: Count carefully to place the beak at the exact center front of the body. An off-center beak is the most immediately noticeable error on the finished face.
- Also, adding eyes too late: The safety eyes must go in between R7–8 while the inside of the body is still accessible. Place them immediately after completing R10 before the body grows any further.
- Furthermore, skipping the felt backing: The white felt circles make a significant visual difference to the finished face. Without them the eyes sit flat and the expression loses much of its charm.
- Moreover, stuffing too early or unevenly: Begin stuffing at R23 as instructed and add small amounts consistently through each remaining round. Waiting until the very end makes even stuffing nearly impossible.
- Finally, sewing wings at the wrong height: The wings attach just below R12 which is the green color band. Placing them higher or lower disrupts the color balance and makes the penguin look uneven from the front.
Finishing Tips
- First, when closing the hole after R27, thread the yarn tail through the remaining 6 stitches using a tapestry needle and pull tight before knotting. This creates a completely smooth and seamless base.
- Additionally, after sewing on the wings, fold each one slightly forward rather than flat against the body. This small adjustment gives the finished penguin a more three-dimensional, lifelike stance.
- Moreover, press each felt circle firmly against the back of the safety eye before clicking the backing in place. A well-seated felt backing does not shift or wrinkle after assembly.
- Furthermore, when sewing the tail, anchor it at both the top and bottom edges for a secure attachment that does not flip or fold away from the body with handling.
- Also, use matching dark grey yarn to sew the wings and matching light grey yarn to sew the tail and feet. Using the correct color for each element keeps all join stitches invisible.
- Finally, give the finished penguin a gentle overall squeeze and reshape after assembly. This settles the stuffing evenly and smooths out any bumps that appeared during the closing rounds.
Gifting Ideas
- First, place the finished penguin inside a small gift box lined with blue tissue paper and a few white paper snowflakes for a wintery presentation that requires almost no additional effort.
- Additionally, pair the penguin with a small handwritten note sharing the yarn colors and hook size used. Recipients who craft themselves always appreciate knowing the details behind a handmade piece.
- Moreover, these penguins make wonderful gifts for children of all ages. If making for very young children, embroider the eyes using black thread instead of safety eyes for a completely safe finished toy.
- Furthermore, make a matching penguin in a different color stripe combination for each person in a family and present them together as a personalized penguin family set.
- Also, attach a small ornament hook to the top of the finished penguin for a handmade Christmas decoration that can be displayed on a tree year after year.
- Finally, these penguins sell beautifully at winter craft markets. The color stripe detail and distinctive beak-integrated face make them stand out immediately from standard amigurumi at any display table.
Conclusion
This chubby penguin amigurumi is one of those patterns that teaches you something genuinely new while remaining completely enjoyable from start to finish. The beak integration technique alone is worth learning for the clean, seamless result it produces. Furthermore, the color stripe sequence keeps every round feeling fresh and visually interesting rather than repetitive. Therefore, count your stitches carefully on the beak joining row, place your eyes precisely, and take your time with the felt backing detail. In addition, sew every piece on with care. The wings, feet, and tail together create the finished silhouette and each one contributes to the overall balance of the piece. In conclusion, this little grey penguin is waiting for its orange beak and webbed feet. All you need to do is pick up your hook and start.