Creative Crochet Lucky God of Wealth Chan Chan Step-by-Step Pattern
Bright red and golden yellow yarn bring instant celebration to a crochet hook. Crochet Lucky God of Wealth Amigurumi charm feels perfect for a festive shelf, desk corner, or entryway display.
Round cheeks, a smiling face, and wide sleeves give a friendly look that suits a crochet lucky doll. God of wealth amigurumi-style turns into a festive crochet toy that also works as a beginner crochet project and a handmade lucky charm.
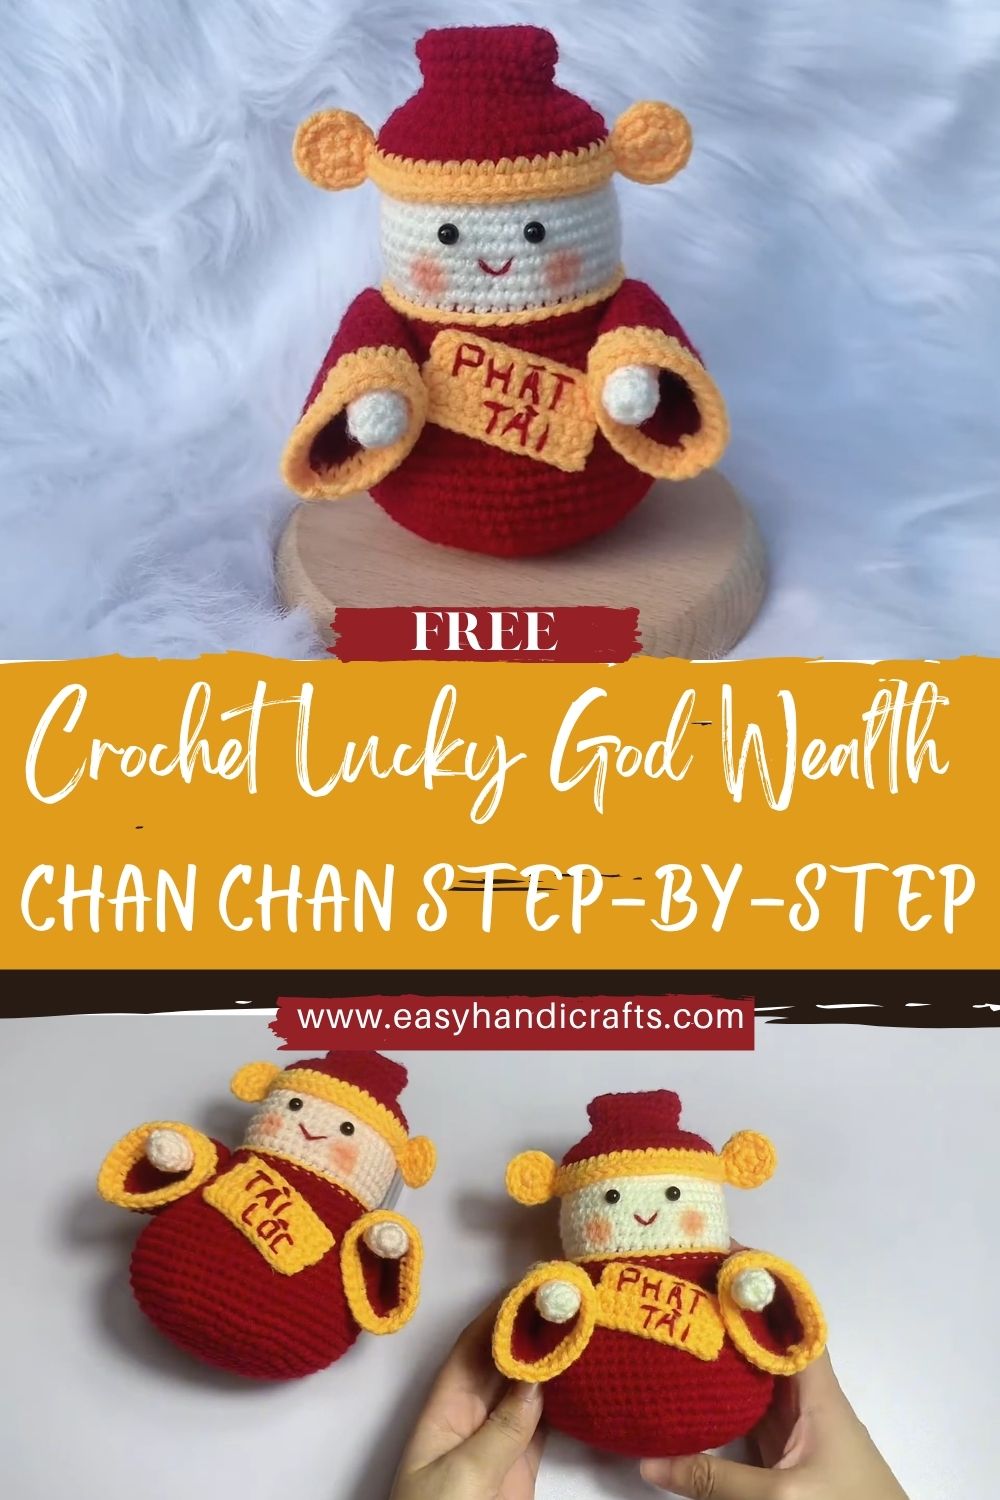
Lucky dolls and prosperity symbols have long been used as cheerful reminders of abundance, success, and good energy. Red often represents joy and celebration, while golden yellow tones are associated with wealth and luck, so a small doll in those colors feels meaningful without needing many extra details.
Traditional inspiration shines through in a cute, chubby shape, tiny ears, and an outfit with a front panel that can hold decorative text or a symbolic design. Handmade gifts feel more personal during holidays and special occasions, and a small amigurumi like this can sit on a desk, hang as decor, or become a centerpiece for a festive corner.
Materials Needed
- Red yarn (main outfit): 35 g DK or worsted weight
- Yellow yarn (details and trim): 15 g
- White yarn (face): 20 g
- Black yarn (facial embroidery): 2 g (or black embroidery floss)
- Crochet hook size: 3.0 mm to 3.5 mm (pick smaller for tighter stitches)
- Safety eyes: 6 mm (optional) or embroider eyes with black yarn
- Stuffing: 40 to 60 g polyester fiberfill
- Tools: needle, stitch marker, scissors
- Optional decorative embroidery thread: 1 to 2 m (gold or red works nicely)
Finished size: about 12-15 cm tall, depending on the yarn and hook size.
Abbreviations
- MR: magic ring
- sc: single crochet
- inc: increase (2 sc in one stitch)
- dec: decrease (single crochet 2 together)
- sl st: slip stitch
- ch: chain
Skill Level
Beginner / Easy Beginner
Simple rounds, basic increases and decreases, and small parts that repeat. Outfit details are mostly color changes and easy shaping.
Estimated Time
- Total time: 3 to 5 hours
- Head: 60 to 90 minutes
- Body: 60 to 90 minutes
- Outfit and accessories (sleeves, hat, panel): 45 to 75 minutes
- Assembly and embroidery: 30 to 60 minutes
Important Notes Before Starting
- Work in continuous rounds unless stated otherwise.
- Keep stitches tight to avoid stuffing showing through.
- Stuff gradually for a smooth, round shape.
- Maintain symmetry by counting rows and pinning parts before sewing.
- Use a stitch marker to track the first stitch of each round.
Step-by-Step Pattern
Color guide:
- White for the head and face area
- Red for the outfit and body
- Yellow for trim, hat details, and front panel accent
Head
- Round 1: MR, 6 sc (6)
- Round 2: inc x6 (12)
- Round 3: (sc, inc) x6 (18)
- Round 4: (2 sc, inc) x6 (24)
- Round 5: (3 sc, inc) x6 (30)
- Round 6: (4 sc, inc) x6 (36)
- Rounds 7 to 10: sc around (36)
Eye placement guidance
8. Place eyes between Rounds 8 and 9, about 6 to 7 stitches apart.
- Embroidered eyes: Mark the spots with pins first.
Next, shape the top.
- Round 11: (4 sc, dec) x6 (30)
- Round 12: (3 sc, dec) x6 (24)
- Round 13: (2 sc, dec) x6 (18)
Stuff before closing
12. Add stuffing firmly but gently, focusing on cheeks and sides.
- Round 14: (sc, dec) x6 (12)
- Round 15: dec x6 (6)
- Fasten off, close the opening, and weave in the end.
Body (Round, chubby shape withan outfit feel)
Switch to red yarn for a traditional outfit look.
- Round 1: MR, 6 sc (6)
- Round 2: inc x6 (12)
- Round 3: (sc, inc) x6 (18)
- Round 4: (2 sc, inc) x6 (24)
- Round 5: (3 sc, inc) x6 (30)
- Round 6: (4 sc, inc) x6 (36)
Next, add height.
- Rounds 7 to 11: sc around (36)
Then, taper slightly toward the neck.
- Round 12: (4 sc, dec) x6 (30)
- Round 13: sc around (30)
- Round 14: (3 sc, dec) x6 (24)
Stuff the body.
- Add stuffing gradually for a squat, chubby shape.
- Round 15: sc around (24)
- Fasten off, leave a long tail for sewing to the head.
Join with the head or crochet as one piece.
- Sewing method: stitch the ead tto the dy with tight whip stitches, mamatching the nt center points.
- One-piece option: keep the head attached and continue the body directly after Round 10 of the head, switching to red and increasing into the body rounds.
Arms (Wide sleeve-style arms)
Make 2 in red. Sleeves should look roomy rather than narrow.
- Round 1: MR, 6 sc (6)
- Round 2: (sc, inc) x3 (9)
- Round 3: (2 sc, inc) x3 (12)
- Rounds 4 to 6: sc around (12)
- Round 7: (2 sc, dec) x3 (9)
- Round 8: sc around (9)
- Lightly stuff only the top half; keep the cuff soft.
- Flatten opening and close with 4 to 5 sc through both layers.
- Fasten off, leave a tail for sewing.
Attach on both sides of the body, slightly forward for a welcoming pose.
Hands (Small round shapes)
Make 2 in yellow or white.
- Round 1: MR, 6 sc (6)
- Round 2: inc x6 (12)
- Round 3: sc around (12)
- Round 4: (2 sc, dec) x3 (9)
- Lightly stuff.
- Round 5: dec x4 (5)
- Fasten off, close.
Attach inside sleeves so hands peek out.
Ears (Small, rounded ears)
Make 2 in white.
- Round 1: MR, 5 sc (5)
- Round 2: inc x5 (10)
- Round 3: sc around (10)
- Flatten and sew slightly curved.
Attach near the upper sides of the head, around eye level or a bit higher.
Hat (Simpl,e rounded hat with trim)
Use yellow for the base, then add a red accent.
- Round 1: MR, 6 sc (6)
- Round 2: inc x6 (12)
- Round 3: (sc, inc) x6 (18)
- Round 4: (2 sc, inc) x6 (24)
- Round 5: (3 sc, inc) x6 (30)
- Round 6: sc around (30)
- Round 7: sc around (30)
- Switch to red: Round 8: sc around (30)
- sl st, fasten off.
Sethe wore what was centered on top of the head. Front Panel and Clothing Detail (Decorative text style)
Make a small flat panel in yellow, then embroider a simple symbol-like design in red or black.
- Ch 9
- Row 1: sc in 2nd ch from hook and across (8)
- Rows 2 to 5: ch 1, turn, sc across (8)
- Fasten off, leave a tail for sewing.
Add embroidery detail
- Use a few straight stitches to create a simple block-character look.
- Keep it symbolic and decorative, such as a square frame, vertical lines, or a “coin” motif.
- Optional: outline panel edge with red running stitches.
Sew the panel to the front center of the body.
Facial Details (Friendly expression)
- Eyes: safety eyes already placed, or embroider small curved eyes.
- Smile: embroider a soft upward curve with black yarn.
- Blush: add two small pink or red stitches on cheeks, or use a tiny dab of blush pencil.
Keep expression gentle and welcoming.
Assembly
- Sew head to body, align centers carefully.
- Attach ears near the upper sides of the head.
- Sew the arms to the sides of the body, then stitch the hands into the sleeve openings.
- Attach the hat on top.
- Sew the front panel onto the outfit neatly.
Ensure balance and neat finishing by checking from the front, sides, and back before tightening knots.
Finishing Touches
- Shape the body by rolling gently between your hands to smooth the stuffing.
- Adjust the stuffing through the seams before fully closing the final stitches.
- Hide yarn ends inside the doll and trim neatly.
- Add extra stitches where pieces might pull, especially the arms and the head join.
Tips for Beginners
- Keep tension even for a clean, polished look.
- Work slowly and count rounds out loud or on a metronome.
- Use stitch markers on the first stitch and also on eye placement spots.
Common Mistakes
- Loose stitches that show stuffing
- Uneven face because the eyes sit at different heights
- The wrong placement of arms makes the doll look unbalanced
- Overstuffing that stretches stitches and flattens the outfit’s shape
Customization Ideas
- Different outfit colors: emerald and gold, pink and yellow, or classic red with white trim
- Add accessories: tiny coin pouch, mini ingot shape, or a small tassel
- Create a festive set: pair with a lucky cat, mini lantern, or coin garland
- Make a keychain version by shrinking the yarn weight and adding a small loop
Conclusion
Festive yarn colors and a sweet smiling face turn a simple project into a meaningful decoration. Crochet Lucky God of Wealth Amigurumi style brings the symbolism of prosperity into a soft, friendly crochet lucky doll that feels great for gifting and displaying.
Enjoy stitching a handmade lucky charm that can sit proudly on a shelf or be part of seasonal decor year after year.