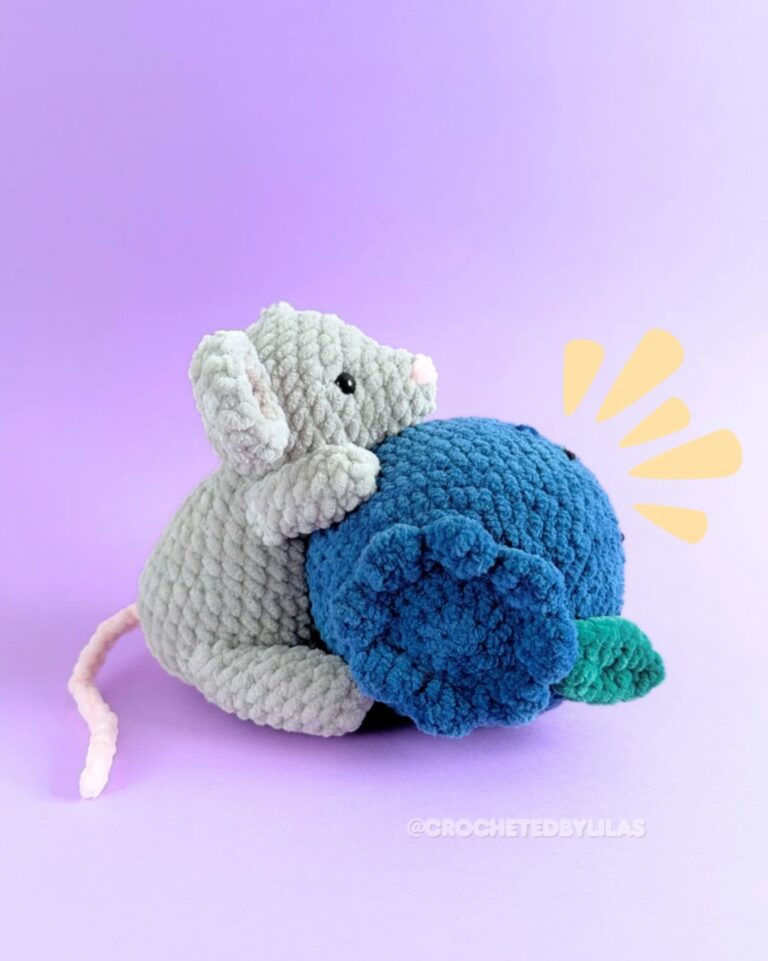
Fearless Crochet Capybara Duck Float Keychain Amigurumi Pattern
Dive into fun with the Fearless Crochet Capybara Duck Float keychain. Beginner-friendly, stash-busting, and delightfully quick, it delivers playful personality and poolside whimsy in every stitch.
Turn tiny stitches into big smiles with the Fearless Crochet Capybara Duck Float Keychain Amigurumi Pattern. This splash-ready mini makes a fast, satisfying project for beginners and a playful palette-cleanser for seasoned makers. Clear step-by-step guidance, minimal yarn, and simple shaping deliver a polished finish, while color swaps and optional accessories keep it uniquely yours. 
The brave little capybara riding a sunny duck float adds poolside charm to everyday carry, photos, and gifts proof that small projects can be bold, buoyant, and unforgettable.
Uses:
- Cheerful bag charm or keyring that starts conversations
- Quick handmade gift or party favor for beach, pool, or summer themes
- Cute craft-fair best-seller for animal lovers and kawaii fans
Fearless Crochet Capybara Duck Float Keychain Amigurumi Pattern
To begin with, let’s make a tiny splash of joy with a fearless crochet capybara riding a duck float. As a result, you’ll get a beginner-friendly amigurumi keychain that works up quickly, looks adorable, and makes a thoughtful gift. Moreover, the steps are simple, the yardage is minimal, and the transitions are smooth, so you can follow along confidently. In addition, the design is easily customizable and portable, which means you can crochet on the go. Ultimately, you’ll finish a charming keychain that brightens bags, keys, and craft fair tables alike.
Materials
- DK/Light worsted cotton yarn (Category 3)
- Color A: Light brown/tan for capybara, 25 g (approx. 75 m)
- Color B: Sunny yellow for float, 15 g (approx. 45 m)
- Color C: Orange for beak, 2 g (approx. 6 m)
- Optional: Black embroidery thread, 1 m for nose/eyes
- Crochet hook: 2.75 mm (US C-2), for tight amigurumi fabric
- Safety eyes: 6 mm (pair)
- Fiberfill stuffing: 10–15 g
- Tapestry needle: 6–7 cm (size 16–18)
- Stitch markers: 2–3 locking markers
- Keychain hardware: 25–30 mm split ring + 8–10 mm jump ring (optional 12 mm lobster clasp)
- Scissors and straight pins
- Optional: Fabric glue and a dab of blush
Consequently, your finished size will be about 7–8 cm (2.75–3.25 in) tall, while the float’s outer diameter will measure roughly 5.5–6.5 cm (2.2–2.6 in) with a thickness of 1.2–1.5 cm (0.5–0.6 in). However, size will vary slightly based on yarn and tension.
Level of Difficulty
Overall, this pattern is beginner-friendly (confident beginner). Specifically, you should know a magic ring, single crochet, increases, and invisible decreases; nevertheless, each step is explained clearly so first-timers feel supported.
Special Features
- First, the head and body are worked in one piece for minimal sewing.
- Next, the entire project is worked on in continuous rounds without joining.
- Furthermore, shaping is simple, stash usage is low, and results are polished.
Abbreviations (US terms)
MR (magic ring), sc (single crochet), inc (2 sc in one stitch), dec (invisible decrease), sl st (slip stitch), st(s) (stitch/es), BLO/FLO (back/front loop only).
Sizing Tips and Gauge
- For a smaller keychain, use sport-weight yarn with a 2.25 mm hook; for a chunkier plush, use worsted with a 3.25 mm hook.
- Similarly, aim for a tight fabric so stuffing doesn’t peek through; if gaps appear, simply size down your hook.
- Additionally, keep your tension consistent to maintain smooth shaping.
Step-by-Step Instructions: Capybara + Duck Float
Note: Times are estimates and include stuffing and placement.
- Capybara Head-to-Body (one piece) Time: 60–75 minutes
To start, work with Color A (tan) and place a marker in the first stitch of each round.
- R1: MR, 6 sc (6)
- R2: inc around (12)
- R3: (sc, inc) x6 (18)
- R4: (2 sc, inc) x6 (24)
- R5–R7: sc around (24)
- R8: (3 sc, inc) x6 (30)
- R9–R11: sc around (30)
At this point, place 6 mm safety eyes between R9 and R10, approximately 7–8 sts apart. - R12: (3 sc, dec) x6 (24)
- R13: (2 sc, dec) x6 (18); gently stuff the head now and continue stuffing as you go.
- R14: (2 sc, inc) x6 (24)
- R15: (3 sc, inc) x6 (30)
- R16–R18: sc around (30)
- R19: (3 sc, dec) x6 (24)
- R20: (2 sc, dec) x6 (18)
- R21: (sc, dec) x6 (12)
- R22: dec around (6)
Finally, fasten off and close the opening. Then, embroider a tiny nose and mouth with black thread for personality.
- Ears (make 2) — Time: 8–10 minutes
First, with Color A, work:
- R1: MR, 6 sc (6)
- R2: sc around (6)
Afterward, fasten off and leave a long tail. Next, flatten into small ovals and, for symmetry, pin before sewing to the top sides of the head.
- Arms (make 2) Time: 10–12 minutes
Similarly, with Color A:
- R1: MR, 6 sc (6)
- R2–R3: sc around (6)
Then fasten off with a long tail. Because the arms will “hug” the float, either do not stuff or stuff very lightly.
- Legs (make 2) Time: 10–12 minutes
Again, with Color A:
- R1: MR, 6 sc (6)
- R2: sc around (6)
Next, fasten off with a long tail. Light stuffing is optional; however, keep them slim so they peek out neatly.
- Duck Float Tube (ring) Time: 35–45 minutes
To create the ring, use Color B (yellow).
- R1: MR, 10 sc (10)
- R2–R22: sc around (10), lightly stuffing as you go until the tube measures 12–14 cm (4.75–5.5 in).
Meanwhile, test-fit the tube around the capybara’s belly. If it’s short, simply add rounds; if it’s long, remove a few. Next, wrap the tube around the belly and whipstitch or mattress-stitch the ends together. Finally, rotate the seam to the back for a clean finish.
- Duck Head — Time: 12–15 minutes
Now, with Color B:
- R1: MR, 6 sc (6)
- R2: inc around (12)
- R3: (sc, inc) x6 (18)
- R4: sc around (18)
- R5: (sc, dec) x6 (12)
Lightly stuff; then: - R6: dec around (6)
Consequently, fasten off with a long tail for sewing.
- Duck Beak — Time: 5–8 minutes
Option A (tiny oval):
- With Color C, ch 4; starting in 2nd ch from hook, sc 3. Then, rotate and work around the chain to form an oval: sc 3 on the other side (6 sts total). Finally, sl st to the first st and fasten off.
Option B (nub beak): - R1: MR, 6 sc with Color C; R2: sc around (6); fasten off.
Afterward, sew the duck head to the outer front of the float and attach the beak. Additionally, embroider tiny eyes or add 4 mm safety eyes for extra charm.
- Assembly and Keychain Finish — Time: 20–30 minutes
First, sew legs to the lower body so the feet peek out beneath the float. Next, sew arms to the sides and tack the hands to the float so the capybara appears to hold on. Then sew ears if not already attached. For the keychain, either thread a 10–12 cm yarn loop through the top of the head and attach your jump ring and split ring, or add a small screw eye with a dab of glue and connect a lobster clasp. Finally, hide ends, add a gentle blush, and squeeze to shape.
Common Mistakes (and How to Fix Them)
- If stuffing shows through, then size down your hook or tighten your tension.
- If you lose count, consequently, your shaping will drift; therefore, move a locking marker to the first stitch of every round.
- If the float seam looks bulky, then mattress-stitch the ends and rotate the seam to the back.
- If eyes sit too far apart, simply reposition to 7–8 stitches apart between R9 and R10; importantly, pin before securing.
- If the float feels rigid, reduce stuffing; as a result, it will sit more naturally around the belly.
Variations
- Color play: For a fresh look, try pastels; alternatively, create a lifebuoy with red/white stripes or a rainbow ring.
- Accessories: Additionally, add tiny goggles, a mini life ring, or a removable scarf for seasonal flair.
- Size changes: For micro keychains, use sport-weight and a 2.25 mm hook; for chubbier plushies, use worsted and a 3.25 mm hook.
- Face options: Conversely, embroider sleepy eyes for a kawaii vibe or add felt cheeks for softness.
Tutor Suggestions (Beginner Boosters)
- First, practice the magic ring on scrap yarn; consequently, your stitches will be neat.
- Next, learn the invisible decrease because it keeps the fabric smooth and prevents bumps.
- Additionally, use a row counter or tally marks to avoid miscounts while multitasking.
- Moreover, pin parts before sewing; as a result, placement stays symmetrical.
- Finally, when weaving ends, follow a duplicate-stitch path; therefore, tails disappear cleanly.
Finishing Tips
- After assembly, gently roll the piece between your palms; consequently, stuffing distributes evenly.
- For durability, add a micro-dot of fabric glue to knots and the back of embroidery; however, avoid excess glue.
- If seams look stiff, lightly steam-block without touching the iron to the yarn; as a result, curves relax.
- For photos, use bright, natural light; consequently, colors pop and details read clearly.
In summary, this Fearless Crochet Capybara Duck Float Keychain Amigurumi Pattern is clear, catchy, and truly beginner-friendly. Because the instructions flow step by step and since the transition words guide your progress, you’ll move confidently from magic ring to final stitch. Additionally, the compact yardage, quick timing, and playful options make it ideal for gifts, markets, and everyday smiles. Ultimately, with a few calm sessions and these polished transitions, you’ll finish a buoyant, camera-ready buddy that floats straight into your heart.