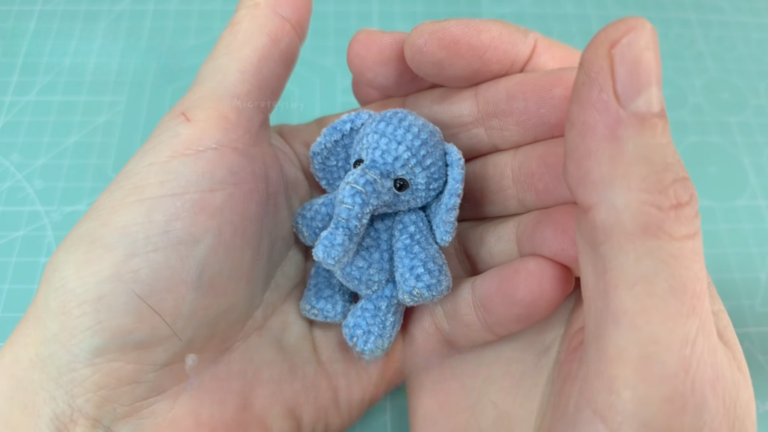
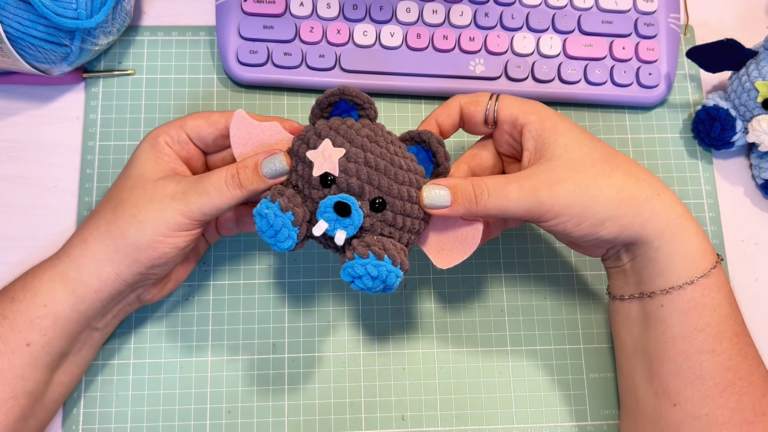
Chubby Crochet Bear Scarf Keychain Amigurumi Pattern
Chubby Crochet Bear Scarf Keychain Amigurumi Pattern: irresistibly plush, tiny, and charming. Beginner-approved stitches, speedy finish, cozy vibes make collectible minis for stocking stuffers, party favors, teacher gifts, or everyday sparkle.
Turn leftover yarn into squeal-worthy magic with this chubby bear scarf keychain amigurumi pattern. The compact design finishes fast but feels luxe, thanks to a cuddly silhouette and textured scarf. Choose safety eyes, French-knot peepers, or sleepy stitches to match your style and audience. Personalize with stripes, tweeds, or plaid-inspired scarves, and add blush for extra kawaii flair. A joyful, repeatable make, it’s perfect for small-batch gifting, swaps, and curated market tables.

Easy stitches and tidy assembly keep the process relaxing.
Uses:
- Keyring organizer and bag charm
- Holiday ornament or gift tag accent
- Desk buddy for daily smiles
Chubby Crochet Bear Scarf Keychain Amigurumi Pattern
Firstly, welcome to the cutest mini make of your week: the Chubby Crochet Bear Scarf Keychain Amigurumi Pattern. Secondly, this tiny teddy with a cozy scarf is quick, squishy, and unbelievably charming. Thirdly, the pattern is written for beginners, uses simple stitches, and uses yarn, so your stash will thank you. Moreover, you can finish it in one sitting, personalize colors, and clip it to keys, backpacks, or zipper pulls. Additionally, the final piece makes a perfect last-minute gift, craft-fair bestseller, or desk buddy for daily smiles. Furthermore, you can pair this written pattern with your favorite tutorial style and keep things relaxing.
Skill Level, Size, and Time
Firstly, skill level: Beginner to Confident Beginner. Secondly, finished size: approximately 8–9 cm (3.1–3.5 in) tall, excluding hardware, when made with worsted/aran yarn and a 3.25 mm hook. Thirdly, total time: approximately 2–3 hours, including assembly and scarf styling.
Materials and Tools (Exact Measurements)
- Firstly, yarn (main bear color): 25–30 g of worsted/aran weight (category 4) cotton or acrylic; sample uses 100% cotton for stitch definition.
- Secondly, yarn (scarf color): 8–10 g of worsted/aran weight yarn; choose contrasting or striped leftovers.
- Thirdly, yarn (accent/muzzle): 2–3 g of light cream or beige in the same weight.
- Moreover, hook: 3.25 mm (D/3) for tight amigurumi stitches; alternatively, 3.5 mm (E/4) if your tension is very tight.
- Additionally, safety eyes: 6 mm (pair), or embroidered eyes for children under 3.
- Furthermore, embroidery floss or yarn for nose and mouth: black or dark brown, approximately 50 cm.
- Also, stuffing: polyester fiberfill, approximately 15–20 g.
- Likewise, keychain hardware: 25 mm split ring plus 15–20 mm lobster clasp, or a pre-made keychain chain (10–12 cm).
- Additionally, 1 small jump ring (6–8 mm) for easier attachment.
- Moreover, tapestry needle: size 16–18 for weaving and stitching.
- Furthermore, a stitch marker: 1 locking marker for keeping place in rounds.
- Also, scissors: sharp snips for clean ends.
- Finally, optional blush or fabric paint: a tiny dab for cheeks.
Abbreviations and Notes
- Firstly, MR = magic ring.
- Secondly, ch = chain.
- Thirdly, sl st = slip stitch.
- Moreover, sc = single crochet.
- Additionally, inc = increase (2 sc in the same stitch).
- Furthermore, dec = decrease (sc2tog using invisible decrease if possible).
- Also, BLO = back loop only.
- Likewise, FO = fasten off.
- Additionally, st(s) = stitch(es).
- Moreover, continuous rounds = crochet in a spiral without joining.
- Furthermore, use a stitch marker to mark the first stitch of each round.
- Finally, for safety: avoid small parts for children under 3; embroider features instead.
Gauge (For Reference)
Firstly, amigurumi prefers tight stitches to prevent stuffing from peeking through. Secondly, a typical gauge for worsted yarn with a 3.25 mm hook is approximately 18–20 sc across 10 cm (4 in), though the exact gauge is less critical. Thirdly, if you see gaps, drop your hook size; if it feels too stiff, go up a half size.
Finished Overview
Firstly, the bear is worked as a chubby sphere for the head and body together. Secondly, separate pieces include ears, a small muzzle, optional stubby arms, and a mini scarf. Thirdly, assembly is simple, and the keychain attaches through the head’s top with a secure loop.
Step-by-Step Instructions
Step 1: Head-Body Sphere (Continuous Rounds)
- Firstly, estimated making time: 45–60 minutes.
- Secondly, use the main color and a 3.25 mm hook.
- Firstly, Round 1: MR, 6 sc into ring (6).
- Secondly, Round 2: inc around (12).
- Thirdly, Round 3: (sc, inc) around (18).
- Moreover, Round 4: (2 sc, inc) around (24).
- Additionally, Round 5: (3 sc, inc) around (30).
- Furthermore, Round 6: (4 sc, inc) around (36).
- Also, Rounds 7–11: sc around (36) for 5 rounds to build height.
- Likewise, place safety eyes: between Rounds 8 and 9, approximately 6–7 sts apart; adjust for expression.
- Additionally, Round 12: (4 sc, dec) around (30).
- Moreover, Round 13: (3 sc, dec) around (24).
- Furthermore, begin stuffing: add small tufts and shape evenly.
- Also, Round 14: (2 sc, dec) around (18).
- Likewise, Round 15: (sc, dec) around (12).
- Additionally, Round 16: dec around (6), then FO and leave a long tail for closing.
- Finally, use the tail to weave through the front loops of the last round and cinch closed, then weave in securely.
Placement Note
Firstly, for a cute “chubby cheeks” look, place eyes a touch lower than center height. Secondly, for a more teddy-like expression, set them slightly closer together and tilt the muzzle upward. Thirdly, for a sleepy bear, embroider curved eyelids over the eyes or skip safety eyes and use stitched peepers.
Step 2: Ears (Make 2)
- Firstly, estimated making time: 10–12 minutes total.
- Secondly, use the main color and a 3.25 mm hook.
- Firstly, Round 1: MR, 6 sc (6).
- Secondly, Round 2: (sc, inc) around (9).
- Thirdly, Round 3: sc around (9), then sl st to even edge and FO with long tail for sewing.
- Moreover, gently flatten each ear to form a half-circle.
- Additionally, do not stuff; keep them flat for a classic teddy ear.
Ear Placement
Firstly, pin ears on Round 4–5 from the top center, spaced symmetrically. Secondly, angle them slightly outward for a playful look. Thirdly, sew with small, neat stitches and secure tails inside the head.
Step 3: Muzzle (Small Oval)
- Firstly, estimated making time: 8–10 minutes.
- Secondly, use an accent color and a 3.25 mm hook.
- Firstly, ch 5.
- Secondly, Row 1: starting in 2nd ch from hook, sc 3, 3 sc in last ch, rotate to work the other side of the chain, sc 2, 2 sc in last ch, sl st to first sc (10).
- Thirdly, Round 2: ch 1, sc 3, inc 3, sc 2, inc 2, sl st to join (15).
- Moreover, FO leaves a long tail for sewing.
- Additionally, lightly stuff the muzzle before closing the last stitches (optional for extra puff).
Face Embroidery
Firstly, thread a needle with black or dark brown floss. Secondly, stitch an upside-down triangle nose centered near the top of the muzzle, then add a short vertical line underneath. Thirdly, curve a small smile to one side or both sides for a sweet expression.
Step 4: Tiny Arms (Optional, Make 2)
- Firstly, estimated making time: 10–12 minutes total.
- Secondly, use the main color and a 3.25 mm hook.
- Firstly, Round 1: MR, 6 sc (6).
- Secondly, Round 2: sc around (6).
- Thirdly, Round 3: sc around (6), then FO and leave a tail for sewing.
- Moreover, do not stuff or add a single puff of fiberfill.
- Additionally, sew arms to the sides around Round 11–12 of the head-body sphere.
Step 5: Scarf (Mini Rib or Simple Stripe)
- Firstly, estimated making time: 20–30 minutes.
- Secondly, use the carf color and a 3.25 mm hook.
Option A: Simple Flat Scarf
- Firstly, ch 46 (approximately 16–18 cm), adjust for your preferred length.
- Secondly, Row 1: sc in 2nd ch from hook and across (45), turn.
- Thirdly, Row 2: ch 1, sc across (45), turn.
- Moreover, Row 3: ch 1, sc across (45), then FO and weave ends.
- Additionally, add tiny fringe by cutting 4–6 short strands (3–4 cm) and lark’s head knotting at ends.
Option B: Ribbed Look (BLO)
- Firstly, ch 8 for width.
- Secondly, Row 1: sc in 2nd ch from hook and across (7), turn.
- Thirdly, Rows 2–28: ch 1, sc BLO across (7), turn each row, then FO.
- Moreover, wrap around the neck and knot lightly at the side.
- Additionally, avoid pulling too tightly to prevent puckering the bear’s face.
Step 6: Assembly and Shaping
- Firstly, estimated making time: 20–25 minutes.
- Secondly, gather the head, body, ears, muzzle, arms (optional), and scarf.
- Firstly, pin muzzle centered between the eyes, slightly lower than the midpoint of the face.
- Secondly, sew the muzzle with a ladder stitch, adding a whisper of stuffing before closing.
- Thirdly, secure ears symmetrically and take time to match angles.
- Moreover, stitch on arms at the sides or slightly forward for a cuddly pose.
- Additionally, hide all tails inside the head-body sphere and massage the stuffing to even out curves.
- Furthermore, tie the scarf around the neck, then angle the knot to one side for extra charm.
- Also, add blush dots with fabric-safe blush or a tiny bit of pastel, then set with a light fixative if desired.
Step 7: Keychain Attachment
- Firstly, estimated making time: 5–8 minutes.
- Secondly, prepare your hardware and a strong scrap of yarn.
- Firstly, cut a 20–25 cm strand of your main color.
- Secondly, insert the needle from the top center of the head down and back up to create a sturdy loop.
- Thirdly, thread the loop through your jump ring and attach the split ring or lobster clasp.
- Moreover, double-knot the yarn ends inside the head and secure with a dab of fabric glue if you prefer.
- Additionally, make sure the loop is firm but not distorting the head shape.
Estimated Time Breakdown
- Firstly, head-body: 45–60 minutes.
- Secondly, ears: 10–12 minutes.
- Thirdly, muzzle: 8–10 minutes.
- Moreover, arms (optional): 10–12 minutes.
- Additionally, scarf: 20–30 minutes.
- Furthermore, assembly: 20–25 minutes.
- Also, attachment: 5–8 minutes.
- Finally, total: approximately 2–3 hours, depending on experience and yarn choice.
Basic Tips for a Polished Finish
- Firstly, keep your tension snug to avoid visible stuffing.
- Secondly, use an invisible decrease for smoother shaping on the head-body.
- Thirdly, place safety eyes before closing the head; test positions with pins first.
- Moreover, lightly stuff in layers and rotate the piece as you go.
- Additionally, steam the scarf lightly if the edges curl (hold the steam at a safe distance).
- Furthermore, weave tails back and forth in multiple directions to lock them in place.
- Also, try cotton for definition and acrylic for bounce; both work beautifully.
- Finally, switch to a smaller hook if you spot gaps.
Common Mistakes and How to Avoid Them
- Firstly, loose stitches causing stuffing to peek out: use a smaller hook or tighten the tension.
- Secondly, uneven sphere shaping: add stuffing gradually and massage the piece into shape.
- Thirdly, eyes too high or too far apart: reposition lower and closer for classic teddy charm.
- Moreover, the scarf is too tight around the neck: tie gently and slide the knot to one side.
- Additionally, bulky knots inside the head: split your yarn tails and weave in smaller strands.
- Furthermore, visible decreases: use invisible dec (front loops only) for smooth results.
- Also, wobbly keychain loop: double up the attachment yarn and anchor through several stitches.
- Finally, color bleeding on blush: test on a swatch and apply sparingly.
Variations to Personalize Your Bear
- Firstly, yarn weight swap: use chunky/blanket yarn and a 5–6 mm hook for a larger plush (adjust yardage up).
- Secondly, seasonal scarves: try candy-cane stripes for holidays, school colors for spirit weeks, or soft pastels for spring.
- Thirdly, textural scarves: switch to half double crochet, moss stitch, or mini rib for cozy dimension.
- Moreover, face styles: embroider sleepy eyes, add tiny eyebrows, or stitch stars for kawaii sparkle.
- Additionally, ear options: line ears with felt, add a contrasting inner ear, or make bear ears slightly smaller for a cub look.
- Furthermore, tiny tail: MR, 6 sc, FO, and sew to the back for a sweet detail.
- Also, accessory swaps: add a mini bow, tiny heart applique, or micro pom-poms at scarf ends.
- Finally, multi-animal set: change colors and ear shapes to create a panda (black/white), polar bear (white/gray), or teddy in latte hues.
Care and Durability
- Firstly, spot clean with a damp cloth and mild soap; avoid soaking hardware.
- Secondly, reshape while damp and let air dry thoroughly.
- Thirdly, reinforce the keychain loop with extra stitches if gifting to kids.
- Moreover, check hardware connections over time and replace jump rings if bent.
- Additionally, store away from direct sunlight to prevent fading.
- Furthermore, use hypoallergenic stuffing if gifting widely.
- Also, avoid harsh heat on acrylic yarn; it may deform.
- Finally, refresh the scarf by smoothing and retightening the knot.
Troubleshooting Quick Guide
- Firstly, the head looks lumpy: redistribute stuffing with the blunt end of a hook.
- Secondly, the scarf curls: steam lightly or add one extra row.
- Thirdly, the eyes feel loose: use safety eye backs sized for your yarn thickness and insert before heavy stuffing.
- Moreover, the muzzle looks too big: remove Round 2 increases and stick with a simpler oval (ch 4 start).
- Additionally, the arms flop: shorten to just two rounds or stitch arms slightly forward for a supported look.
- Furthermore, the keychain twists: add a swivel lobster clasp to reduce spin.
- Also, the bear hangs sideways: center the loop and insert through the head’s topmost stitches.
- Finally, the scarf sheds: knot fringe firmly and trim ends cleanly.
SEO Tips and Keywords (For Your Listing or Blog)
- Firstly, primary keyword: “Chubby Crochet Bear Scarf Keychain Amigurumi Pattern.”
- Secondly, secondary keywords: “beginner amigurumi,” “mini crochet teddy,” “crochet keychain pattern,” “kawaii crochet gift.”
- Thirdly, product tags: “quick crochet project,” “stash buster,” “cute crochet bear,” “crochet bag charm,” “DIY keychain.”
- Moreover, photo ideas: flat-lay with yarn and hook, in-hand scale shot, and clipped to a backpack zipper.
- Additionally, caption prompts: emphasize “fast make,” “gift-ready,” and “customizable colors.”
- Finally, call to action: invite readers to share color combos and tag your socials.
Quick Recap Checklist
- Firstly, make the head-body sphere to 36 stitches, then shapeit down.
- Secondly, attach safety eyes and embroider the nose and mouth.
- Thirdly, add ears, optional arms, and a soft scarf.
- Moreover, secure a strong loop and attach your keychain hardware.
- Additionally, weave in ends, add blush, and fluff lightly.
- Furthermore, take photos and note your favorite colorways.
- Also, gift, sell, or keep your new pocket buddy.
- Finally, repeat with new colors and build a tiny bear family.
Closing
Firstly, thank you for crocheting along with this Chubby Crochet Bear Scarf Keychain Amigurumi Pattern. Secondly, may your stitches be even, your bears be chubby-cute, and your gifts be adored. Thirdly, because it’s fast and fun, you can absolutely make a handful in an afternoon. Moreover, you can tailor each one with different scarf textures and eye styles. Additionally, you can experiment with yarn weights to create a whole range of sizes. Furthermore, you can turn scraps into smiles while leveling up your amigurumi confidence. Finally, happy hooking, and enjoy every pinchable, portable, pocket-sized moment.