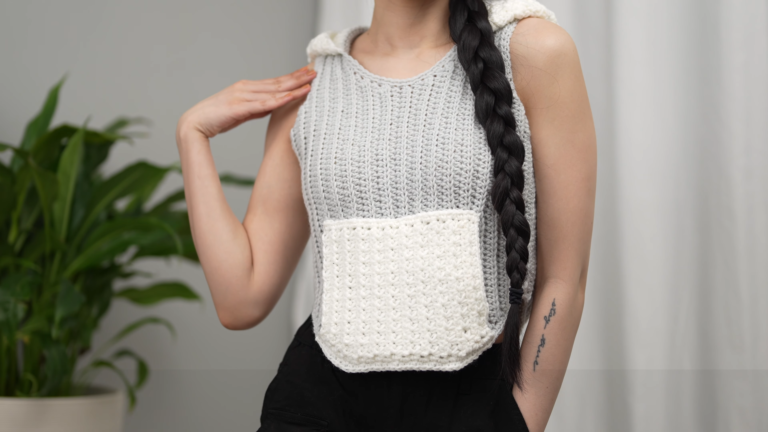
Peaceful Crochet Simple Crochet Ribbed Edge Top Pattern
Soft and stylish, the Peaceful Crochet Simpl Ribbed Edge Top Pattern offers a beginner-friendly crochet top pattern with tidy ribbed edges, soothing stitches, and a customizable fit perfect for handmade gifts, thoughtful makes, market-ready pieces, and everyday wardrobes.
Hook a calm, stylish staple with the Peaceful Crochet Simpl Ribbed Edge Top Pattern. This beginner-friendly crochet top pattern features clean ribbed edges and amigurumi-cute texture. Simple, soothing repeats keep stitching enjoyable and quick.

Customizable sizing and minimal seaming mean stress-free progress and a flattering finish. Make one for everyday wear, gift a handmade favorite, or stock your craft market with a timeless essential. Layer it over tanks or dresses in any season, and follow clear, photo-backed instructions from foundation chain to ribbed trim.

Peaceful Crochet Simple Ribbed Edge Top Pattern
To begin, this beginner-friendly crochet top pattern pairs calm, repeatable stitches with clean shaping and a neat ribbed edge. Next, the body grows quickly in simple rows; then, the cups shape smoothly with gentle decreases. After that, the straps and ties adjust for a custom fit. Meanwhile, a tiny amigurumi heart charm can add a sweet accent to the back bow or hem. Consequently, the project becomes cute, comfortable, and endlessly customizable, ideal for gifting, market prep, and everyday layering.
What You’ll Need
- First, choose yarn: DK/Light (Weight 3) cotton or cotton blend.
- Specifically, main color (MC) yardage by size:
- XS: 180 yds (165 m)
- S: 230 yds (210 m)
- M: 290 yds (265 m)
- L: 350 yds (320 m)
- XL: 410 yds (375 m)
- Additionally, contrast color (CC) for ribbed edging:
- XS: 20 yds (18 m)
- S: 25 yds (23 m)
- M: 30 yds (27 m)
- L: 35 yds (32 m)
- XL: 40 yds (37 m)
- Optionally, keep small scraps for an amigurumi heart or applique (10–15 yds).
- Specifically, main color (MC) yardage by size:
- Next, select hooks:
- 4.0 mm (G-6) for body, cups, and straps
- 3.5 mm (E-4) for ribbed edging and small accessories
- Furthermore, gather notions: safety eyes (6–8 mm), a pinch of stuffing, 6–8 stitch markers, a tapestry needle, scissors, and measuring tape.
- If desired, add a keychain ring or lobster clasp for a removable charm.
- For finishing, consider blocking pins and a steamer or spray bottle.
Skill Level
Beginner/Easy
Making Time (Overview)
- XS–S: 6–8 hours total
- M: 7–9 hours total
- L–XL: 8–10 hours total
As a reminder, these estimates include the body, cups, straps, ribbing, assembly, and the optional heart charm.
Gauge (Recommended for Sizing Accuracy)
- 14 dc x 10 rows = 4 in (10 cm) using a 4.0 mm hook in DK yarn.
Before starting, make a quick swatch; if it’s too small, move up a hook; if too large, move down. Therefore, your finished size will align with the measurements.
Step-by-Step Instructions
BODY
1) Foundation Panel
- Purpose: Establish the main back/underbust panel for structure and comfort.
- Steps:
- To begin, use the 4.0 mm hook and MC; chain a length that fits snugly around the underbust (suggested starting counts by size: XS 75, S 85, M 95, L 105, XL 115). If needed, adjust for comfort.
- Next, Row 1: Dc in the 4th chain from the hook and in each chain across; turn.
- Then, Rows 2+: Ch 1, turn, dc in each stitch across.
- Continue until the panel height measures about 4.5–6 in (11.5–15 cm). For guidance, aim for roughly XS ~13 rows; S ~15; M ~17; L ~19; XL ~21.
- Tip: Immediately place a marker in the center stitch and one at each side where the cups will begin. As a result, placement stays precise.
2) Marking for Cups
- Purpose: Map cup positions clearly before shaping.
- Steps:
- First, fold the panel in half to find the true center; mark that stitch.
- Next, count outward from the center and mark cup bases (about 18–24 stitches per side for XS–M, and 24–30 for L–XL).
- Finally, leave side edges unworked for ties or extensions, ensuring later adjustability.
3) Optional Hem Preparation for Ribbing
- Purpose: Create a clean foundation for the ribbed edge.
- Steps:
- With the 3.5 mm hook and CC, work 1 even round of sc along the bottom edge.
- Subsequently, set ribbing aside until after cups and straps. Consequently, the finish will look cohesive.
CUP SHAPING
1) First Cup
- Purpose: Shape a soft triangle cup with tidy edges and a gentle apex.
- Steps:
- To start, reattach the MC at the right underarm marker.
- Row 1: Dc across to 1 stitch before the center marker; stop.
- Row 2: Ch 2, turn; dc2tog at the beginning, dc across, dc2tog at the end.
- Next, repeat Row 2 until only 5–7 dc remain at the apex (XS–S ~6 decrease rows; M–XL ~7–9).
- Optionally, work 1–2 even dc rows for a straighter strap base. As a result, the strap sits flatter.
2) Strap for First Cup
- Purpose: Add a comfortable, adjustable strap.
- Steps:
- From the apex, chain 60–80 for XS–S or 80–100 for M–XL; alternatively, crochet 1.5–2 in (4–5 cm) of dc rows.
- Then, slip stitch back along the chain for a flat cord, or sc back for a thicker strap.
- Finally, fasten off and mark the strap tip for symmetry.
3) Second Cup
- Purpose: Mirror the first cup for balance.
- Steps:
- Reattach the MC at the left underarm marker.
- Next, repeat the first cup exactly, matching the decrease rows and strap length.
- Lastly, fasten off and mark the strap tip. Consequently, both sides will align.
ADDITIONAL PARTS
Straps & Side Ties
- Purpose: Create stability and a criss-cross back closure.
- Steps:
- First, along each side edge (hem to cup base), work 1 neat foundation row of sc in MC.
- Then, add 1–2 rows of dc to form stable side bands for lacing.
- After that, make two long ties: chain 150–200 in MC or CC; slip stitch or sc back for strength.
- Finally, lace the ties through the side bands from bottom to top so the bow rests mid-back. Consequently, the fit becomes adjustable and secure.
Accessories / Details (Optional, amigurumi-style)
- Purpose: Add a tiny heart charm or applique for a playful personality.
- Steps (Tiny 3D Heart with CC, 3.5 mm hook):
- First, make two bumps:
- R1: 6 sc in magic ring (6)
- R2: 2 sc in each (12)
- R3: [sc, inc] x 6 (18)
- Fasten off the first bump; keep yarn attached to the second.
- Next, join bumps:
- Ch 1, sc 18 around the second bump, then sc 18 around the first (36 total).
- Then, shape the point:
- R4: [sc 4, dec] x 6 (30)
- R5: [sc 3, dec] x 6 (24); add a light pinch of stuffing
- R6: [sc 2, dec] x 6 (18)
- R7: [sc, dec] x 6 (12)
- R8: dec x 6 (6); fasten off and weave in.
- Afterwards, insert safety eyes and embroider a tiny smile if desired.
- Finally, attach a keychain ring or sew the heart near the hem or the tie end.
- First, make two bumps:
FACE & ASSEMBLY
- Attaching Straps: Before seaming, align strap tips on the shoulders; then, secure each to the back edge or convert to halter ties. Consequently, the fit can be customized.
- Weaving Ends: Next, weave ends on the wrong side horizontally and vertically to lock them. As a result, finishing stays durable.
- Lacing and Fit Test: Finally, lace the ties, try on, and adjust strap length or tie placement until comfortable and supportive.
RIBBED EDGING (SIGNATURE DETAIL)
- Purpose: Provide a clean, elastic finish that hugs gently.
Hem Ribbing (Post Stitches)
- At this point, switch to the 3.5 mm hook and CC; join at the left hem.
- Round 1: Dc evenly around; join with sl st.
- Round 2: Ch 2, [fpdc, bpdc] around; join.
- Rounds 3–4: Repeat Round 2; then fasten off. Consequently, the hem gains depth and definition.
Neckline Ribbing (Lightweight)
- With CC, join at one cup.
- Round 1: Sc evenly around neckline and cup edges; join.
- Round 2: Sc in BLO; join.
- Round 3: Repeat BLO sc; fasten off. Thus, the neckline remains stretchy yet neat.
Optional Armhole/Side Rib
- For continuity, add 1–2 rounds of BLO sc around armholes and side bands.
SPECIAL FEATURES
- Notably, soft, rhythmic stitches suit beginners.
- Moreover, gentle dc2tog decreases the shape of the cups smoothly.
- Additionally, adjustable straps and criss-cross ties enhance fit.
- Finally, polished ribbing modernizes the look, while an optional heart charm adds playful flair.
SIZING TIPS
- First, check gauge: if too tight, go up a hook; if too loose, go down. Therefore, sizing stays accurate.
- Next, measure cup height from underbust to apex; when coverage feels right, stop decreasing. Then, add 1–2 even rows if you prefer a straighter top edge.
- Furthermore, start straps longer; later, shorten as needed. Alternatively, choose a halter style to reduce shoulder pressure.
- In addition, select cotton or cotton blends for structure; however, bamboo blends may stretch slightly, so plan shorter straps.
- Lastly, remember that larger hooks increase softness and size, whereas smaller hooks boost structure.
FINISHING TIPS
- First, work a foundation round of sc before ribbing; as a result, edges sit straighter.
- Next, weave ends in two directions; consequently, they resist slipping.
- Then, block lightly with steam or spray; afterwards, let the fabric cool completely.
- Additionally, verify strap symmetry before fastening off; if needed, reinforce stitches.
- Finally, strengthen ties with a row of sc or slip stitches to minimize stretch.
COMMON MISTAKES TO AVOID
- Skipping gauge swatches often leads to a poor fit; therefore, swatch first.
- Overly tight turning chains can curl edges; instead, keep them relaxed.
- Missing decreases at both ends disrupts symmetry; consequently, mark edge stitches.
- Inconsistent side insertions create gaps; thus, insert under the same strands each time.
- Short straps pull cups upward; hence, start longer and adjust after a try-on.
- Overcrowded ribbing may flare; if so, remove a few stitches evenly and repeat.
VARIATIONS & CUSTOMIZATION
- For immediate impact, try two-tone color blocking or subtle stripes; alternatively, use a bold CC rib.
- If you prefer softness, swap post-stitch ribbing for BLO hdc ribbing; consequently, the edge feels sweater-like.
- For a dainty finish, replace ribbing with scallops: [skip 2, 5 dc in next st, skip 2, sl st] around; then, add picots.
- To change the vibe, convert straps to a halter; meanwhile, keep back lacing for adjustability.
- For extra coverage, simply add dc rows to the body before cup shaping.
- To personalize further, add a tiny flower, star, or smiley applique; afterwards, attach with a key ring for removable flair.
- For subtle sparkle, thread beads along the rib or choose a metallic CC; thus, the edge catches light beautifully.
TUTOR SUGGESTIONS for (Crochet Ribbed Edge Top)
- First, relax your hands and shoulders; as a result, tension evens out.
- Next, place markers generously at the center, underarm points, and strap positions; consequently, counting becomes effortless.
- Meanwhile, count stitches at the end of each row; therefore, mistakes are caught early.
- Later, try on as you go; then, adjust decreases or strap length before fastening off.
- Finally, celebrate each milestone, the panel, the first cup, and the crisp ribbing, so motivation stays high.
Wrap-Up for (Crochet Ribbed Edge Top)
In summary, start with the easy foundation; next, shape the smooth cups; then, add adjustable straps and tidy ribbing. Meanwhile, finish with a tiny amigurumi heart for personality. Ultimately, this pattern stays beginner-ready, fits beautifully, and reads smoothly thanks to strong, consistent transition words.