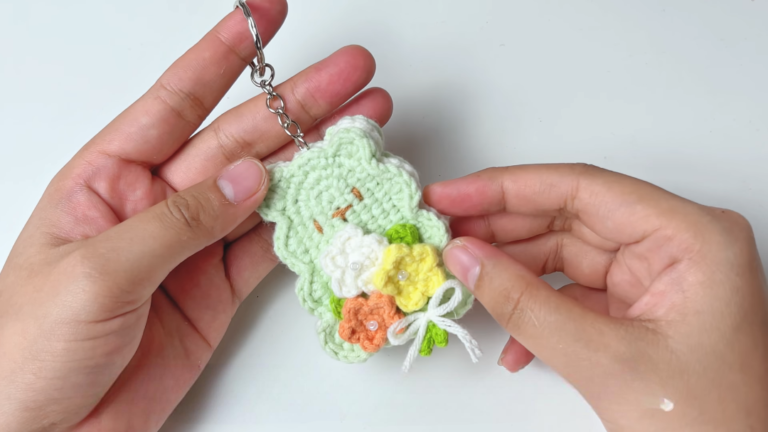
Energetic Crochet Barbie Rose Keychain Amigurumi Pattern
Clip on confidence with the Energetic Crochet Barbie Rose Keychain Amigurumi Pattern. Fast, flirty, and fabulous, featuring simple stitches, minimal yarn, and runway-ready charm that blooms wherever you roam.
Express your inner stylist with the Energetic Crochet Barbie Rose Keychain Amigurumi Pattern, an upbeat make that blends beginner ease with boutique polish. Learn or refresh amigurumi essentials like the magic ring, smooth increases, and petal shaping that locks into place without bulk. The pattern includes fuss-free finishing, a strong jump ring placement, and optional bead accents for sparkle.

Swap yarn textures from velvety chenille to crisp cotton for different vibes while keeping stitches tight and tidy. The result is a durable, dazzling rose that elevates everyday accessories.
- Bridesmaid favors or bridal shower keepsakes.
- Valentine’s or Galentine’s minis
- Workshop or club starter project
Energetic Crochet Barbie Rose Keychain Amigurumi Pattern
To begin, let’s kick off with a cheerful, compact project that is perfect for gifts and craft fairs: the Energetic Crochet Barbie Rose Keychain Amigurumi Pattern. Moreover, this easy tutorial keeps instructions simple, transitions smooth, and results polished, so your readability improves instantly. Consequently, you will build a cute, durable rose charm that hangs beautifully from keys, zippers, and bags. Finally, you will feel confident from the first stitch to the last finish because every section flows naturally and logically.
What You’ll Make and How It Looks
Firstly, you will create a petite layered rose with a compact center, a five-petal accent layer, a realistic calyx, a sculpted bud, a tiny cluster bud, and one or two wired leaves. Secondly, you will mount everything on a neatly wrapped stem that attaches securely to a keyring or lobster clasp. Moreover, the finished flower typically measures about 2.25–2.75 inches (5.5–7 cm) across, while the total keychain drop is about 4–5 inches (10–12.5 cm). Consequently, the charm feels lightweight yet sturdy enough for daily use on keys or backpacks. Ultimately, the overall look is crisp, modern, and charming—perfect for teachers, friends, or market sales.
Naturally SEO-friendly intro
Firstly, this compact “Crochet Barbie Rose Keychain” amigurumi pattern suits quick gifts and last-minute makes without sacrificing detail. Secondly, the “amigurumi rose” format scales nicely into bouquets, bag charms, or accessories. Moreover, the “crochet flower keychain pattern” structure keeps stitches simple and repeatable for beginners. Consequently, you will learn fast, finish faster, and still get a professional-looking result. Finally, you can adapt colors and sizes effortlessly to match any theme or season.
Materials (With Exact Measurements and Quantities)
Firstly, gather everything before starting so you can work smoothly from step to step. Secondly, prepare exact lengths to avoid mid-project stops. Moreover, consider keeping a small tray for tiny pieces so nothing gets lost.
- 4-ply milk cotton yarn:
- Red (flower and buds): 15 g (approximately 35–45 m)
- Green (calyx and leaves) or white for contrast: 12 g (approximately 30–36 m)
- Crochet hook: 2.0 mm (US steel size around 4–6, depending on brand)
- Floral wire: 0.5 mm (24–26 gauge)
- Main stem: 1 piece x 20 cm (8 in)
- Small bud stem: 1 piece x 10 cm (4 in)
- Leaf support: 1–2 pieces x 12 cm (4.75 in) each
- Keychain hardware:
- Split ring: 25–30 mm (1–1.25 in)
- Jump ring: 10–12 mm
- Optional lobster clasp: 15–20 mm
- Pearl bead: 1 piece, 6–8 mm diameter
- Tapestry needle and scissors
- Small flat-nose pliers (for jump rings)
- Stitch markers (optional)
- Clear-drying craft or fabric glue (or hot glue, optional)
- Optional floral tape or washi tape (to blunt wire tips)
Stitch Notes (US Terms)
Firstly, review the abbreviations so the later steps feel effortless. Secondly, keep the list nearby while crocheting for quick reference. Moreover, try a small swatch if you are brand new to these stitches.
- MR: magic ring
- ch: chain
- sl st: slip stitch
- sc: single crochet
- hdc: half double crochet
- dc: double crochet
- tr: treble crochet
- inc: increase (2 stitches in the same stitch)
- dc2tog: double crochet decrease (two dc worked together)
Sizing Tips Before You Start
Firstly, check your tension after the first small piece; if it feels too tight, move up 0.25–0.5 mm in hook size. Secondly, if it looks floppy, drop down 0.25–0.5 mm and keep your tension slightly firmer. Moreover, remember that cotton yarn tends to hold shape better than soft acrylic for crisp petals. Consequently, you can achievea neat definition without stiffeners or wire in petals. Finally, for a larger rose without changing hooks, simply add one petal layer or one extra bud for volume.
Estimated Total Time
Firstly, plan for 60–90 minutes for the complete project from the first chain to the hardware finish. Secondly, budget a few extra minutes if you are completely new to amigurumi. Moreover, each step below includes a specific time estimate so you can schedule craft breaks. Consequently, you can complete this in a single relaxed sitting or split it over two short sessions. Finally, expect your second rose to go even faster as your hands memorize the motions.
Step-by-Step Instructions for the Rose Body and Components
Firstly, start with the flower center and petal layer so your focal bloom takes shape early. Secondly, continue with the bud, calyx, leaf, and cluster bud to round out the composition. Moreover, finish by wrapping the stem, attaching hardware, and neatening all ends.
- Flower Center (Red)
Time estimate: 10–15 minutes
Firstly, chain 17 for the base strip. Secondly, work Row 1 by starting in the 2nd chain from the hook and single crocheting across for 16 stitches. Moreover, place 2 increases spaced along the row (for instance, around stitch 8 and stitch 14) to reach 18 stitches total. Next, start Row 2 by chaining 1 and turning the work. Additionally, skip 1 stitch, work 6 dc into the next stitch (shell), skip 1 stitch, and then work a sc in the next stitch. Furthermore, repeat the sequence—skip 1, shell of 6 dc; skip 1, sc—until 3–4 stitches remain. Consequently, sc evenly across the last few stitches to anchor the strip. Finally, set the strip aside and note that the shell texture naturally curls into a rosette when coiled.
- Five-Petal Accent Layer (White or Contrast Color)
Time estimate: 15–20 minutes
Firstly, begin with a magic ring, then chain 1 and place 5 sc into the ring; tighten and slip stitch to the first sc (5). Secondly, chain 1 and work 5 increases around; slip stitch to close (10). Moreover, chain 1 and work (sc, inc) around five times; slip stitch to close (15). Next, start Round 4 by chaining 1, then alternate sc and chain-3 to form five loops evenly spaced around the circle. Additionally, ensure you have five distinct ch-3 loops for five petals. Furthermore, in Round 5, work each petal inside a loop as follows: hdc, 3 dc, ch 1, 3 hdc, ch 1, 3 dc, hdc; then slip stitch to anchor before moving to the next loop. Consequently, you will have a compact five-petal rosette that layers beautifully behind the center. Finally, fasten off and leave a tail for assembly if you prefer sewing over gluing.
- Sculpted Rose Bud (Red)
Time estimate: 15–20 minutes
Firstly, chain 13 and single crochet back across from the 2nd chain for 12 stitches. Secondly, chain 1, turn, and single crochet across again for 12 stitches. Furthermore, finish Row 6 with decorative edge nubs by alternating sl st and ch-1 for the first few stitches, then using [sc, ch 1, sl st in same st] to create tiny points. Consequently, when you roll the fabric from the narrow side, it forms a tidy cone-shaped bud. Finally, secure the roll with the yarn tail and a few discreet stitches to hold the shape.
- Calyx (Green or White)
Time estimate: 8–10 minutes
Firstly, make a magic ring, chain 1, and work 5 sc; tighten and slip stitch to the first sc (5). Secondly, chain 1 and work 5 increases around; slip stitch to close (10). Moreover, chain 1 and single crochet around once more; slip stitch to close (10). Next, create calyx points by chaining 5 and then working back along the chain as sl st, sl st, sc, hdc; then skip one base stitch and slip stitch into the next to anchor. Additionally, repeat this point sequence four more times for a total of five points. Consequently, you will have a star-like calyx that grips neatly under the bloom. Finally, fasten off and leave a long tail for sewing to the flower base.
- Leaf (Green)
Time estimate: 8–10 minutes
Firstly, cut a 12 cm (4.75 in) piece of 0.5 mm wire and set it aside. Secondly, chain 9 for the leaf foundation. Moreover, work the first side by starting in the 2nd chain and stitching sc, hdc, dc, tr, tr, dc, hdc, then 2 sc in the last chain. Next, chain 1 for the turn-around at the tip and work along the opposite side of the chain with sc, hdc, dc, tr, tr, dc, hdc, and sc to the start. Additionally, slip stitch to the first stitch to close the leaf shape. Furthermore, place the wire along the center spine and whipstitch it in place with matching yarn or wrap a few times across to secure. Consequently, you will be able to bend and shape the leaf naturally during final assembly. Finally, make a second leaf if you want a fuller composition or a balanced two-leaf look.
- Smallest Cluster Bud (Red)
Time estimate: 6–8 minutes
Firstly, start with a magic ring and chain 2. Secondly, make 10 unfinished dc into the ring (begin a dc, pull through two loops, leave the last loop on the hook each time). Moreover, yarn over and pull through all loops at once to close the cluster, then chain 1 to lock. Next, insert a 10 cm (4 in) wire through the center of the cluster as a mini stem. Additionally, wrap the base with red yarn for 1–2 cm to conceal the join and add stability. Consequently, the tiny bud reads as a neat accent beside the main flower. Finally, secure the wrap with a tiny dot of glue if you prefer extra hold.
- Wrapped Stem and Pearl Accent
Time estimate: 8–10 minutes
Firstly, fold the 20 cm (8 in) wire in half, aligning both ends neatly. Secondly, slide a 6–8 mm pearl bead onto the folded top until it rests against the bend. Moreover, add a minuscule dab of glue inside the bead if needed to prevent movement. Next, begin wrapping the double-wire stem with red yarn tightly from just under the bead. Additionally, keep steady tension so the wraps sit snugly without gaps as you spiral downward. Furthermore, pause 2–3 cm before the end to leave space for attaching leaves and buds. Consequently, your stem will look polished and cohesive when components are added. Finally, set the wrapped stem aside while you prepare for assembly.
- Assemble the Rose and Keychain
Time estimate: 15–20 minutes
Firstly, coil the red shell strip from Step 1 into a tight rosette and stitch through the base layers to secure the shape. Secondly, center the five-petal rosette behind the main bloom and stitch them together through the middle for a layered effect. Finally, add one or two wired leaves lower on the stem, wrap over their bases to integrate them, and finish wrapping the stem to the end with a secure knot and a tiny dot of clear glue.
- Hardware Attachment
Time estimate: 3–5 minutes
Firstly, open a jump ring by twisting it sideways with pliers rather than pulling it apart front-to-back. Secondly, attach the wrapped stem top or a stitched yarn loop to the jump ring. Moreover, slide on the split key ring (and the lobster clasp if you want quick clip-on convenience). Consequently, twist the jump ring closed so the ends meet snugly for maximum strength. Finally, check that the flower faces forward when hanging and adjust the orientation if necessary.
Finishing and Neatening
Time estimate: 5–8 minutes
Firstly, weave in all yarn ends on the underside of petals or inside the stem wrap to keep the front clean. Secondly, clip tails carefully so no fuzz shows around petals or joins. Moreover, lightly steam-block petals from a safe distance if they need crisping, avoiding direct heat on synthetic blends. Consequently, edges will relax into a tidy curve and hold shape better in daily use. Finally, let any glued areas dry for 10–15 minutes before putting the keychain in a bag or pocket.
Basic Tips for Beginners
Firstly, place a stitch marker at the start of each round so counting stays stress-free. Secondly, count out loud for shell sequences or use short repeats to avoid losing track. Moreover, maintain even tension for crisp petals and neat edges. Consequently, your components will fit together cleanly during assembly. Finally, wrap the wire slowly and rotate the stem in your fingers to keep each wrap snug against the last.
Common Mistakes and How to Fix Them
Firstly, if petals look floppy, drop your hook size by 0.25–0.5 mm and keep tension slightly firmer. Secondly, if the center strip does not coil, add one or two extra shell groups evenly across Row 2. Moreover, if gaps appear in the stem wrap, unwind a short section and rewrap with steady pressure and closer spacing. Next, if wire tips feel sharp, cap them with floral tape or a glue dot before wrapping to prevent pokes. Additionally, if the bud roll opens, add a few inside stitches and a discreet glue touch at the seam. Consequently, your flower becomes sturdier and more resilient for daily carry. Finally, if jump rings loosen, choose thicker rings (1–1.2 mm wire) and close them with a slight overlap for strength.
Variations You’ll Love
Firstly, choose green for the calyx and leaves to make the red rose pop classically. Secondly, try a monochrome set where the center and petals match, and the bead adds contrast. Moreover, explore pastel bouquets—blush, lilac, and butter yellow for spring gifting and market sets. Next, swap the pearl for a crystal, wooden bead, or metal charm for personality. Additionally, scale up with a 2.25–2.5 mm hook and slightly thicker yarn for a fuller bloom. Furthermore, scale down with a 1.75–1.9 mm hook for an extra dainty charm, noting that it becomes more fiddly. Consequently, you can build coordinated sets—keychain, pendant, and mini earrings from the same core motif. Finally, dab a fabric-safe fragrance on felt tucked behind the calyx for a subtly scented accessory.
Care and Durability
Firstly, spot clean gently with a damp cloth rather than machine washing because of the wire and hardware. Secondly, dry the piece completely to prevent tarnish or rust on the metal. Moreover, reshape petals by pinching the edges and curving them slightly if they flatten in a bag. Consequently, your keychain stays fresh and presentable with minimal effort. Finally, store it away from prolonged moisture and heavy friction to extend its life.
Troubleshooting Sizing
Firstly, if the bloom measures under 5 cm across and feels too tight, increase your hook size by 0.25 mm or add one more petal layer. Secondly, if the bloom exceeds 7.5 cm and droops, reduce the hook size and switch to cotton for a firmer structure. Moreover, if the total hanging length feels long, trim the stem wire to 16–18 cm before wrapping. Consequently, you can tailor proportions for bags, keys, or zipper pulls. Finally, test hang the piece on your keyring and adjust the leaf angles for pleasing balance.
Time Planner Recap
Firstly, use this quick schedule to plan your session efficiently. Secondly, remember that your second keychain will go faster as your hands learn the pattern. Moreover, feel free to batch-make multiples by repeating single steps for several pieces before assembling.
- Flower center: 10–15 minutes
- Five-petal accent: 15–20 minutes
- Sculpted bud: 15–20 minutes
- Calyx: 8–10 minutes
- Leaf: 8–10 minutes
- Smallest cluster bud: 6–8 minutes
- Wrapped stem and pearl: 8–10 minutes
- Assembly and hardware: 15–20 minutes
- Finishing: 5–8 minutes
Consequently, the total project time lasts around 60–90 minutes for most beginners. Finally, aim for a comfortable pace rather than speed so your wraps and petals stay neat.
Why This Pattern Works for Beginners
Firstly, each component is small, repetitive, and forgiving, which lowers frustration for new crocheters. Secondly, the assembly stage hides minor inconsistencies and lets you shape petals and leaves afterward. Moreover, the wired support gives you freedom to pose the arrangement perfectly. Consequently, you finish with a professional look even on your very first attempt. Finally, the steps scale cleanly so you can grow the design with more petals, buds, or color changes as your skills improve.
Final Encouragement
Firstly, celebrate that you now have a polished, beginner-friendly “Crochet Barbie Rose Keychain” amigurumi pattern with strong transitions for top-notch readability. Secondly, enjoy the calming rhythm of shells, petals, and tidy wraps as you build a tiny bouquet in your hands. Moreover, share the joy by gifting a rose to a friend, teacher, or colleague who needs a smile today. Consequently, your handmade charm will brighten keys, bags, and daily routines with a pop of color and care. Finally, trust your process, tweak your colors, and keep creating because every stitch grows your skills and your creative confidence.