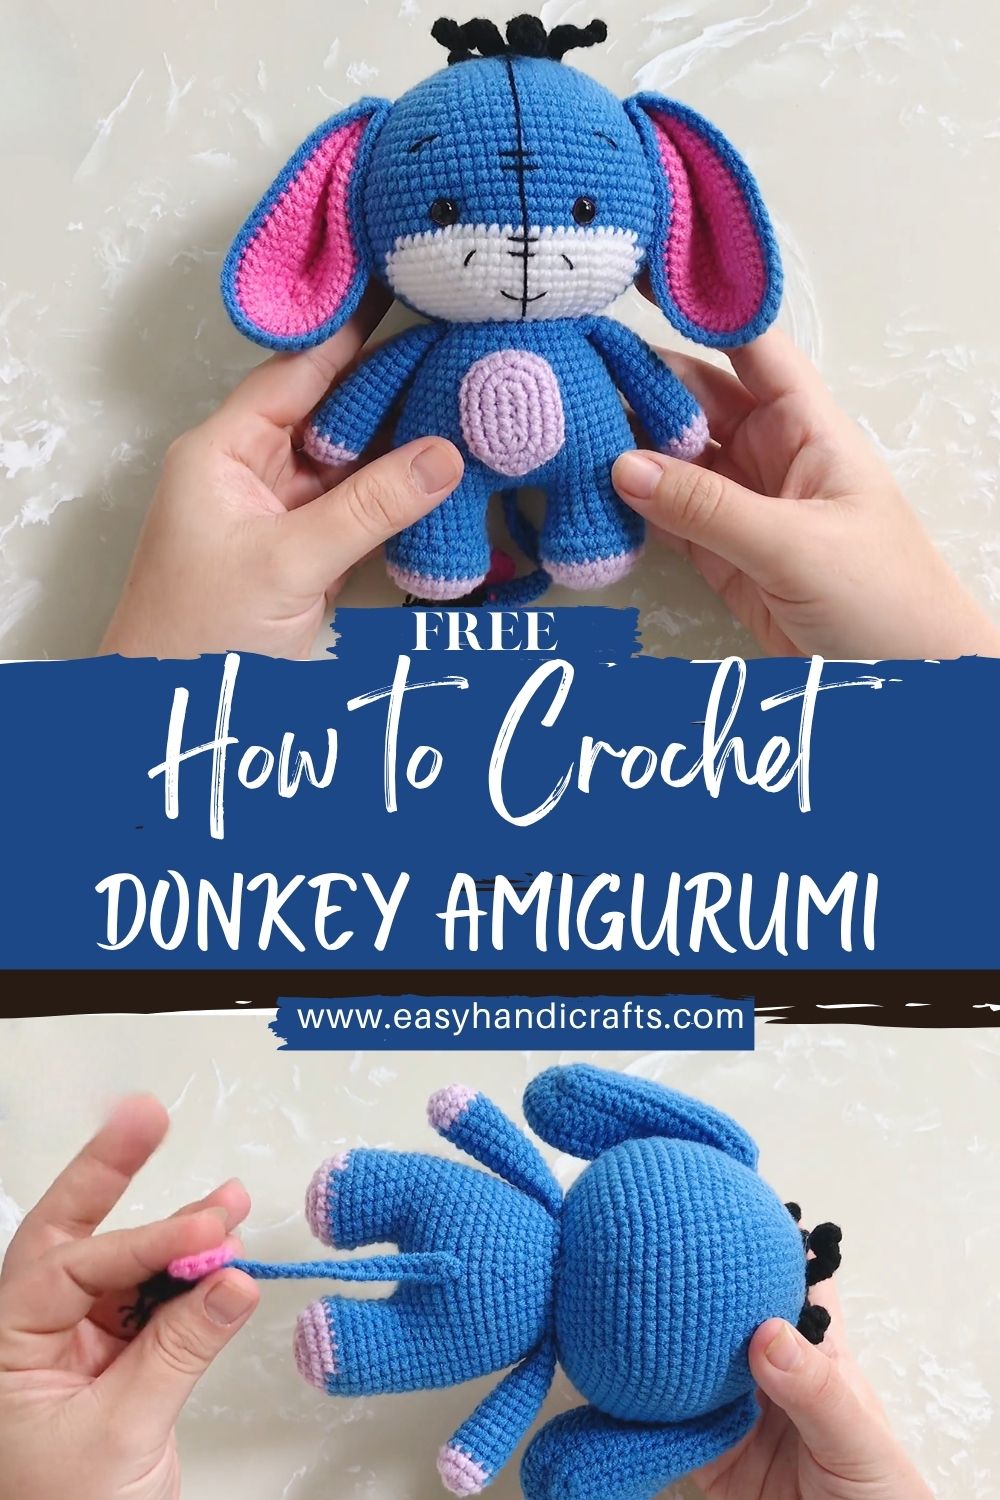
How to Crochet a Cute Donkey Amigurumi Beginner Pattern
Today we’re making a cute donkey amigurumi that’s small, squishy, and full of personality. This is a beginner-friendly crochet pattern, so if you can single crochet and count stitches, you can absolutely make it. I’ll walk you through each piece step by step, then we’ll sew it together into the sweetest little donkey.
Make a cute donkey amigurumi with this beginner free crochet pattern, simple stitches, clear steps, and an adorable DIY toy you’ll love.
If you’re new to amigurumi, you’re in for a treat. Amigurumi is the Japanese-inspired craft of crocheting small stuffed toys using tight stitches worked in the round. It’s one of those hobbies where a few basic techniques can turn into endless cute characters.
This donkey amigurumi is a perfect, easy crochet project for beginners because it’s built from simple shapes: a round head, a slightly oval body, and small limbs that you can crochet quickly. The details (like the muzzle and ears) look impressive, but they’re made with beginner-level stitches and straightforward sewing.
In this amigurumi tutorial, you’ll learn how to:
- Crochet in continuous rounds (without joining)
- Use increases and decreases to shape parts neatly
- Place safety eyes and embroider a simple face
- Assemble and shape your toy so that it looks polished
And the best part? This little donkey makes a heartfelt gift, a nursery keepsake, a desk buddy, or a comforting, cute crochet toy to tuck into a bag. It’s the kind of project that feels relaxing while you make it—and genuinely satisfying when it’s finished.
Materials List
Here’s what you’ll need for your DIY amigurumi donkey:
Yarn (choose soft worsted/medium or DK)
- Maincolourr: lighgreyay or medium grey
- Accent colour: cream/white (muzzle + belly optional)
- Detailcolourr: black (nostrils, mouth, eyebrow/eyelash optional)
- Optional: light pink (inner ears or blush)
Tools & Notions
- Crochet hook: 3.0 mm–3.5 mm (use a smaller hook than yarn label for tight stitches)
- Polyester fiberfill stuffing
- Safety eyes: 8–10 mm (or embroider eyes with black yarn/thread)
- Tapestry needle (for sewing parts)
- Scissors
- Stitch marker (or a scrap piece of yarn)
- Optional: felt for tiny nostrils, ribbon for a bow, or a mini scarf
Before You Start: Stitch Guide (Beginner-Friendly)
These are the stitches used in the pattern:
- SC (single crochet): insert hook, yarn over, pull up a loop, yarn over, pull through both loops.
- INC (increase): work 2 SC into the same stitch (this makes the piece wider).
- DEC (decrease): crochet 2 stitches together (this shapes inward).
- Tip: an invisible decrease makes amigurumi look smoother.
- SL ST (slip stitch): used to finish or join edges.
Pattern notes
- Work in continuous rounds (spiral). Do not join rounds unless stated.
- Always count stitches at the end of each round.
- Stuff as you go, especially before closing small openings.
Step-by-Step Instructions (Donkey Amigurumi)
1) Head (maigreyay)
Round 1: Magic ring (MR), 6 SC (6)
Round 2: INC in each stitch (12)
Round 3: (SC, INC) x6 (18)
Round 4: (2 SC, INC) x6 (24)
Round 5: (3 SC, INC) x6 (30)
Rounds 6–9: SC around (30)
Round 10: (3 SC, DEC) x6 (24)
Round 11: (2 SC, DEC) x6 (18)
At this stage, place safety eyes between Rounds 7–8, about 6–7 stitches apart (adjust to your preferred expression).
Round 12: (SC, DEC) x6 (12)
Start stuffing the head firmly (but not rock-hard).
Round 13: DEC x6 (6)
Fasten off and close the opening. Weave in the end.
2) Muzzle (cream/white)
This small piece gives the donkey that classic sweet face.
Round 1: MR, 6 SC (6)
Round 2: (SC, INC) x3 (9)
Round 3: (2 SC, INC) x3 (12)
Round 4: SC around (12)
Fasten off, leave a long tail for sewing.
Lightly stuff the muzzle or keep it flat for a softer look.
3) Body (main grey)
Round 1: MR, 6 SC (6)
Round 2: INC in each stitch (12)
Round 3: (SC, INC) x6 (18)
Round 4: (2 SC, INC) x6 (24)
Round 5: (3 SC, INC) x6 (30)
Rounds 6–10: SC around (30)
Now shape the bottom slightly smaller:
Round 11: (3 SC, DEC) x6 (24)
Round 12: (2 SC, DEC) x6 (18)
Stuff firmly—this helps the donkey sit nicely.
Round 13: (SC, DEC) x6 (12)
Round 14: DEC x6 (6)
Fasten off and close. Weave in the end.
Optional belly patch: Crochet a small oval in cream and sew it to the front of the body before attaching limbs.
4) Ears (make 2: main grey + optional pink inner ear)
Ears are where the donkey charm really shows up.
Round 1: MR, 6 SC (6)
Round 2: (SC, INC) x3 (9)
Round 3: SC around (9)
Round 4: (2 SC, INC) x3 (12)
Rounds 5–6: SC around (12)
Flatten the ear and SC across the opening (or SL ST closed).
Fasten off, leave a tail for sewing.
Optional inner ear:
Make a smaller ear shape in pink (stop at 9–10 stitches), then stitch it onto the front of each ear.
5) Arms (make 2, main grey)
Round 1: MR, 6 SC (6)
Round 2: SC around (6)
Round 3: (SC, INC) x3 (9)
Rounds 4–6: SC around (9)
Lightly stuff the lower half only (keeps arms flexible).
Flatten opening and SC across to close.
Fasten off, leave tail.
6) Legs (make 2, main grey)
Round 1: MR, 6 SC (6)
Round 2: INC in each stitch (12)
Round 3: SC around (12)
Round 4: (2 SC, DEC) x3 (9)
Rounds 5–7: SC around (9)
Stuff firmly, especially the foot area.
Flatten opening and SC across to close.
Fasten off, leave tail.
Optional hoof detail: Switch to cream for Round 3 to create a cute hoof edge.
7) Tail (main gray + black tip optional)
Round 1: MR, 5 SC (5)
Rounds 2–6: SC around (5)
Optional: switch to black for the last 1–2 rounds for a “tail tuft” look.
Fasten off, leave a tail for sewing.
Alternative tail tuft: Cut a few short strands of black yarn, fold, and latch them onto the tail end like mini fringe.
8) Face Details (simple and beginner-friendly)
Now the donkey becomes expressive.
Attach muzzle:
Place the muzzle centred under the eyes. Sew it on using the long tail.
Nostrils:
With black embroidery thread, stitch two tiny nostrils on the muzzle (small vertical stitches work well).
Mouth (optional):
Stitch a short curved line under the muzzle or a tiny “Y” shape for a sweet smile.
Eyebrows/eyelashes (optional):
A couple of small stitches above each eye can make the face look extra gentle.
Assembly Instructions (Putting Your Donkey Together)
Take your time here—assembly is where amigurumi really comes to life.
- Sew hthe ead to the body
- Pin the head to the top of the body first (or use scrap yarn to tack it in place).
- Sew around the neck opening with small, tight stitches.
- Add a pinch more stuffing right before closing if the neck looks soft.
- Attach ears
- Place ears on the top sides of the head.
- Angle them slightly outward for a classic donkey silhouette.
- Sew firmly along the base.
- Attach arms
- Sew arms to the sides of the body, just under the head seam.
- Keep them even so the donkey looks balanced from the front.
- Attach legs
- Sew legs near the bottom front of the body.
- If you want your donkey to “sit,” place the legs slightly forward and flatter.
- Attach tail
- Sew the tail to the lower back of the body.
- A few extra stitches here help since tails love to get tugged.
- Final shaping
- Gently pinch and massage the stuffing into place.
- Adjust ear angles and muzzle position if needed before weaving in all ends.
Tips for Beginners (So Your Donkey Turns Out Neat!)
- Use a stitch marker every round. It prevents getting lost, especially in continuous rounds.
- Tension matters more than speed. Aim for snug stitches so stuffing doesn’t show through.
- Count often. If a piece looks wobbly, recount the last round—one missed INC/DEC change can quickly alter the shape.
- Stuff gradually. Overstuffing can stretch stitches; understuffing can make the toy look lumpy. Add stuffing in small amounts and shape with your fingers.
- Pin before sewing. Even two pins can save you from crooked ears or a muzzle that drifts off-centre.
- Read the round out loud (seriously!). For example, “(2 SC, INC) x6” helps your hands stay in rhythm.
Conclusion
Once you sew on those ears and stitch the little nostrils, you’ll be surprised how quickly this donkey amigurumi turns from a handful of simple parts into a character with real sweetness. If you’re following this as a beginner crochet pattern, be proud—amigurumi is a skill, and every finished toy is proof you’re improving.