Lovely Crochet Mushroom Frog Amigurumi Pattern Beginner Project
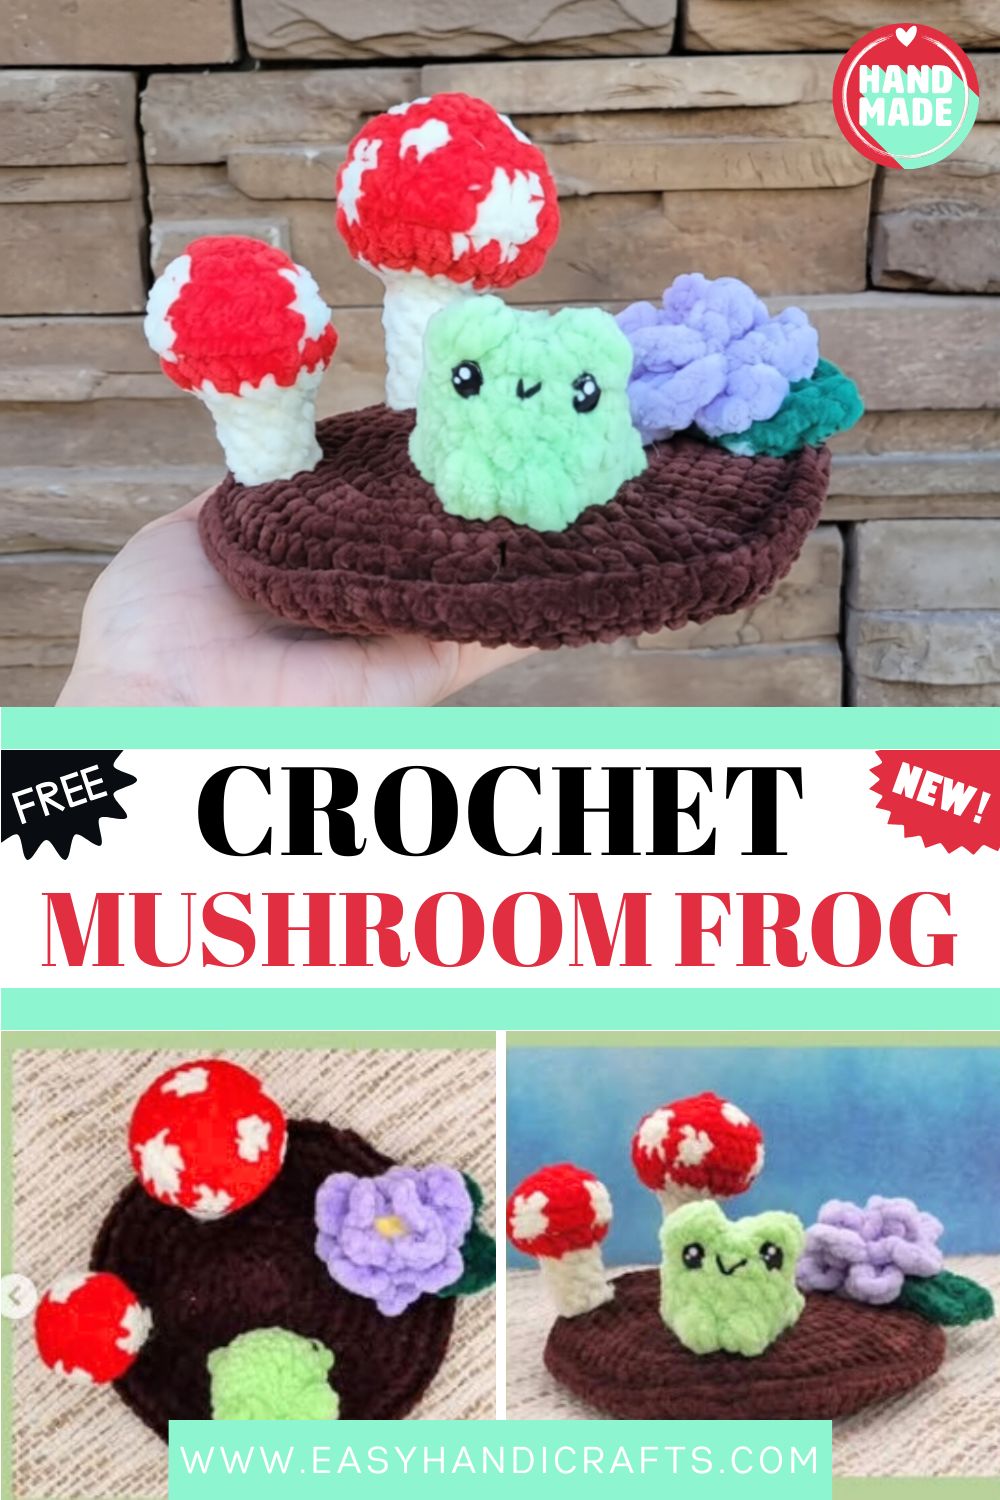
A chubby green frog resting on a tiny patch of mud, accompanied by two spotted toadstools and a water lily floating nearby this Crochet Mushroom Frog Amigurumi scene transforms a few simple pieces into a charming little pond that you can display on any shelf, table, or display corner.
Frogs and mushrooms have gained considerable popularity in the crochet world lately, and it’s truly hard not to be charmed by their cozy, woodland appeal. Instead of making just a plush frog, this design creates a whole little world that includes mud, toadstools, and a delicate water lily too. Beginners who want to challenge themselves a little will love how this project gradually transforms into a sweet, handmade, shelf-ready decoration.
The Story Behind This Froggy Pond
Crochet Mushroom Frog Amigurumi have taken over the crochet world lately, and it’s easy to see why. Both lean into that woodland-cottage feeling everyone’s chasing right now, all soft greens, earthy browns, and a touch of fairy-tale magic. Instead of stopping at a single frog, this design builds out the whole habitat: the mud he sits in, the toadstools keeping him company, and a delicate lily resting on the water.
Crafters love these little scenes because they double as decor. It’s a plush and a piece of art rolled into one, and it makes a genuinely memorable handmade gift.
What You’ll Be Making
You’ll crochet several small pieces and bring them together into one finished display. The frog gets puffy little legs and big kawaii eyes. The two mushrooms wear red caps with ivory spots. A layered water lily and a leafy lily pad round out the pond, and everything attaches to a firm, canvas-backed base that keeps the whole scene upright.
The finished piece sits roughly four and a half inches across, matching the circular canvas at its core.
Skill Level
Not a first-ever project, but very doable. You’ll meet puff stitches and some back-loop shaping, nothing scary once you slow down a little.
Everything You’ll Need
Pull your supplies together before you start so nothing breaks your flow mid-round.
Yarn
This Crochet Mushroom Frog Amigurumi pattern uses weight 6 (super bulky) yarn, which works up fast and gives the scene a plump, cozy look. Grab these colors:
- Light green for the frog
- Red and ivory for both mushrooms (red caps, ivory spots and undersides)
- Yellow and purple for the water lily
- Green for the lily pad
- Brown for the landscape base
- A little light green worsted-weight yarn for sewing the frog down
Other Supplies
- Two 9 mm kawaii safety eyes
- Black embroidery thread for the mouth
- A 4.5-inch circular canvas piece to stiffen the base
- Polyester fiberfill
- A tapestry needle and scissors
- A bit of craft glue and a few sewing pins for the lily
A quick heads-up: this pattern uses US crochet terms throughout.
The Stitches You’ll Lean On
Most of the project rides on familiar stitches, plus two puff stitches that give the frog and toadstools their chubby texture.
The Basics
- Magic ring / starting chain to begin each piece
- Single crochet (sc), the workhorse stitch
- Increase (inc) and decrease (dec) for shaping
- Slip stitch (sl st) to tidy and join
3 DC Puff Stitch (3 dc ps)
- Yarn over and insert your hook into the next stitch.
- Pull up a loop.
- Yarn over and pull through the first two loops on your hook.
- Repeat steps 1 through 3 two more times, for three partial double crochets total. You’ll have four loops on the hook.
- Yarn over and pull through all four loops.
6 DC Puff Stitch (6 dc ps)
- Yarn over and insert your hook into the next stitch.
- Pull up a loop.
- Yarn over and pull through the first two loops on your hook.
- Repeat steps 1 through 3 five more times, for six partial double crochets total. You’ll have seven loops on the hook.
- Yarn over and pull through all seven loops.
The Full Pattern, Piece by Piece
Work in continuous spirals unless a round tells you otherwise, and keep a stitch marker in the first stitch of each round so you never lose your place.
The Frog
Use light green yarn, and stuff as you go.
- R1: ch 4. Starting in the 2nd ch from the hook: inc, sc, inc. Then along the other side of the chain: inc, sc, inc. (10)
- R2: inc, 6 dc ps, inc x2, 6 dc ps, inc x5 (18)
Tip: Before each 6 dc ps, drop a stitch marker into the stitch you’ll work right after the puff. The puff stitch tends to hide the next stitch, and the marker keeps you on track.
- R3: 18 sc (18)
Now pause. Set the safety eyes between rounds 2 and 3, tucked just beneath and right beside each puff stitch. Embroider the mouth onto round 3 with black thread.
- R4-5: 18 sc (18)
- R6: 4 sc, 3 dc ps, 1 sc, 3 dc ps, 4 sc, 3 dc ps, 6 sc (18)
The puff stitches here become the front legs. Depending on your tension, you can shift where you place them to line up better with your frog.
- R7: BLO 3 dc ps, reg dec, (sc, reg dec) x5 (12)
- R8: dec x6 (6)
Fasten off and weave in the end.
The Big Mushroom
Begin in red yarn, and stuff as you go. Switch to ivory where you want the spots and the underside of the cap, then return to red as needed.
- R1: ch 2, work 7 sc into the 2nd ch from the hook (7)
- R2: inc in each st around (14)
- R3: (sc, inc) around (21)
- R4: (2 sc, inc) around (28)
- R5: BLO sc, 2 sc, 4 sc, 2 sc, 5 sc, 3 sc, 8 sc, 3 sc (28)
- R6: sc, 2 sc, 4 sc, 2 sc, 5 sc, 3 sc, 11 sc (28)
- R7: BLO (2 sc, reg dec) around (21)
- R8: (sc, dec) around (14)
- R9: dec around (7)
- R10-15: 7 sc (7)
Sl st into the next stitch after round 15 to smooth out the stem. Fasten off and leave a tail long enough to wrap around the stem twice when you sew it down later.
The Small Mushroom
Start with red yarn, stuffing as you go, with ivory spots placed the same way as the big mushroom.
- R1: ch 2, work 7 sc into the 2nd ch from the hook (7)
- R2: inc in each st around (14)
- R3: (sc, inc) around (21)
- R4: BLO 3 sc, 3 sc, 6 sc, 3 sc, 3 sc, 3 sc (21)
- R5: BLO (sc, reg dec) around (14)
Switch to ivory yarn for the rest of the mushroom.
- R6: dec around (7)
- R7-10: 7 sc (7)
Sl st into the next stitch after round 10 to even out the stem. Fasten off and leave a long sewing tail.
The Water Lily
This is the fanciest piece, so take it slow. The blanket-style yarn can hide your stitches, so stitch markers really earn their keep here. Mark the leftover back loops you’ll need later, and the petals come together cleanly.
Begin with yellow yarn.
- R1: ch 2, work 8 sc into the 2nd ch from the hook, then sl st to the first sc (8). Fasten off.
Pop a stitch marker into the back loop of both the first and last stitch. The slip stitch counts as a stitch, so one marker belongs in the back loop of that final slip stitch.
- R2: Attach purple yarn, insert your hook into a front loop of a round-1 stitch, then work FLO 8 sc.
Mark the leftover back loops of the first and last stitch of round 2. A small gap between them is normal and closes up once round 3 begins.
- R3: FLO (in the first stitch: sl st. In the second stitch: sc, ch 2, tr, ch 2, sc) x4
Move your yarn tails to the outside of your work now to make the next rounds easier.
- R4: Work into the leftover back loops of round 2, starting with whichever loop is closest to your hook. (First stitch: sc, ch 2, dc, ch 2, sc. Second stitch: sl st) x4
- R5: Work into the yellow leftover back loops of round 1, again starting with the closest loop. (First stitch: sl st. Second stitch: sc, ch 1, hdc, ch 1, sc) x4
Fasten off and weave in the ends.
The Lily Pad
Use green yarn.
- R1: ch 2, work 6 sc into the 2nd ch from the hook, sl st to the first sc, then ch 2 and turn (6)
- R2: 3 dc into the first stitch, dc inc x4, then 3 dc into the final stitch (14)
Fasten off and weave in the ends.
The Landscape Base
Use brown yarn. You’ll make two matching halves and join them around the canvas circle.
- R1: ch 2, work 8 sc into the 2nd ch from the hook, sl st to the first sc (8)
- R2: inc x8 (16)
- R3: (sc, inc) x8 (24)
- R4: (2 sc, inc) x8 (32)
- R5: (3 sc, inc) x8 (40)
- R6: (4 sc, inc) x8 (48)
- R7: (5 sc, inc) x8 (56)
- R8: (6 sc, inc) x8 (64)
- R9: (7 sc, inc) x8 (72)
- R10: 72 sc (72)
Check whether your canvas circle fits inside the crocheted base around now. If it’s snug, add a round of 72 sc; if it’s loose, drop one. Adjust freely.
Fasten off this first half. Make a second identical half, but don’t fasten off the second one. Head straight to round 11.
Line the two halves up like puzzle pieces so the seam stays even. Insert your hook into the next stitch of the second half, then into the stitch right after where you fastened off the first half. That’s your first score of round 11.
- R11: Crochet both halves together with 72 sc. About halfway through, slide the canvas circle inside, then finish closing it up with the canvas tucked within.
Putting the Whole Scene Together
Directions for left and right assume you’re looking at the base from the front, top-down.
- Sew the frog onto the front of the base across rounds 4 through 8 using light green worsted-weight yarn. Worsted weight holds better than the bulky here. Aim to anchor all four feet to the surface.
- Using its long tail, sew the big mushroom behind the frog and a touch to the left, on rounds 7 and 8.
- Using its tail, sew the small mushroom between the frog and the big mushroom on the left side, on rounds 8 and 9.
A floppy mushroom is a common snag. Sewing around the stem twice helps, and on the second pass, anchor it to a stitch a little further out than the first. Pulling a bit of stuffing from the round cap can firm it up, too.
- Glue the lily pad on the right side, between the big mushroom and the frog, letting it hang slightly off the edge.
- Glue the water lily on top, with the bottom four petals split between the base and the lily pad. Use sewing pins to hold everything while it dries. Once set, fold the innermost petals up, then fold the middle petals up partway for a layered, open-bloom look.
Beginner Tips Worth Knowing
A few small habits make this scene come out clean and sturdy.
Keep Your Tension Snug
Tight stitches hide the stuffing and keep the shapes crisp. With bulky yarn especially, loose loops show gaps fast, so hold steady and don’t be afraid to firm things up.
Mark Everything
Between the spirals and the back-loop work on the water lily, stitch markers save you from constant recounting. Mark the start of each round and any leftover loops you’ll come back to.
Stuff Firmly, in Small Amounts
Feed the fiberfill in little pinches as you close each piece rather than cramming it all at the end. Firm but not bursting is the sweet spot, especially for the mushroom caps.
Make It Your Own
Once the basic scene clicks, the fun really starts.
- Recolor it: swap the red mushrooms for blue or purple, or make a sunset-toned frog. Pastels feel dreamy; brights feel playful.
- Add little extras: a tiny bee, a pebble, or a second lily can fill out the pond.
- Resize it: thinner yarn and a smaller hook shrink the whole scene into a pocket-sized version, while extra-chunky yarn supersizes it into a statement piece.
Frequently Asked Questions
What’s the best yarn for Crochet Mushroom Frog Amigurumi like this?
For this scene, weight 6 yarn keeps things fast and plush. In general, cotton gives sharp, defined stitches and holds shape well, while acrylic runs softer and cheaper with loads of colors. Pick whatever feels best in your hands.
How do I keep the pieces firm and standing?
Firmness comes from snug stitches plus the canvas circle in the base. Stuff each piece well as you close it, and use the double-stem sewing trick to keep the mushrooms from flopping.
How long does the Crochet Mushroom Frog Amigurumi scene take?
Because it’s several small pieces, plan for a handful of hours spread across a few cozy sessions. An advanced beginner can usually finish over a weekend, and the pace quickens once the puff stitches feel natural.
Final Thoughts
This Crochet Mushroom Frog Amigurumi scene proves that a few small pieces can add up to something genuinely special. With cozy colors, a couple of new stitches, and a bit of patience, you’ll end up with a charming froggy world that looks like it hopped straight off a storybook page.
So gather your yarn, grab that hook, and start with the frog. When your pond is finished, snap a photo, share it with your crochet community, and save this pattern, because one little scene is rarely enough.