Crochet Meme Lizard Amigurumi The Funniest Open Mouth Plush Pattern for Beginners
This Crochet Meme Lizard Amigurumi is a goofy, wide‑mouthed little plush that looks like it just heard the most dramatic gossip. Because it’s made with simple rounds and easy shaping, it’s perfect for anyone who loves cute amigurumi, funny crochet toys, and quick handmade gifts.
A Crochet Meme Lizard Amigurumi is a small crocheted lizard plush designed with an exaggerated, meme‑style face usually featuring big eyes and an open mouth that looks surprised, shocked, or hilariously confused.
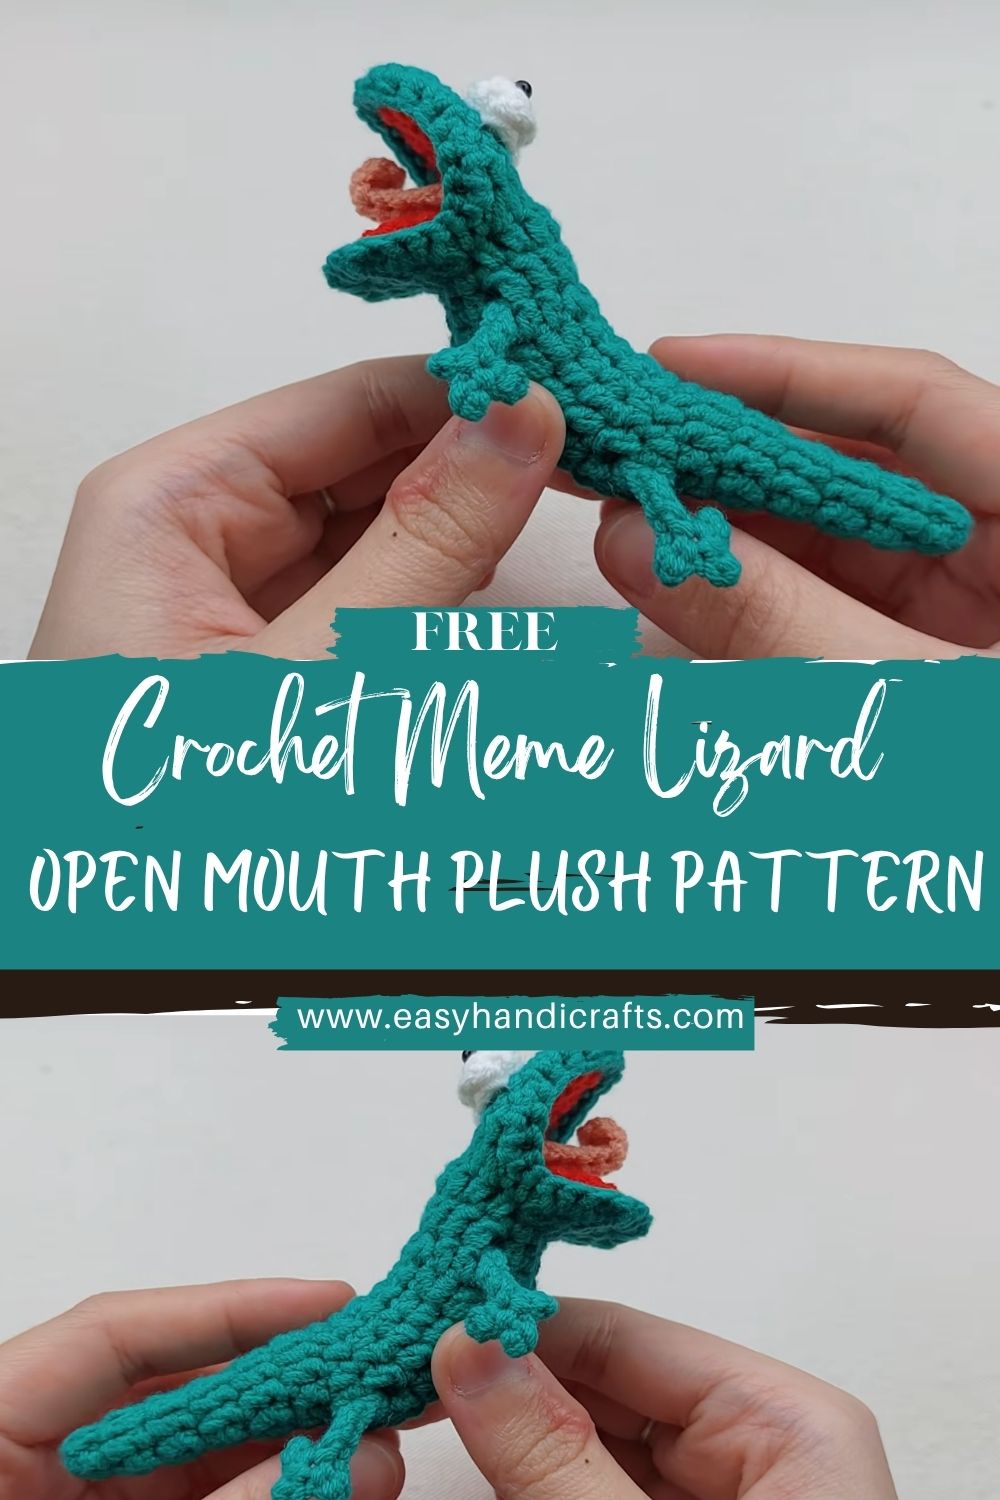
This style is trending because it turns a simple animal into a personality piece. After that first glance, the expression does all the talking, which makes it great for photos, desks, gift baskets, and even keychains. This pattern is especially friendly for beginners, because it relies mostly on single crochet, basic increases, and gentle decreases. Additionally, making a funny amigurumi like this can be surprisingly calming—stitching in rounds feels steady and repetitive in the best way, and seeing the face come alive at the end is a genuine mood boost.
This project suits beginners, gift makers, craft fair sellers (where permitted), and anyone who wants a lighthearted crochet win. Finally, the finished lizard works as cute décor, a stress‑squeeze buddy, a backpack charm, or a silly “just because” present.
Materials Needed
- Yarn (DK weight / #3):
- Main color (green or any lizard shade): 35–45 g
- Contrast color for mouth interior (pink, red, or dark purple): 5–10 g
- Optional accent for belly or spots (light green/cream): 5–10 g
- Crochet Hook: 2.75 mm–3.5 mm (use a smaller hook for tighter stitches)
- Safety Eyes: 8–10 mm (choose 8 mm for a smaller face, 10 mm for extra meme energy)
- Fiberfill Stuffing: 20–30 g (small handful, added gradually)
- Stitch Markers: 2 (one for rounds, one for eye placement)
- Yarn Needle: 1
- Scissors: 1 pair
- Optional: keychain ring + jump ring, tiny blush/embroidery thread, mini hat, or a small felt tongue
Skill Level:
Beginner / Easy
This pattern uses basic amigurumi skills such as working in continuous rounds, increasing, decreasing, and simple sewing. Meanwhile, the open‑mouth look is created with easy layered pieces rather than complicated shaping.
Making Time (Overview):
Total approximate time: 2–3 hours (depending on pace and sewing comfort)
Body (Main Part)
(Making time: ~50–75 minutes)
- First, start the belly base:
Using the main color, make a magic ring and crochet 6 single crochet (sc) into it. - Next, build a smooth, round bottom:
Increase evenly for a few rounds until the base is about the size of a large coin. A simple approach is:- Round 2: inc around
- Round 3: (sc, inc) repeat
- Round 4: (2 sc, inc) repeat
- Meanwhile, stretch the shape into a long body:
Crochet several rounds with no increases to form a tube. Keep the stitches tight so the plush looks neat and the stuffing stays hidden. - After that, create a gentle curve for the “meme posture”:
To curve the body slightly, place decreases only on one side for one round, then crochet a normal round. This creates a natural bend without sharp angles.- Tip: Put a stitch marker on the “inside curve” side to keep the shaping consistent.
- Later, begin stuffing gradually:
Add small amounts of stuffing, pushing it into the bottom and sides first. Keep the body firm but still squishy. - Next, narrow slightly at the neck area:
Decrease a little to create a smaller opening where the head will attach. Stop when the opening looks proportional to the head size. - Finally, fasten off and leave a long tail:
This yarn tail will be used for sewing the head on later.
Additional Parts
Head / Mouth Shaping
(Making time: ~35–55 minutes)
- First, crochet the head as a rounded oval:
Start with a magic ring and increase until the head is wider than the neck opening. Then crochet a few plain rounds so the head becomes slightly taller—this helps the face look expressive. - Next, plan the open mouth placement:
Before closing the head, decide which side will be the front. Meanwhile, mark a center point so the mouthpiece goes on straight. - After that, add safety eyes before sealing:
Place the eyes between the widest part of the head and the lower face area. Position them slightly wide apart for a funnier, more meme‑style look. Then secure the backs tightly. - Meanwhile, stuff firmly for a smooth face:
Add stuffing in small portions, and keep the front of the face slightly rounded. - Next, shape the mouth opening using a separate “lip” piece:
Crochet a simple oval in the mouth‑interior color (pink/red). This will sit inside the mouth area like a lining. - Finally, make a top mouth/lip edge:
Crochet a small curved strip in the main color and sew it above the mouth lining. This creates the illusion of an open mouth without complicated cutting or shaping.
Legs (Small, Cute Limbs) – Make 4
(Making time: ~15–25 minutes total)
- First, crochet tiny stumpy legs:
Start with a magic ring, crochet 5–6 sc, then do 1 small increase round if desired. - Next, add a few short rounds:
Crochet 2–4 rounds to create a little tube. - After that, lightly stuff (optional):
For tiny legs, stuffing is optional. If stuffing is used, add only a pinch. - Finally, flatten and close:
Press the opening flat and stitch through both sides to close, leaving a sewing tail.
Tail (Long and Tapered)
(Making time: ~15–25 minutes)
- First, begin with a small round:
Make a magic ring and crochet 4–6 sc. - Next, lengthen the tail:
Crochet several rounds without increases. - Meanwhile, taper gradually:
Add occasional decreases to slim the tail toward the tip. Keep it elegant rather than too skinny. - Finally, leave a long tail for sewing:
This helps position the tail securely at the back.
Details & Features
(Making time: ~20–35 minutes)
- Eyes placement (extra expression trick):
After inserting safety eyes, angle the head slightly and check the “vibe.” Next, push a tiny bit more stuffing behind one eye area if a more dramatic, surprised look is desired. - Mouth interior (contrast color):
Sew the mouth lining neatly so the edges sit flat. Meanwhile, stitch a few anchoring points in the center to prevent the lining from shifting. - Tongue (optional funny detail):
Crochet a tiny pink tongue: chain a short strip, then work back with slip stitches or single crochet to thicken it slightly. After that, sew it so it flops out of one side of the mouth for maximum meme energy.
Face & Assembly
(Making time: ~30–45 minutes)
- First, attach the head to the body:
Pin the head in place, then sew around the neck opening using small, tight stitches. Meanwhile, keep checking alignment so the face remains centered. - Next, sew on the legs:
Attach two legs near the front underside and two legs slightly behind. After that, set the plush on a table to confirm it sits evenly. - Then, attach the tail:
Sew the tail to the back of the body. For a cute pose, angle it slightly upward or to one side. - Meanwhile, refine the expression:
Add small embroidery details with black yarn, such as tiny nostrils, a slight smile crease, or short “laugh lines” near the corners of the mouth. - Finally, weave in ends securely:
Run the yarn tails through several stitches inside the plush, then trim. This keeps everything tidy and durable.
Sizing Tips
- Yarn weight matters: DK yarn creates a medium-plush lizard; worsted-weight yarn makes a larger, squishier lizard; fingering yarn makes a mini version.
- Hook size controls firmness: A smaller hook creates tighter fabric and sharper details, while a larger hook makes softer stitches.
- For a mini keychain: Use lighter yarn, smaller eyes (6–8 mm), and reduce the number of straight rounds in the body and tail.
- For a bigger plush: Use thicker yarn, 10–12 mm eyes, and add extra rounds to the body length.
Finishing Tips
- Keep stitches tight and consistent to avoid gaps, especially around curves.
- Stuff in layers: First, fill the bottom and sides; next, smooth the center; and finally, shape the neck-and-head connection.
- Shape adjustment: Gently roll the plush between your hands after stuffing to smooth out lumps.
- Secure attachments: Double-stitch the legs and tail, as those areas get handled most.
Variations & Customization Ideas
- Different colors: Bright neon for a party lizard, pastel for a soft,t cute look, or realistic greens/browns for a nature vibe.
- Funny expressions:
- Angry: add angled embroidered “bro.ws.”
- Sleepy: stitch half-closed eyes
- Goofy: add a sideways tongue and slightly uneven eye spacing
- Keychain or plush version: Add a keychain loop at the top of the head and at the back of the neck for a clip-on charm.
- Accessories: Tiny hat, mini scarf, a little prop (like a crochet “snack”), or blush dots on the cheeks.
Tutor Suggestions
- First, focus on clean rounds rather than speed; neat stitches make the meme face pop instantly.
- Next, use pins or stitch markers to map the face before sewing anything permanent.
- Meanwhile, practice sewing with small, hidden stitches that skill improves every amigurumi project.
- After that, treat the first lizard as a “test buddy,” because the second one always turns out even cuter.
- Finally, trust the process: the lizard can look plain until the mouth and eyes go on, and then the personality appears all at once.
Conclusion
The Crochet Meme Lizard Amigurumi is the perfect mix of cute and hilarious, thanks to its long, slender body, unique open-mouth design, and meme-style expression that instantly brings personality to the plush. First,t the simple rounds build confidence, and then the eyes and mouth details suddenly transform it into a character that looks like it’s reacting to the funniest moment ever.