Exceptional Crochet Kitty AirPods Case Cover Amigurumi Pattern Beginner with Face Details
This Kitty AirPods case crochet pattern is a quick, adorable way to dress up earbuds with something soft, handmade, and protective. It’s a cozy little project for anyone who loves crochet accessories, amigurumi-style details, and cute cat designs. Even better, the small size makes it perfect for using up leftover yarn while creating a gift that looks extra special.
A kitty AirPods case is a crocheted cover that slips over an AirPods charging case, usually with a snug body, a flap or opening for charging, and playful details like ears, eyes, and stripes. This pattern is great for beginners because it relies on simple stitches, mostly single crochet, and straightforward shaping.
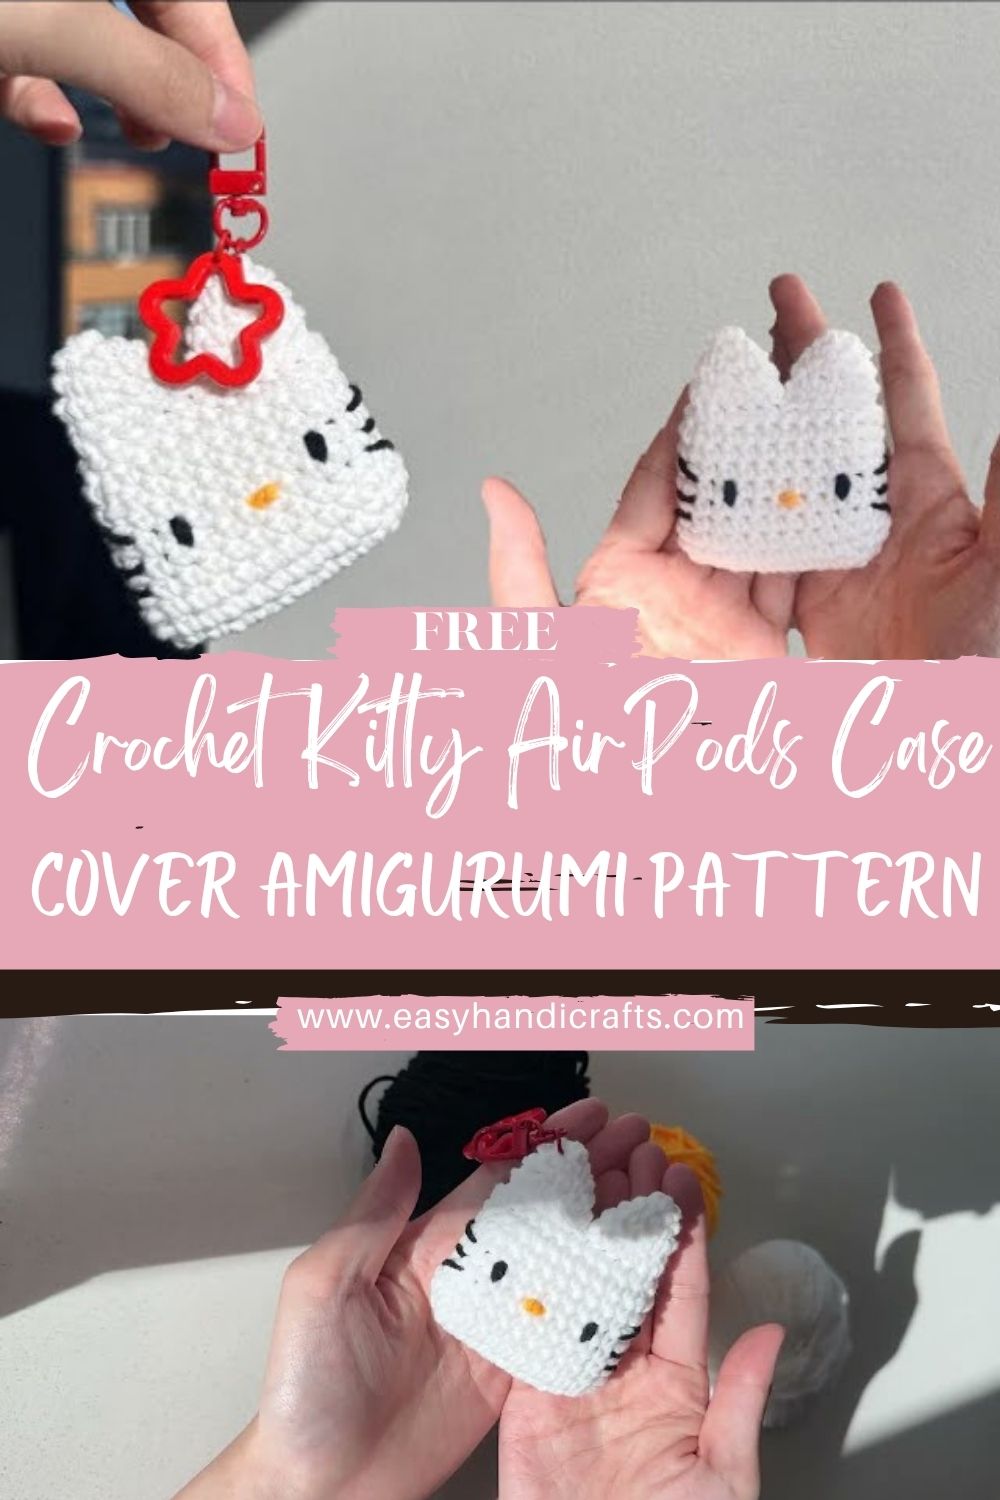
First, the case body is crocheted to match the AirPods case size, and next, the top edge is shaped to sit neatly without slipping off. Meanwhile, the fun comes at the end: adding tiny ears and an easy-to-embroider face that turns a plain case into a cute cat companion. Since it’s small, it finishes quickly, making it ideal for quick gifts, craft fair items, or a satisfying evening project.
Materials List (exact items needed)
Yarn
- Worsted-weight cotton or cotton‑blend yarn (recommended for durability)
- Main color (cat body): 15–20 g
- Accent color (stripes/inner ears): 5–10 g
- Small amounts of black/pink (face): scraps
Hook & Notions
- Crochet hook: 3.0 mm–3.5 mm (choose smaller for tighter fabric)
- Stitch marker: 1
- Yarn needle: 1 (for sewing/embroidery)
- Scissors
- Optional: keychain clasp + jump ring, small charm, or lobster clasp
- Optional: snap button (6–10 mm), tiny magnetic snap, or a short elastic loop
Helpful (not required)
- A measuring tape
- The AirPods case to test fit while crocheting
Estimated Time & Difficulty
- Difficulty level: Beginner‑Friendly / Easy
- Estimated time: 45–90 minutes (depending on details and embroidery)
Stitch Guide (simple)
- ch = chain
- sc = single crochet
- sl st = slip stitch
- inc = 2 sc in the same stitch
- dec = sc2tog (single crochet two together)
- BLO = back loop only (optional for a cleaner edge)
Step‑by‑Step Kitty AirPods Case Crochet Instructions
Step 1: Choose sizing (important first step)
AirPods cases vary slightly (AirPods 1/2 vs Pro). Therefore, the best approach is crocheting a snug rectangle base that matches the bottom of the case.
Target fit: The crochet should be slightly smaller than the case so it stretches into place.
Part A: Case Body
Step 2: Crochet the base rectangle
- First, chain 11–15 (start with 13 for a typical AirPods 1/2 case).
- Next, sc in the 2nd chain from the hook and sc across to the end.
- ch 1, turn.
- Then, sc in each stitch across for 3–5 rows total, until the rectangle matches the bottom size.
Fit check: Place the rectangle under the case. If it’s too short, add 1–2 chains and redo; if it’s too long, reduce the number of chains.
Step 3: Build walls around the rectangle (working in rounds)
- Next, crochet sc evenly around the entire rectangle, placing 3 sc in each corner to ensure smooth turning.
- Meanwhile, add a stitch marker to mark the start of the round.
- Continue crocheting sc in rounds (no increases) to form the sides.
Height guide:
- For AirPods 1/2: usually 10–14 rounds
- For Pro: usually 8–12 rounds (wider and shorter)
Fit check: Slide the cover onto the AirPods case as the rounds grow. The fabric should hug the case snugly.
Step 4: Shape the top edge (optional but neat)
- Later, crochet 1 round in BLO (back loops only). This creates a tiny fold line that helps the cover sit cleanly.
- Then crochet 1–2 more rounds sc normally.
- Finally, fasten off and weave in the end.
Optional opening for charging port:
If the yarn is thick and covers the bottom port area, stop 1–2 rounds earlier or skip stitches in the center front of one round to create a small gap.
Part B: Closure Options (pick one)
Option 1: No closure (snug fit)
If the stitch tension is tight and the cover grips well, no closure is needed. This is the fastest option.
Option 2: Button loop
- First, attach the arm to the back edge.
- Next, ch 10–18 (test length), then sl st back into the same spot to form a loop.
- Sew a small button on the front.
Option 3: Elastic loop
- Sew a small elastic loop to the back rim.
- Later, hook it around a button or a small sewn yarn nub on the front.
Part C: Kitty Ears (2 small triangles)
Step 5: Crochet the ears (make 2)
- First, make a magic ring and crochet 3 sc into it.
- Next round: ch 1, turn, then inc in each stitch (6 sc).
- Next round: ch 1, turn, then (sc, inc) repeat (9 sc).
- Finally, fasten off, leaving a tail for sewing.
Optional inner ear:
With accent color, stitch a tiny triangle using simple embroidery stitches, or crochet a smaller earpiece and sew it on.
Step 6: Attach the ears
- First, pinch the base of each ear slightly so it stands up.
- Next, place them on the top rim, spaced evenly.
- Finally, sew securely with tight stitches.
Tip: If ears droop, sew through the ear base twice and anchor into multiple rim stitches.
Adding Face Details (Eyes, Nose, Stripes)
Step 7: Place the face (plan before stitching)
- First, decide the “front.” Usually, the front is opposite the hinge.
- Next, use a stitch marker or scrap yarn to mark where the eyes will go.
Step 8: Add eyes (choose a style)
- Thread black yarn or embroidery floss.
- Stitch two small curved lines, about 3–5 stitches apart.
- Make a few straight stitches in a tiny circle to form each eye.
- Add a white highlight stitch if desired.
Because the case is used daily, safety eyes can rub. Therefore, embroidery is usually the safest option.
Step 9: Add the nose and mouth
- With pink yarn, stitch a tiny triangle or a small “V” nose.
- Next, with black yarn, add a short line down and two small mouth curves.
Step 10: Add stripes (classic tabby look)
- First, choose an accent color (darker than the body works best).
- Next, embroider 2–3 short stripe lines on each side of the face.
- Meanwhile, add one small stripe or “M” shape on the forehead if a tabby style is desired.
Clean look tip: Keep stripes symmetrical by counting stitches from the center line.
Tips, Tricks & Variations
Fit & structure tips
- Use cotton yarn for a case that holds its shape and resists fuzzing.
- Go down a hook size if gaps appear; tight stitches protect the case and look neater.
- Test fit often; small adjustments early save time later.
Color ideas
- Classic: cream body + light brown stripes + pink nose
- Black cat: black body + yellow eyes + tiny white whisker dots
- Calico: patchy embroidery “spots” instead of stripes
- Pastel: soft pink or mint with white ears for a kawaii vibe
Add-ons (cute but optional)
- Charm: attach a small charm to a jump ring sewn into the side seam.
- Keychain: Crochet a small loop at the back rim and add a clasp.
- Mini scarf: Crochet a thin chain strap and wrap it like a tiny collar.
Sizing adjustments (quick method)
- If the cover is too tight, add 1–2 stitches to the starting chain or use a slightly larger hook.
- If it’s too loose, reduce the starting chain by 1–2 or drop a hook size.
- If it’s too tall, remove 1–2 rounds; if too short, add rounds before finishing the rim.
Common Mistakes (and easy fixes)
- Wavy corners on the base: too many corner stitches; reduce corner count from 3 sc to 2 sc.
- Cover slipping off: stitch tension is loose; switch to a smaller hook or add a button loop.
- Face looks uneven: eyes placed without marking; mark the center front and count stitches outward.
- Ears flopping: not enough anchoring; sew ear bases deeper into the rim and pinch the base.
Conclusion
This Kitty AirPods case crochet pattern is small, practical, and packed with personality, especially once the ears, eyes, nose, and stripes are stitched in. First, the snug body comes together quickly, and next, the details turn it into a cat that’s almost impossible not to smile at. After finishing, trying a second version in a new colorway becomes even more tempting, especially with charms, collars, or different face expressions. Share the finished kitty case with friends, gift one as a cute surprise, or keep it as a daily reminder that handmade things make everyday routines feel a little softer.