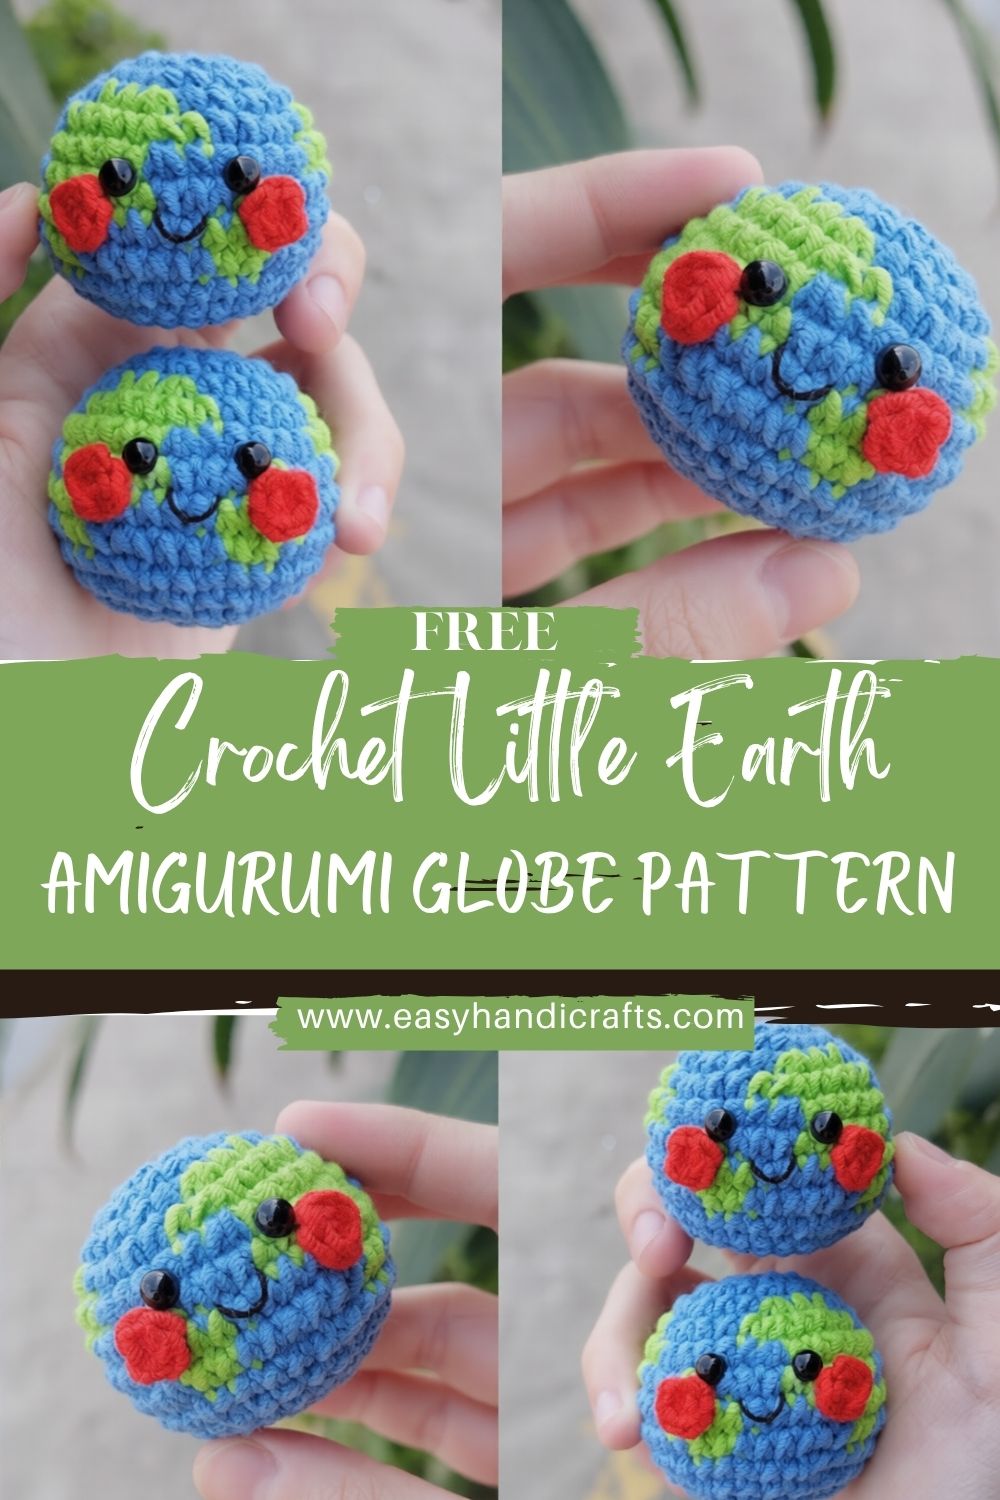
Awesome Crochet Little Earth Amigurumi Globe Pattern & Mini Earth Plush Beginners
First, imagine holding a tiny handmade planet that fits right in the palm, soft, squishy, and cheerfully round. This Crochet Little Earth Amigurumi turns simple yarn into an adorable mini world, complete with oceans, continents, and an optional cute face.
Next, this crochet globe pattern is an ideal beginner project because it uses easy stitches, simple shaping, and forgiving color changes. After that, it becomes a perfect gift, classroom craft, or educationaldécorr piece that feels meaningful without being complicated.
First, amigurumi is the Japanese art of crocheting small stuffed figures, usually worked in continuous rounds to create cute, plush shapes. Because the stitches are tight and the forms are simple, amigurumi projects feel especially satisfying—each round quickly starts to look like something real.
Then, round shapes like planets are perfect beginner projects because a sphere teaches the most important foundation skills: steady tension, even increases, and neat decreases. After that, this miniEarthh plush tutorial becomes extra fun thanks to simple color changes that form little “continent” patches without needing advanced techniques. Finally, this project strengthens confidence with working in rounds, shaping a smooth ball, and adding small details like eyes, embroidery, and optional accessories.
Materials Needed (Exact Measurements):
- Worsted weight yarn (Category #4)
- Blue (oceans): approx. 25–35 g
- Green (continents): approx. 8–15 g
- Optional white (details/clouds): approx. 2–5 g
- Crochet hook size: 4mm (G/6 recommended)
- Safety eyes: 8–10mm (or black embroidery thread if preferred)
- Polyester stuffing: approx. 10–20 g
- Stitch markers: 1–2
- Yarn needle: 1
- Scissors: 1 pair
- Optional: Keychain ring (plus a small jump ring or sturdy yarn loop)
Skill Level:
Beginner / Easy
First, the main Earth shape is a simple sphere made with basic increases and decreases. Next, the color changes are small and flexible, so they stay beginner-friendly even if they aren’t perfectly placed.
Making Time (Overview):
Approximately 1–2 hours (quick, cozy, and beginner-friendly)
Body (Earth Shape)
(Making time: ~45–75 minutes)
Before starting: Work in continuous rounds (no joining), meanwhile, keep stitches tight to prevent stuffing from showing.
- Start with a magic circle:
First, make a magic ring using blue yarn. Next, crochet 6 single crochet (sc) into the ring, and then pull it snug to close the center. - Increase rounds:
Next, increase evenly to build a flat circle that naturally curves into a sphere. Use this beginner-friendly guide for the first rounds:- Round 1: 6 sc in magic ring (6)
- Round 2: inc in each stitch (12)
- Round 3: (sc, inc) repeat around (18)
- Round 4: (2 sc, inc) repeat around (24)
- Round 5: (3 sc, inc) repeat around (30)
- Round 6: (4 sc, inc) repeat around (36)
After that, crochet 3–5 rounds of sc with no increases. This is the part that makes the globe look round instead of flat.
- Color changes (continents):
Meanwhile, switch between blue and green yarn to add simple continent shapes. Keep it playful—continents do not need to be accurate to look adorable. Easy continent method (beginner-friendly):- First, crochet mostly in blue.
- Next, when a green patch is desired, change to green for 2–6 stitches, then change back to blue.
- After that, stack patches by placing green stitches above earlier green stitches in the next round.
- Finally, keep the yarn not in use snug but not tight to avoid puckering.
Helpful tip: If long color carries feel messy, cut the green yarn after each patch and weave in ends later. This takes longer, but it keeps the inside cleaner.
- Stuff and close:
After that, begin decreasing to close the sphere. At this stage, keep adding small amounts of stuffing and shape gently as the opening gets smaller. Simple decrease guide:- Crochet 1 round of (4 sc, dec) repeat around
- Next round: (3 sc, dec) repeat around
- Next round: (2 sc, dec) repeat around
- Next round: (sc, dec) repeat around
- Final round: dec around until closed
Finally, fasten off, thread the tail onto a yarn needle, and weave it through the last stitches to close neatly.
Additional Details
Face (Cute Expression)
(Making time: ~10–20 minutes)
- Add safety eyes evenly:
First, decide where the face will sit—usually centered on a blue area for nice contrast. Next, place the safety eyes between the “middle rounds” of the globe, spaced about 6–10 stitches apart depending on size. Meanwhile, check the face from multiple angles before securing the backs. - Embroider a small smiling mouth:
After that, use black yarn or embroidery thread to stitch a tiny smile. A simple curved line or a small “u” shape works beautifully for a kawaii look. Then, add one small stitch at each end if a wider grin is preferred. - Optional blush using pink yarn:
Finally, add two tiny blush marks under the eyes using pink yarn, pastel thread, or a soft fabric crayon. Keep it subtle so the Earth still feels clean and bright.
Optional Add-ons
(Making time: ~5–15 minutes)
- Keychain loop:
First, insert a keychain ring at the top of the globe. Next, use sturdy yarn to create a loop and tie it securely through several stitches. After that, hide the knot inside if possible for a clean finish. - Small hanging thread:
Alternatively, add a simple hanging loop using a chain of 15–25 chains (depending on desired length). Then slip-stitch back down the chain for a thicker strap. - Decorative embroidery:
Finally, add tiny white “cloud” dashes, little stars, or simple lines around the globe for extra charm.
Face & Assembly
First, place your eyes before the globe is fully closed, if preferred, because it is easier to secure them with access to the inside. Next, keep the spacing balanced by counting stitches from the center and checking the face straight on. Finally, use simple embroidery to express small details; they look cleaner on a tiny plush than more complex ones.
Special Features
- Round, soft, and squishy miniEarthh that feels great in the hand
- Cute smiling face for a sweet kawaii vibe
- Lightweight and portable design that works asdécorr, a gift topper, or a keychain
Sizing Tips
- Smaller hook = tighter, smaller globe:
First, switch to a 3.0–3.5mm hook for a firmer, smaller Earth with very tight stitches. - Thicker yarn = bigger, plushier Earthh:
Next, use bulky yarn with a larger hook to create a pillow-like planet. After that, increase additional rounds to keep the sphere smooth. - Mini version idea:
Finally, reduce the number of increase rounds (stop at 24–30 stitches around), and use 6–8mm eyes for a balanced face.
Finishing Tips
- Keep stitches tight to avoid gaps:
First, use a hook slightly smaller than the yarn label suggests. Next, keep tension steady, especially during decreases. - Stuff evenly for a smooth round shape:
Meanwhile, add stuffing in small pieces. After that, press and rotate the globe to smooth out lumps. - Hide yarn ends carefully:
Finally, weave the ends through several stitches inside, end the sphere, then trim. If color changes were frequent, secure each end firmly so it can’t slip out over time.
Common Mistakes to Avoid
- Loose tension causing holes:
First, tighten tension and choose the smaller hook size. Next, avoid pulling the yarn too tightly during decreases, as this can open gaps. - Uneven color changes:
Meanwhile, keep color changes simple and short. After that, if a patch looks messy, treat it like a “cloudy ocean moment” and move on to tiny imperfections, which often read as cute texture. - Overstuffing or understuffing:
Next, avoid overstuffing because it stretches stitches and distorts the face. On the other hand, avoid understuffing because it creates a wrinkled globe. Finally, aim for a firm but squeezable feel. - Misplaced eyes:
Finally, pin eye positions first (or mark with stitch markers). Then adjust spacing before securing safety eyes permanently.
Variations & Customization Ideas
- Add different continent styles:
First, make blocky pixel continents for a playful look. Next, try wavy organic patches for a softer style. - Make pastel or rainbow Earth:
After that, use pastel blue and mint green for a dreamy aesthetic, or go full rainbow for a “happy planet” theme. - Turn it into a keychain or deskdécorr:
Later, add a keychain top loop for bags, or leave it plain as a desk buddy. - Add tiny clouds or stars:
Finally, stitch a few white cloud puffs, or crochet a tiny yellow star to sit beside the Earth for a space-themed set.
Tutor Suggestions
- First, always use a stitch marker when working in rounds to keep the increases even.
- Next, practice color changes slowly; clean transitions matter more than speed.
- Meanwhile, keep tension consistent, especially when switching colors, so the globe stays smooth.
- After that, take breaks if your hands feel tired, because relaxed hands create neater stitches.
- Finally, remember that planets look charming with “imperfect geography,” so the goal is cute and tidy, not scientifically exact.
Conclusion
This Crochet Little Earth Amigurumi is a sweet, beginner-friendly project that quickly turns into something meaningful and giftable. First, the simple sphere teaches the most useful amigurumi skills, and next,t the color patches make the globe feel alive without any complicated techniques. Finally, once the face is added, the mini planet becomes instantly cheerful, perfect for keychains, desks, classrooms, or just a cozy,y handmade reminder that small projects can bring big joy.