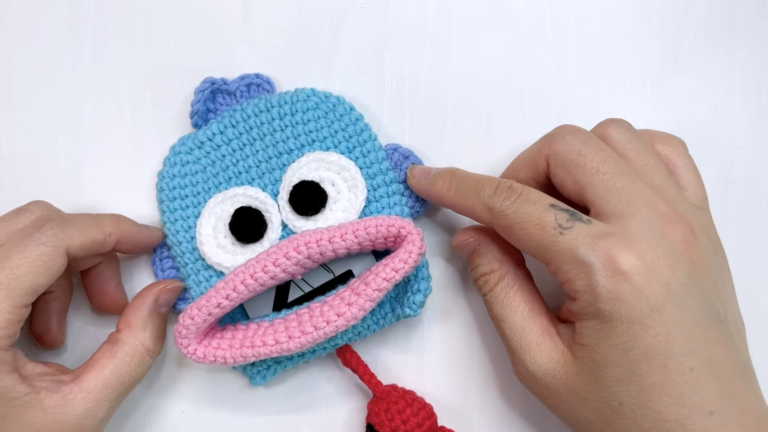
Fabulous Crochet Soft Penguin Rattle Amigurumi Pattern
From first stitch to final jingle, this fabulous crochet soft penguin rattle makes baby-safe cuteness effortless, quick, cuddly, photogenic, and perfect for thoughtful, handmade gifting.
Fabulous Crochet Soft Penguin Rattle Amigurumi Pattern delivers instant aww-factor in every stitch. This beginner-friendly design pairs plush texture with a gentle jingle, guiding you through materials, step-by-step shaping, secure assembly, and photo-ready finishing. Work it up fast in velvety or cotton yarn, customize colors and scarves, and tuck in a baby-safe rattle insert for sensory magic.

Durable, washable, and irresistibly cuddly, this penguin is equal parts playmate and keepsake, perfect for last-minute gifting and adorable nursery flair.
Uses:
- Sweet newborn or baby shower gift
- Soothing sensory rattle for tummy time or stroller walks
- Charming nursery decor or milestone photo prop
Fabulous Crochet Soft Penguin Rattle Amigurumi Pattern
If you’re craving a quick, cuddly, and photogenic baby gift, this Fabulous Crochet Soft Penguin Rattle Amigurumi Pattern has you covered. Right from the first stitch, you’ll notice how the plush texture and gentle jingle feel soothing and modern. Moreover, the steps are simple, the shaping is forgiving, and the results are consistently adorable. In this guide, you’ll find exact materials, clear sizing tips, body instructions with time estimates, common mistake fixes, smart variations, and polished finishing techniques.
Materials
- To begin, choose soft, washable yarns for baby safety and durability.
- Yarn: 100% cotton DK (Light-3)
- Main color (charcoal/navy/gray): 50 g (≈125 m / 137 yd)
- Contrast white (belly/face): 20 g (≈50 m / 55 yd)
- Accent (beak/scarf): 5 g (≈12 m / 13 yd)
- Crochet hook: 3.25 mm (D/3) for a dense, secure fabric
- Rattle insert: sealed plastic sphere, 30 mm diameter (1.18 in), baby-safe
- Stuffing: 20–25 g polyester fiberfill (or organic cotton fill)
- Tapestry needle: size 16
- Stitch markers: 1–2
- Scissors and pins: as needed
- Optional: 6–8 mm safety eyes (decor use only; alternatively, embroider eyes for under-3s)
- Optional: black embroidery floss (1 m) for eyes
Level of Difficulty
- Beginner/Easy. Consequently, if you can single crochet in the round, increase, decrease, and make a magic ring, you’re ready.
Sizing & Gauge Tips
- Finished size: approximately 12–14 cm (4.75–5.5 in) tall with DK cotton and a 3.25 mm hook.
- Gauge (amigurumi-tight): about 6.5–7 sc per 2.5 cm (1 in). Therefore, if stuffing shows through, go down to a 3.0 mm hook. Conversely, if stitches feel too tight, try 3.5 mm.
- For size changes, simply switch yarn: alternatively, use chenille/velvet (Bulky-5) with a 4.5–5.0 mm hook for a larger plush, or use sport (Fine-2) with a 2.75–3.0 mm hook for a mini.
Special Features
- Baby-safe construction: embroidered eyes and a securely enclosed rattle insert.
- Gentle jingle: soft sound that calms during tummy time and stroller walks.
- Washable durability: Cotton resists pilling and keeps its shape.
- Minimal sewing: notably, the body is worked in one piece with quick add-ons.
Step-by-Step Instructions for the Body (with time estimates)
Work in continuous rounds; do not join unless stated. Additionally, place a stitch marker in the first stitch of each round.
- Base and Start of Body — 10–12 minutes
- First, with the main color, make a magic ring; 6 sc into the ring. (6)
- Next, Round 2: Inc in each stitch around. (12)
- Then, Round 3: [Sc 1, inc] repeat around. (18)
- After that, Round 4: [Sc 2, inc] repeat around. (24)
- Subsequently, Round 5: [Sc 3, inc] repeat around. (30)
- Finally, Round 6: [Sc 4, inc] repeat around. (36)
Tip: Keep your tension firm; consequently, the base will stay flat and sturdy.
- Build the Belly Curve 15–18 minutes
- Meanwhile, Rounds 7–12: Sc around evenly. (36 each round)
This creates the rounded lower body. Additionally, lightly mold the shape with your fingers to maintain symmetry.
- Subtle Torso Shaping 12–15 minutes
- Next, Round 13: [Sc 5, inc] repeat around. (42)
- Then, Round 14: Sc around evenly. (42)
- Afterward, Round 15: [Sc 6, inc] repeat around. (48)
- Finally, Round 16: Sc around evenly. (48)
As a result, you’ll get a soft, squishy silhouette that’s easy to hold.
- Begin the Taper 12–14 minutes
- Now, Round 17: [Sc 6, dec] repeat around. (42)
- Then, Round 18: Sc around evenly. (42)
- Next, Round 19: [Sc 5, dec] repeat around. (36)
At this point, pause to prepare for the rattle insert.
- Insert Rattle + Stuffing 6–8 minutes
- First, add a small layer of fiberfill at the bottom.
- Then, place the sealed 30 mm rattle insert in the center.
- Subsequently, surround it with stuffing so it cannot shift.
- Finally, add a thin top layer of fiberfill; therefore, the insert won’t be felt through the stitches.
- Close the Top Neatly 12–15 minutes
- Next, Round 20: [Sc 4, dec] repeat around. (30)
- Then, Round 21: [Sc 3, dec] repeat around. (24)
- After that, Round 22: [Sc 2, dec] repeat around. (18)
- Subsequently, Round 23: [Sc 1, dec] repeat around. (12)
- Finally, Round 24: [Dec] repeat around. (6)
- To finish, fasten off with a long tail, weave through front loops, and cinch closed. Consequently, you’ll get a neat finish.
Pro tip: Gently roll the body in your hands to smooth lumps and balance the stuffing.
Optional Belly Patch 8–10 minutes
- With white, ch 6. Round A: 2 sc in second ch from hook, sc 3, 3 sc in last ch; on the other side, sc 3, sc in first space to close. (12)
- Next, Round B: Evenly spaced increases at curve ends until the oval reaches 6.5–7 cm (2.5–2.75 in) tall.
- Finally, pin to the front and whipstitch with tiny, even stitches.
Common Mistakes (and quick fixes)
- However, if you see gaps, your hook may be too large. Therefore, switch down 0.25–0.5 mm or gently tighten tension.
- If the base wobbles, your increases may be inconsistent. Instead, steam lightly (cotton only) and reshape with your hands.
- If the rattle insert is visible, add a thin layer of stuffing or use a smaller 25–28 mm insert.
- When shapes look lopsided, count stitches at each round marker; additionally, rotate your starting point periodically to reduce tension bias.
- If ends pop out, double-secure knots and weave tails 5–6 cm (2–2.5 in) inside.
Variations You’ll Love
- For a classic tux look, use a dark body, white belly, and orange beak/feet.
- Alternatively, choose pastels (mint, blush, butter yellow) with a cream belly for a soft nursery vibe.
- For seasonal flair, add a mini scarf: chain 22–24 cm; hdc rows for 2–3 rows; then wrap and tie.
- For sleepy charm, embroider closed eyes with curved lines and tiny lashes.
- For a jumbo hug, switch to chenille/velvet (Bulky-5) with a 4.5–5.0 mm hook; consequently, upsize the rattle to 35–40 mm or add two smaller inserts for a layered chime.
Tutor Suggestions (to crochet with confidence)
- First, place a stitch marker in the first stitch of every round; consequently, you’ll prevent miscounts and keep shaping evenly.
- Additionally, maintain a breathing rhythm, inhale as the hook goes in, exhale as you pull through to stabilize tension.
- Furthermore, pre-cut shorter seam lengths to avoid tangles.
- For smoother shaping, use invisible decreases (front-loop-only dec); as a result, bumps nearly disappear.
- Finally, practice the magic ring a few times; therefore, your base will look clean and professional.
Wings, Beak, and Details (quick add-ons)
- Wings (make 2) — 10–12 minutes total: Magic ring 6; [sc, inc] around (9); sc around for 3–4 rounds; leave a tail; flatten and stitch to sides at mid-height.
- Beak 5–6 minutes: Magic ring 4; [sc, inc] around (6); sc 1 round; lightly stuff; sew centered above belly.
- Eyes 4–5 minutes: Embroider small ovals or curved “sleepy” lines 1.5–2 cm apart; then bury tails securely.
For under-threes, avoid safety eyes; instead, always embroider.
Finishing Tips (polished and practical)
- First, seam with tiny whipstitches, catching inner loops so seams vanish.
- Next, check the balance: if the penguin leans, redistribute stuffing before you finalize seams.
- Additionally, roll the body gently to even the fiberfill and smooth the silhouette.
- For care, place the toy in a mesh bag; use a cold, gentle cycle; reshape while damp; and air-dry.
- Finally, add a fiber-content tag and care note; as a result, parents will appreciate the extra thought.
Time Overview (for planning your make)
- Body (Rounds 1–24): about 1 hr 15 min–1 hr 30 min
- Belly patch: 8–10 min
- Wings, beak, eyes: 20–25 min
- Final assembly and finishing: 10–15 min
Overall, expect approximately 2–2.5 hours at a relaxed, beginner-friendly pace.
Why This Pattern Works for Beginners
Because the body uses simple single crochet in the round, it feels calm and predictable. Moreover, the gradual increases and decreases teach essential shaping without the stress. Additionally, the rattle insert adds playful function while remaining securely enclosed. As a result, you’ll finish with a soft, camera-ready penguin that delights babies and reassures parents. Lastly, share your waddling cutie once it’s done because handmade joy, quite simply, is irresistible.