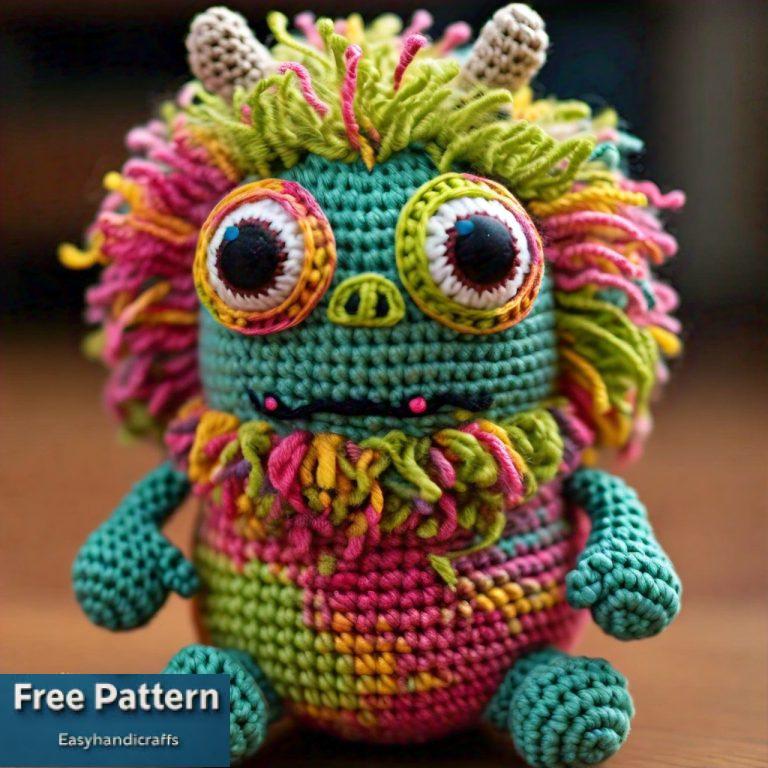
Crochet LaBuBu Wearing Frog Hat Doll Amigurumi Pattern
Instant charm: crochet LaBuBu wearing a playful frog hat with plush textures, quick rounds, minimal materials, beginner-proof steps, and adorable finishing details perfect for gifting or selling.
Whimsy meets cuddle in this Crochet LaBuBu Wearing Frog Hat Doll Amigurumi Pattern. Designed for confident beginners, it guides you through neat shaping, tidy color changes, and plush stuffing for a perfectly chubby silhouette. You’ll get round-by-round stitch counts, clear assembly notes, and helpful tips for attaching the sweet froggy cap.

Use cotton or acrylic yarn and a 2.5–3.5 mm hook to achieve a soft, huggable finish in a weekend. Customize eye styles, cheek blush, and hat spots to create a personality-packed companion everyone adores.
- Gift for birthdays, baby showers, or holidays
- Cute desk or nursery decor
- Sellable item for craft fairs and online shops
Introduction: Crochet LaBuBu Wearing Frog Hat Doll Amigurumi Pattern
Firstly, meet your next cheerful project: a cuddly LaBuBu doll topped with an irresistibly cute frog hat. Secondly, this beginner-friendly amigurumi pattern is designed to be clear, cozy, and absolutely giftable. Moreover, you’ll enjoy round-by-round instructions, precise stitch counts, and helpful tips that keep your crocheting smooth from the first loop to the final stitch. In addition, the frog hat features charming “eyeball” bumps, playful spots, and a comfortable fit that sits perfectly on LaBuBu’s head. Consequently, you’ll end up with a photogenic, huggable companion that looks polished, sturdy, and undeniably adorable. Lastly, if you’re crafting for markets, birthdays, or just because, this pattern balances speed, detail, and repeatability.
Finished Size and Skill Level
- Finished size: Approximately 18–20 cm (7–8 inches) tall using DK (Light #3) yarn and a 2.75–3.0 mm hook.
- Skill level: Confident beginner (comfortable with magic ring, increases, and invisible decreases).
- Construction: Worked in the round, stuffed firmly, and assembled with secure seams.
Abbreviations (US Terms)
- MR: Magic Ring
- ch: chain
- sc: single crochet
- inc: increase (2 sc in one stitch)
- dec: invisible decrease (sc 2 together through front loops)
- sl st: slip stitch
- st(s): stitch(es)
- BLO/FLO: back/front loop only
- FO: fasten off
Gauge and Tension
- Gauge (in sc, worked in the round): about 22 sts × 24 rows = 10 cm × 10 cm (4 in × 4 in), unblocked.
- However, the gauge is not critical. Nevertheless, do keep stitches snug to prevent stuffing from showing. Additionally, if your fabric is loose, use a smaller hook.
Materials (With Exact Measurements)
- Yarn: DK (Light #3) cotton or cotton-acrylic blend
- Main “LaBuBu” color (e.g., soft pink, cream, or light peach): 60 g (≈ 150 m / 165 yd)
- Frog green (hat + details): 35 g (≈ 90 m / 98 yd)
- White (frog eye whites): 10 g (≈ 25 m / 27 yd)
- Black (embroidery or frog eye pupils if not using safety eyes): 2–3 g (≈ 6–8 m)
- Optional blush yarn or embroidery floss (rose): < 1 g
- Hook: 2.75 mm (C) for tight stitches; alternatively, 3.0 mm if your tension is tight
- Safety eyes for LaBuBu’s face: 6–8 mm (pair)
- Safety eyes for frog hat bumps (optional look): 10 mm (pair)
- Fiberfill: 50–70 g, high-loft preferred for a plush feel
- Tapestry needle: 1 large eye needle for sewing
- Stitch markers: at least 2 (one for rounds, one for eye placement)
- Pins or clips: for holding parts during assembly
- Scissors: sharp snips for clean ends
- Optional: blush or soft pastel with a cotton swab for cheek color
Before You Start
- Firstly, read through the entire pattern once. Secondly, gather all materials and weigh yarn if needed to ensure you have enough. Moreover, place your stitch marker at the first stitch of each round. Additionally, stuff firmly but evenly to maintain the doll’s chubby silhouette. Finally, always count stitches; consequently, your shaping will remain precise and balanced.
Step-by-Step Instructions With Time Estimates
Because beginners love clarity, each step includes an estimated making time. Additionally, your pace may vary depending on tension and experience.
- Head (Main Color) — Time: 70–90 minutes
- Work in continuous rounds; do not join unless noted.
- R1: MR 6 sc (6)
- R2: inc × 6 (12)
- R3: (sc, inc) × 6 (18)
- R4: (2 sc, inc) × 6 (24)
- R5: (3 sc, inc) × 6 (30)
- R6: (4 sc, inc) × 6 (36)
- R7: (5 sc, inc) × 6 (42)
- R8: (6 sc, inc) × 6 (48)
- R9–R14: sc around (48 each round)
- Placement note: Insert 6–8 mm safety eyes between R11 and R12, spaced 9–10 sts apart. Alternatively, embroider eyes later for baby-safe dolls.
- R15: (6 sc, dec) × 6 (42)
- R16: (5 sc, dec) × 6 (36)
- R17: (4 sc, dec) × 6 (30)
- R18: (3 sc, dec) × 6 (24)
- Begin stuffing the head firmly.
- R19: (2 sc, dec) × 6 (18)
- R20: (sc, dec) × 6 (12)
- R21: dec × 6 (6), FO and weave tail to close circle.
- Face details: With black floss, embroider a tiny “v” nose and a soft smile centered between the eyes; with blush, add rosy cheeks.
- Body (Main Color) — Time: 55–70 minutes
- R1: MR 6 sc (6)
- R2: inc × 6 (12)
- R3: (sc, inc) × 6 (18)
- R4: (2 sc, inc) × 6 (24)
- R5: (3 sc, inc) × 6 (30)
- R6: (4 sc, inc) × 6 (36)
- R7–R10: sc around (36 each round)
- R11: (4 sc, dec) × 6 (30)
- R12: (3 sc, dec) × 6 (24)
- R13: (2 sc, dec) × 6 (18)
- Begin stuffing firmly for a rounded belly.
- R14: (sc, dec) × 6 (12)
- R15: dec × 6 (6), FO with long tail for sewing head to body.
- Arms × 2 (Main Color) — Time: 30–35 minutes total
- R1: MR 6 sc (6)
- R2: inc × 6 (12)
- R3–R8: sc around (12 each round)
- Lightly stuff the hand portion only.
- R9: Flatten and sc through both layers across 6 sts to close, FO with tail for sewing.
- Legs × 2 (Main Color) — Time: 55–65 minutes total
- R1: MR 6 sc (6)
- R2: inc × 6 (12)
- R3: (sc, inc) × 6 (18)
- R4–R6: sc around (18 each round)
- R7: (4 sc, dec) × 3 (15)
- R8–R10: sc around (15 each round)
- Lightly stuff, flatten, sc through both layers across 7 or 8 sts to close neatly, FO with long tail for sewing.
- Ears × 2 (Main Color) — Time: 12–15 minutes total
- R1: MR 6 sc (6)
- R2: (sc, inc) × 3 (9)
- R3: sc around (9)
- FO leaving a long tail for sewing.
- Note: LaBuBu’s ears are small and rounded; alternatively, slightly pinch the base when sewing to create a subtle curve.
- Tiny Tail (Main Color) — Time: 8–10 minutes
- R1: MR 6 sc (6)
- R2–R3: sc around (6 each round)
- FO with tail.
- Note: Lightly stuff and sew low on the back body; consequently, it balances the silhouette nicely.
- Frog Hat Base (Frog Green) — Time: 55–70 minutes
- Work top-down in continuous rounds.
- R1: MR 6 sc (6)
- R2: inc × 6 (12)
- R3: (sc, inc) × 6 (18)
- R4: (2 sc, inc) × 6 (24)
- R5: (3 sc, inc) × 6 (30)
- R6: (4 sc, inc) × 6 (36)
- R7: (5 sc, inc) × 6 (42)
- R8: (6 sc, inc) × 6 (48)
- R9–R11: sc around (48 each round)
- Fit check: Place the hat on the head; it should sit just at the brow without squeezing. If too tight, add one more increase round to 54; if too loose, remove one even round.
- Edging: Option A: sc one more round and FO. Option B: add reverse sc (crab stitch) around for a neat corded edge; consequently, the brim holds its shape beautifully.
- Frog Eye Bumps × 2 (White + Green) — Time: 30–35 minutes total
- Using white:
- R1: MR 6 sc (6)
- R2: inc × 6 (12)
- R3: (sc, inc) × 6 (18)
- R4: sc around (18)
- Switch to frog green:
- R5: sc around (18)
- Optional: insert a 10 mm safety eye centered in the white area now.
- R6: (sc, dec) × 6 (12)
- Lightly stuff.
- R7: dec × 6 (6), FO with tail.
- Position and sew both bumps symmetrically on top of the hat; moreover, angle slightly outward for a playful expression.
- Frog Spots (Green or Contrasting) — Time: 10–15 minutes
- Small spot: MR 5 sc, sl st to close, FO with tail.
- Medium spot: MR 6 sc, inc around next round to 12, FO.
- Sew a few spots on the hat’s side and back; consequently, the hat looks more animated.
- Chin Straps (Optional) — Time: 8–10 minutes
- Attach yarn at one lower corner of the hat, ch 20–24, FO; repeat on the other side.
- Add a tiny knot or a micro pom at each end if desired.
- Alternatively, leave the hat strap-free for easy on/off play.
- Assembly — Time: 45–60 minutes
- Firstly, pin the head to the body, ensuring the face looks straight when the doll is upright. Secondly, whipstitch around the neck seam using the body tail; add a touch more stuffing before closing the last 4–5 stitches. Moreover, sew legs to the bottom sides of the body so the doll stands or sits stably. Additionally, attach arms slightly below the head join, angled downward for a relaxed pose. Furthermore, sew ears symmetrically on the head, keeping them close to the top rear for that rounded LaBuBu silhouette. Next, stitch on the tiny tail at the base. Subsequently, try the hat on and mark the best placement for the frog eye bumps; sew them and add spots if you haven’t yet. Finally, weave in all ends securely and add a soft blush to the cheeks.
Basic Tips for a Cleaner Finish
- Firstly, use invisible decreases to minimize gaps; consequently, the shaping stays smooth.
- Secondly, keep a consistent tension across rounds; additionally, consider dropping hook size if you see stuffing.
- Thirdly, stuff in layers and test-squeeze; moreover, distribute fiberfill to avoid lumpy patches.
- Furthermore, pin limbs before sewing; consequently, symmetry improves dramatically.
- Likewise, leave long tails for seaming; additionally, lock your stitches with tiny backstitches every few centimeters.
- Finally, steam-block the frog hat lightly (no direct heat on acrylic); therefore, the brim sets neatly without curling.
Common Mistakes and How to Avoid Them
- Loose stitches showing stuffing: Use a smaller hook or firmer tension; furthermore, add a thin inner layer of yarn scraps inside if needed.
- Crooked facial alignment: Place both safety eyes temporarily, step back, and evaluate in good light; subsequently, adjust before locking the washers.
- Wobbly neck seam: Sew head-to-body with frequent passes and insert a final pinch of stuffing at the end; therefore, the join stays sturdy.
- Uneven limbs: Count placement stitches from the center front and center back; additionally, mirror across both sides using pins.
- Overstuffed frog eye bumps: Use light stuffing; consequently, the bumps stay rounded without bulging.
- Hat too tight or too loose: Add or remove an even round before the edging; moreover, try your hat on the head several times during construction.
Variations to Personalize Your LaBuBu
- Color play: Choose pastel main bodies (mint, lavender, butter yellow) and pair with richer green hats; consequently, your shelf looks vibrant.
- Expression set: Embroider sleepy eyes, winks, or a tiny open mouth; additionally, add freckles with dotted stitches.
- Outfit tweaks: Add a mini scarf, a tiny backpack, or a heart aappliquéon the belly; moreover, small accessories instantly change the vibe.
- Frog hat remix: Swap the round spots for tiny embroidered stars, add a striped brim, or use two-tone greens; consequently, the hat becomes a statement.
- Size changes: Use sport weight yarn with a 2.25–2.5 mm hook for a mini keychain; alternatively, use worsted weight with a 3.5–4.0 mm hook for a bigger hug buddy.
Care and Safety Notes
- For gifts to young children, avoid detachable small parts. Alternatively, embroider facial features and frog pupils instead of using safety eyes.
- Hand wash gently in cool water, shape, and air dry; furthermore, avoid heat to protect the stuffing loft.
- Store out of direct sun to prevent color fading; consequently, the doll remains photo-ready.
Quick Troubleshooting
- Head shaping looks angular: Add a half-round of sc before your first decrease round; additionally, massage the stuffing into smoother layers.
- Hat slides off: Add a single decrease round near the brim or attach chin straps; consequently, the fit improves.
- Visible seam line: Shift your stitch marker every few rounds; moreover, consider using a jogless technique when color-changing.
Estimated Total Time
- Beginners: 6.5–8 hours across several sessions
- Intermediate crafters: 4.5–6 hours
- Market batch makers: 3.5–4.5 hours per doll with streamlined assembly
SEO-Friendly Highlights (for your listing or blog)
- Crochet LaBuBu Wearing Frog Hat Doll Amigurumi Pattern
- Beginner-friendly amigurumi with clear stitch counts and assembly tips
- Exact material measurements and realistic time estimates
- Frog hat with 3D eye bumps, spots, and optional chin straps
- Perfect handmade gift, market-ready plush, and social-ready photo prop
Printable Stitch Recap (At a Glance)
- Head to 48, hold 6 rounds even, then decrease to close
- Body to 36, hold 4 rounds even, then decrease to close
- Arms: 12 sts tubes, lightly stuffed, flattened to close
- Legs: up to 18, taper to 15, lightly stuffed, flattened to close
- Ears: tiny rounds to 9 sts, minimal shaping
- Tail: tiny nub, 6 sts around
- Frog hat: top-down to 48, hold 3 rounds, edge neatly
- Eye bumps: white to 18, one even round, green rim, taper to 6
Assembly Order (Recommended)
- Firstly, sew the head to the body.
- Secondly, attach legs for balance.
- Thirdly, sew arms slightly low for a cuddly posture.
- Fourthly, add ears and a tail.
- Fifthly, complete hat details and fit.
- Finally, finish with facial embroidery and blush.
Friendly Sign-Off
Ultimately, your Crochet LaBuBu Wearing Frog Hat Doll Amigurumi will be sweet, sturdy, and delightful to hold. Additionally, the clear counts, careful shaping, and step-by-step times help you move confidently from start to finish. Moreover, you can customize colors, faces, and hat details to match any personality. Finally, share your finished LaBuBu, note your unique twists, and, of course, enjoy every squishy stitch.