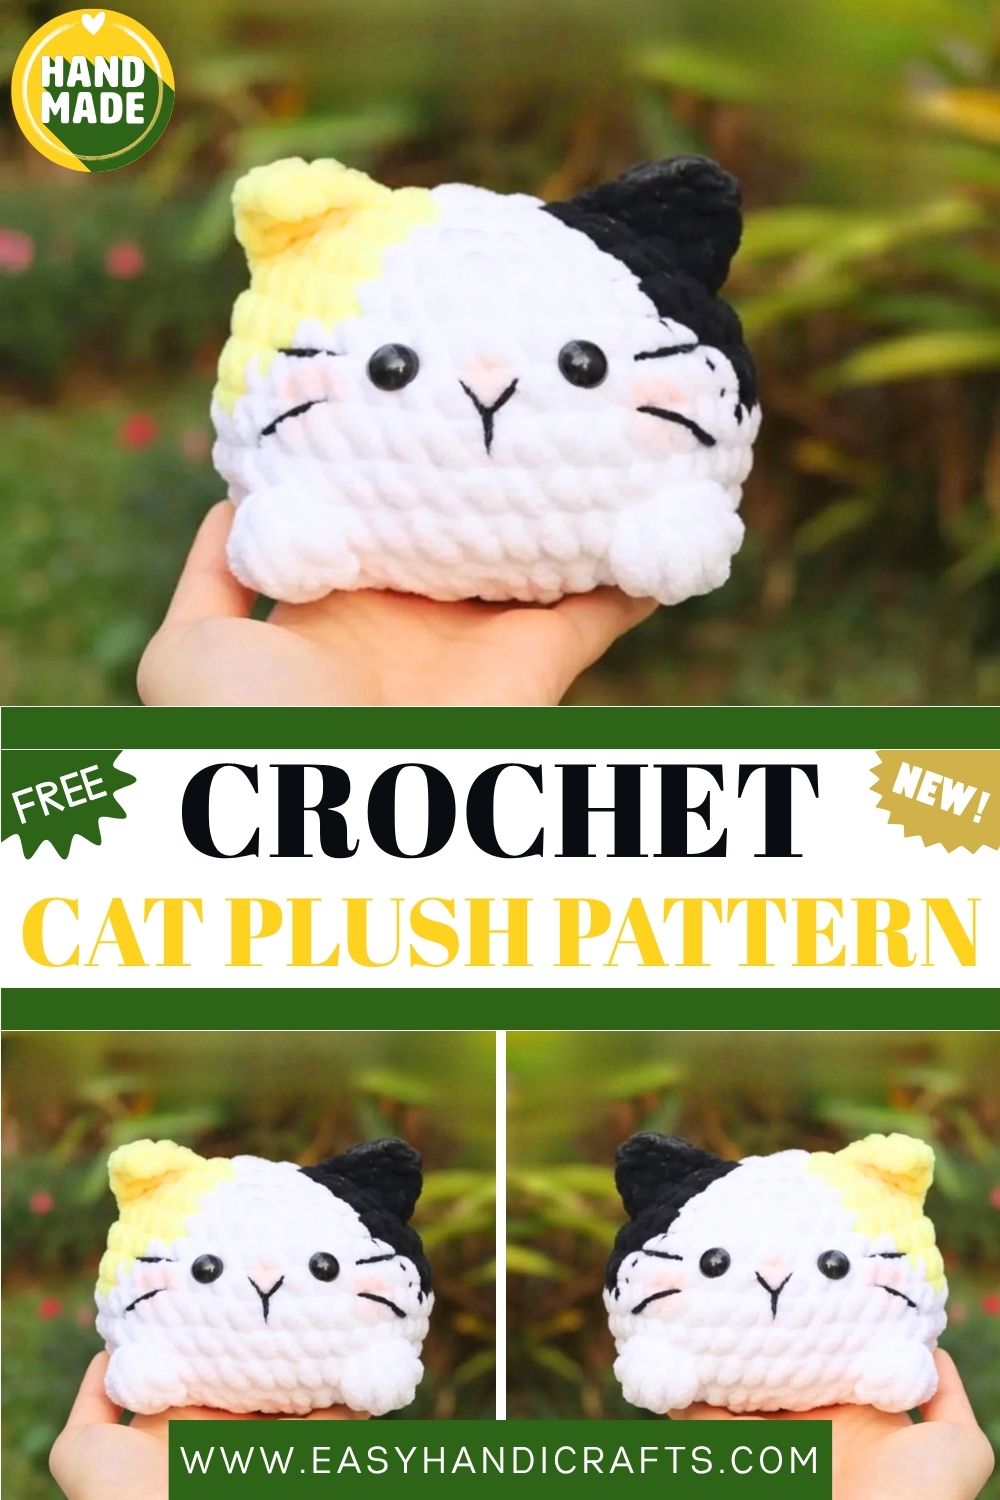
Chunky Crochet Cat Plush Pattern | Soft Chenille Kitty Amigurumi
This chubby little crochet cat is chunky, squishy, and full of personality — the perfect beginner amigurumi to stitch up today!
There is something irresistible about a chubby crochet cat. This pattern creates a round, squishy kitty with color block markings, bobble paws, and the most charming little face you will ever embroider. It is worked in the round from the bottom up. The body, ears, and tail are all made separately and then assembled at the end. Furthermore, the chunky 6mm yarn and 8mm hook make the stitches large and easy to see. As a result, this is a genuinely comfortable pattern to work through, even for complete beginners. In addition, the color block design, a white base with yellow and black patches, gives the finished cat a classic tabby look. However, you can swap any colors you like for a completely different cat personality. Whether you make this as a gift, a shelf decoration, or simply for the joy of crocheting it, this chubby kitty delivers a big reward for a small amount of effort.
Skill Level
Beginner to intermediate. Basic single crochet in the round is the main skill needed. Additionally, the bobble stitch adds a fun texture detail that is straightforward once practiced once or twice.
Materials You Will Need
Yarn:
- 6mm chunky yarn in white, yellow, and black
Other Supplies:
- Crochet hook — 8mm
- Safety eyes — 12mm
- Stitch marker
- Sewing needle
- Scissors
- Polyfill fiberfill stuffing
Abbreviations
- R / RND — Round
- MR — Magic Ring
- SLST — Slip Stitch
- CH — Chain
- ST / STS — Stitch / Stitches
- SC — Single Crochet
- INC — Increase (2 sc in same stitch)
- DEC — Decrease (sc 2 stitches in front loops together)
- HDC — Half Double Crochet
- DC — Double Crochet
- BO — Bobble Stitch: yarn over, insert hook, yarn over, pull through loop, yarn over again, pull through — repeat x3 until 6 loops on hook, yarn over and pull through all 6 loops
- () x N — Repeat N times
Pattern: Chubby Cat Body
Using white yarn as the base, with yellow and black color sections as marked
R1: MR, 8 sc (8)
R2: inc, (yellow: 2 inc), 2 inc, (black: 2 inc), inc (16)
R3: sc, inc, (yellow: (sc, inc) x2), (sc, inc) x2, (black: (sc, inc) x2), (sc, inc) (24)
R4: (2sc, inc), (yellow: (2sc, inc) x2), (2sc, inc) x2, (black: (2sc, inc) x2), (2sc, inc) (32)
R5: 4 sc, (yellow: 8 sc), 8 sc, (black: 8 sc), 4 sc (32)
R6: 3sc, inc, sc, (yellow: 2sc, inc, 3sc), inc, 3sc, inc, sc, (black: 2sc, inc, 3sc), inc, 3sc, inc (40)
R7: 7 sc, (yellow: 5 sc), 15 sc, (black: 5 sc), 8 sc (40)
R8–9: 40 sc around for 2 rounds (40)
R10: 5sc, BO, 9sc, BO, 9sc, BO, 9sc, BO, 4sc (40)
The four bobble stitches on R10 form the cat’s paws. Therefore, count carefully before placing each BO. They should be evenly spaced around the body for a balanced look.
Glue safety eyes at R6–7, approximately 4 stitches apart.
R11: (sc, dec, sc) x10 (30)
R12: (sc, dec) x10 (20)
R13: dec x10 (10)
Fasten off and cut yarn. Close the hole securely.
Pattern: Ears — Make 2
Using black or yellow yarn
Chain 3. Starting in the second chain from the hook: work 1 sc, then 1 dc.
Fasten off and leave a long tail for sewing.
Attach each ear to R2 of the body, one on each side.
Pattern: Tail
Using yellow yarn
R1: MR, 5 sc (5) R2: 5 sc (5)
Switch to white yarn.
R3: 5 sc (5) R4–5: 2 sc, 2 hdc, sc
Fasten off and leave a long tail for sewing. Attach the tail at R9 on the back of the body.
Finishing the face: Use small pieces of yarn to embroider the cat’s nose and whiskers. A simple V-shape for the nose and three straight stitches on each side for the whiskers create the most expressive little face.
Customization and Variation Ideas
- First, swap the color block placement entirely. A ginger and white cat, an all-black cat, or a calico with three colors all use the exact same base pattern.
- Additionally, use a pastel yarn palette for a softer, more kawaii aesthetic. Lavender, peach, and cream together create a dreamy color combination.
- Moreover, adjust the bobble paw placement on R10 to sit further apart for a wider, more spread-out paw look on larger yarn sizes.
- Furthermore, add a tiny crocheted bow between the ears using scrap yarn. It takes only a few minutes and transforms the whole personality of the finished cat.
- Also, try skipping the color change sections entirely for a solid color cat. A single-color version works up even faster and still looks completely charming.
- Finally, make a matching mini version using fingering weight yarn and a 2mm hook for a tiny cat that sits beside the large one as a mother-and-kitten pair.
Common Mistakes to Avoid
- First, losing track of color sections: Use stitch markers to clearly separate the yellow, black, and white sections before starting R2. This prevents color placement errors that are hard to fix later.
- Additionally, uneven bobble paws: Practice the BO stitch on scrap yarn before working R10. Consistent tension across all four bobbles makes the paws look neat and uniform.
- Also, attaching eyes too late: Glue or lock the safety eyes at R6–7 before the body is too closed up for your fingers to reach inside comfortably.
- Furthermore, skipping the front loop decrease: This pattern specifically uses front loop only decreases. Using both loops creates a visible ridge that affects the smooth shape of the body.
- Moreover, sewing ears on unevenly: Pin both ears in place simultaneously before sewing either one down. This ensures they sit at the same height and angle on both sides.
- Finally, leaving the tail seam visible: Use matching yellow yarn to sew the tail onto the body so the joining stitches blend completely into the surrounding color.
Finishing Tips
- First, close the top of the body hole by weaving the yarn tail through the remaining 10 stitches and pulling tight. This creates a cleaner close than sewing.
- After stuffing, give the body a gentle squeeze and reshape it into a round, even ball before the fiberfill settles permanently.
- Additionally, the bobble paws benefit from a light finger-press after finishing. This flattens the base slightly and helps the cat sit more stably on a flat surface.
- Moreover, use a tapestry needle to carefully work the whisker stitches. Pull each one to the same tension for a symmetrical face that looks intentional and precise.
- Furthermore, when attaching the tail, curve it slightly before sewing it down. A gently curved tail gives the finished cat far more character than a straight one.
- Finally, weave in every yarn end through at least three direction changes before trimming. Chunky yarn ends can work loose quickly without proper securing.
Gifting Ideas
- First, place the finished cat inside a small gift box lined with tissue paper in a complementary color. The chunky size makes it an impressive and substantial handmade gift.
- Additionally, these cats make wonderful birthday gifts for cat lovers of any age. Pair it with a cat-themed mug or a small candle for a cohesive themed gift set.
- Moreover, make a set of three cats in different color combinations and gift them together as a little cat family. The receiver can name each one and display them as a collection.
- Furthermore, these chubby cats work beautifully as nursery decorations. A soft pastel version sitting on a shelf adds handmade warmth to any baby’s room.
- Also, attach a keyring to the top of a miniature version for a handmade bag charm that cat lovers will reach for every single day.
- Finally, consider selling these at craft fairs or online. The chunky yarn makes them fast to produce, and the color block design makes each one feel unique and eye-catching on a display table.
Conclusion
This chubby crochet cat pattern is one of those satisfying projects that comes together faster than expected and looks better than you dared to hope. The chunky yarn makes every stitch visible and forgiving. Furthermore, the color block technique introduces a fun new skill without overwhelming beginners. Therefore, work through each round at your own pace, keep your color sections tidy, and count carefully before placing the bobble paws. In addition, take your time with the face embroidery — the nose and whiskers are small details that make a very big difference. In conclusion, this little kitty is waiting to be made in your favorite colors. All you have to do is start.
Happy crocheting! Cannot wait to see your chubby cat come to life.