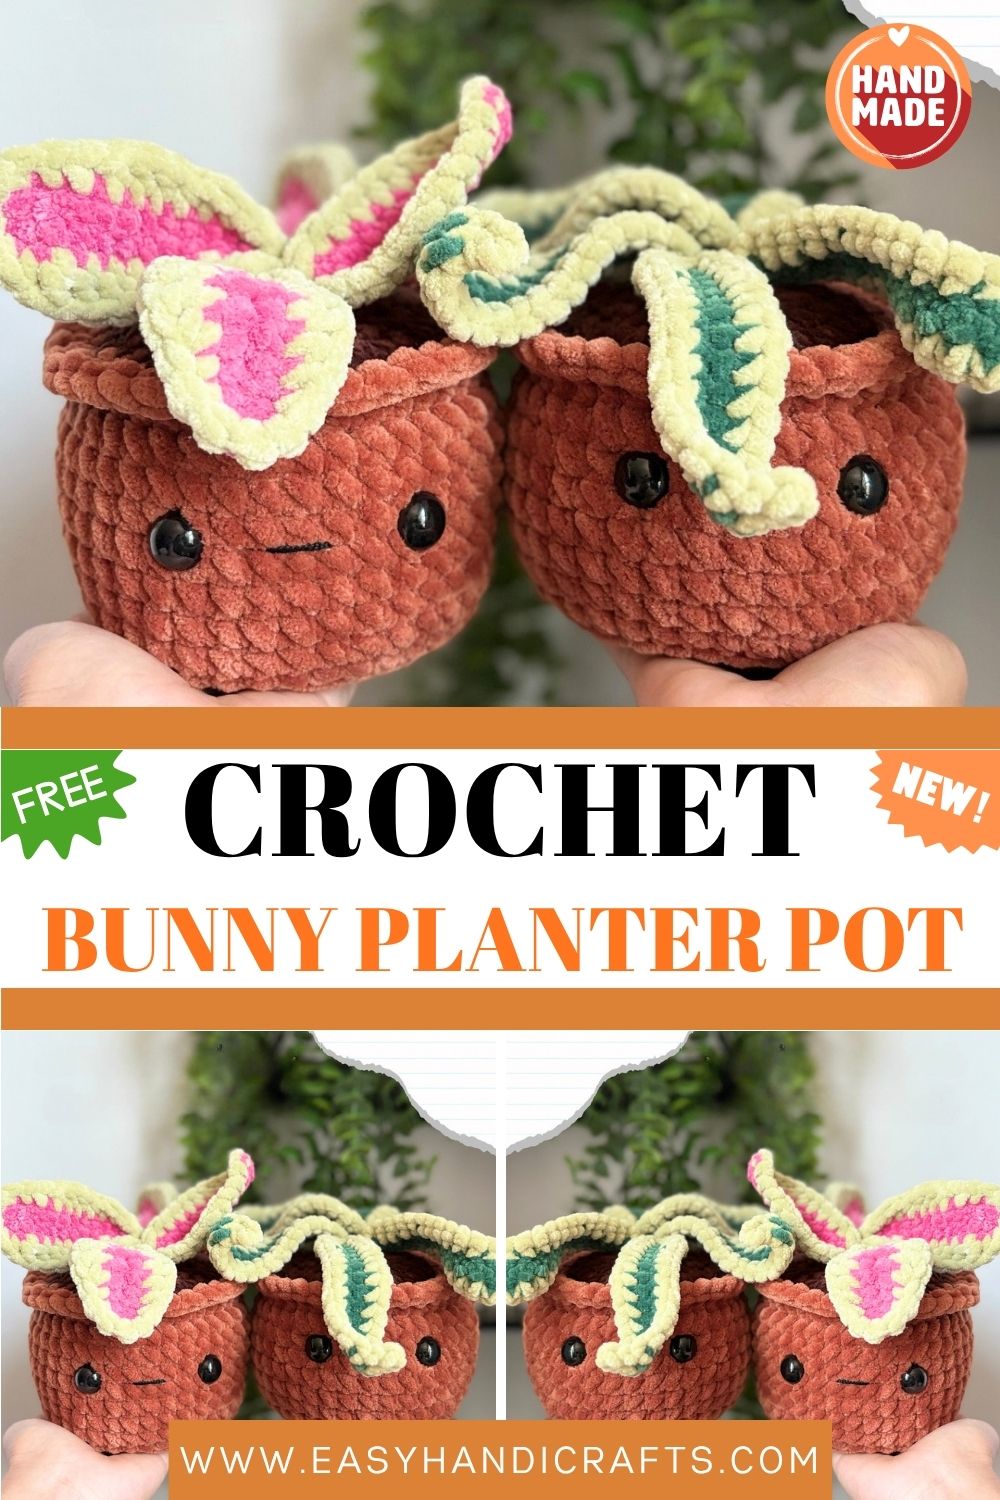
Adorable Crochet Bunny Planter Pot | Kawaii Amigurumi Basket | Handmade Home Decor
This crochet bunny planter pot is cute, functional, and full of charm. It is the perfect kawaii home decor piece or handmade gift!
If you are looking for a crochet project that is both decorative and delightful, then this kawaii bunny planter pot is exactly what you need. This adorable pattern creates a sweet little pot complete with a smiling face, layered leaves, and a dark soil top. Furthermore, the combination of textures and colors makes it look incredibly realistic and charming at the same time. Whether you want to display it on a shelf, use it as a small storage basket, or gift it to a plant lover, this piece works beautifully in any setting. In addition, the pattern uses basic stitches and is beginner-friendly. Overall, this is one home decor project you will be truly proud to make and display.
Materials You Will Need
Yarn:
- Brown yarn (for pot)
- Dark brown yarn (for soil)
- Dark green and light green yarn (for leaves)
- Pink yarn (for pink leaves)
- Thin black yarn (for smile)
Hooks:
- 6mm crochet hook (for pot)
- 5mm crochet hook (for soil and leaves)
Additional supplies:
- 16mm safety eyes
- Fiberfill stuffing
- Cardboard (for base)
- Scissors
- Sewing needle
- Stitch markers
Abbreviations
- sc – Single crochet
- inc – Increase
- dec – Decrease
- ch – Chain
- MR – Magic ring
- BLO – Back loop only
- FLO – Front loop only
- hdc – Half double crochet
- dc – Double crochet
- sl st – Slip stitch
Skill Level
This pattern is great for beginners who know basic crochet stitches. If you can work in continuous rounds and do simple color changes, you are ready. Additionally, working in BLO and FLO adds a fun, textured detail that is easy to learn.
Plant Pot Pattern
Start with brown yarn and a 6mm hook.
R1: Ch 2, 8 sc in second ch from hook (8) (If using acrylic or cotton yarn, start with 8 sc in MR instead)
R2: 8 inc (16) R3: (sc, inc) x8 (24) R4: (sc, inc, sc) x8 (32) R5: (3 sc, inc) x8 (40) R6: 40 BLO sc (40) R7–R12: 40 sc (40)
Insert safety eyes between R9 and R10, approximately 5 or 6 stitches apart.
R13–R14: 40 FLO sc (40)
Add a stitch marker to the back loop of R14. Then fasten off and sew. Next, cut a round cardboard circle and place it inside the base of the pot. Finally, stuff the pot firmly.
Soil Pattern
Start with dark brown yarn and a 5mm hook. Begin working in the BLO of R14 of the pot.
R1: 40 sc (40) R2: (3 sc, dec) x8 (32) R3: (2 sc, dec) x8 (24)
Add more stuffing at this point.
R4: (sc, dec) x8 (16) R5: 8 dec (8) R6: 4 dec (4)
Fasten off and sew closed neatly.
Pink Leaf Pattern
Use pink yarn and a 5mm hook.
R1: Ch 13 R2: Starting in 2nd ch from hook — 11 sc, inc, 11 sc (color change on last stitch)
Add a stitch marker on the first sc to mark the start of the next row.
R3: In light green — 3 sc, 2 hdc, 3 dc, hdc, 7 sc, hdc, 3 dc, 2 hdc, 3 sc
Leave long tails for sewing. Then hide the extra tails from the color change. Repeat this 4 to 5 times total. Finally, sew all leaves together at the center, layering them for a full and lush look.
Green Leaf Pattern
Use dark green yarn and a 5mm hook.
R1: Ch 16 R2: Starting in 2nd ch from hook — 15 sc (color change on last stitch) R3: In light green — 14 sc, (ch 3, sl st in third ch from hook), skip one stitch, sl st in next stitch, 14 sc
Leave long tails for sewing and hide all extra tails from the color change. Repeat this 5 times total. Then sew all leaves together at the center, layering them for a beautiful full arrangement.
Customization and Variations
There are so many fun ways to personalize this kawaii planter pot. Here are some creative ideas:
- Different face expression: Change the smile to a surprised O-shaped mouth or add rosy cheeks with blusher. Furthermore, you can embroider small eyelashes for an extra cute look.
- Color variations: Try terracotta orange for the pot instead of brown. Additionally, use all pink leaves for a fully floral and feminine version.
- Add ears: Attach small crocheted bunny ears to the top of the soil section. As a result, your pot transforms into an adorable bunny character planter.
- Seasonal theme: Use orange and black yarn for a Halloween pot. Moreover, red and white work beautifully for a Christmas-themed version.
- Different leaf styles: Mix and match pink and green leaves for a more colorful arrangement. Additionally, add small crocheted flowers between the leaves for extra detail.
- Functional use: Place a small real succulent or faux plant inside the finished pot. This makes it a genuinely functional and decorative home decor piece.
Common Mistakes to Avoid
This pattern is beginner-friendly. However, a few common mistakes are worth knowing before you start:
- Missing the BLO row: R6 must be worked in the back loop only. Otherwise, the pot will not have that clean, defined ridge at the base.
- Eye placement too late: Always insert safety eyes before stuffing and closing. After sealing the pot, adding eyes becomes impossible without unraveling.
- Skipping the cardboard base: Always cut and insert the cardboard circle. Without it, the base of the pot will sag and lose its flat shape.
- Uneven leaf layers: Pin the leaves in place before sewing. Then check the arrangement from above to make sure it looks balanced and full.
- Tight color changes: Keep your tension relaxed during color changes on the leaves. Otherwise, the edges will pucker and curl inward.
- Insufficient stuffing: Stuff the pot firmly before closing the soil section. As a result, the pot holds its round shape and stands upright properly.
Finishing Tips
- First, weave in all yarn tails securely before assembling the leaves. This keeps every section neat and prevents unraveling later.
- Next, embroider the smile with thin black yarn using small and even back stitches. Furthermore, a simple curved line gives the most adorable and clean result.
- Also, layer the leaves slightly unevenly for a more natural and organic look. As a result, the arrangement appears fuller and more lifelike.
- Additionally, press the cardboard circle flat against the base before stuffing. This ensures the pot sits evenly on any flat surface.
- When sewing leaves to the center, go through all layers several times. Then knot firmly so the leaves stay securely in place with handling.
- Finally, give the finished pot a gentle reshape with your hands. This helps it look perfectly round and evenly proportioned from every angle.
Gifting Ideas
This kawaii planter pot makes a truly wonderful handmade gift. Here are some fun gifting ideas:
- Housewarming gift: A crochet planter pot is a unique and cheerful housewarming present. Moreover, it adds instant personality to any shelf or windowsill.
- Plant lover gift: Pair the finished pot with a small real or faux succulent inside. Furthermore, it makes a gift that is both decorative and functional.
- Birthday gift: Make the pot in the recipient’s favorite colors for a personalized birthday surprise. Additionally, tuck a small note or treat inside before gifting.
- Mother’s Day gift: A handmade kawaii planter is a heartfelt and creative Mother’s Day present. After all, handmade gifts always carry the most meaning.
- Desk decor gift: This pot is the perfect size for a work desk or study table. Therefore, it makes a sweet and practical gift for students or coworkers.
- Craft market item: Kawaii home decor items sell beautifully at craft fairs and online shops. Furthermore, these pots are quick to make in batches for seasonal markets.
Conclusion
This crochet bunny planter pot is one of those rare projects that combines cuteness, creativity, and real everyday function. Furthermore, the layered leaves, smiling face, and textured soil top make it one of the most charming amigurumi-style pieces you can make. Whether you display it at home, gift it to a loved one, or sell it at a craft market, this pot is always a crowd pleaser. Additionally, the straightforward pattern means you can make several in different color combinations without getting bored. So pick up your hook, gather your yarn, and start crocheting today. After all, every home deserves a little handmade happiness. Happy crocheting!