Polished Crochet a Mini Fox Easy Amigurumi Pattern for Beginners
A tiny crochet mini fox is one of those projects that instantly looks adorable, even with simple stitches. Plus, this easy crochet fox pattern works up quickly, making it perfect for a calm evening of crafting.
Amigurumi is simply the art of crocheting small stuffed shapes, usually animals, using tight stitches and soft stuffing. Instead of working in flat rows like a scarf, most amigurumi is crocheted in continuous rounds, which creates a neat little “plush” shape.
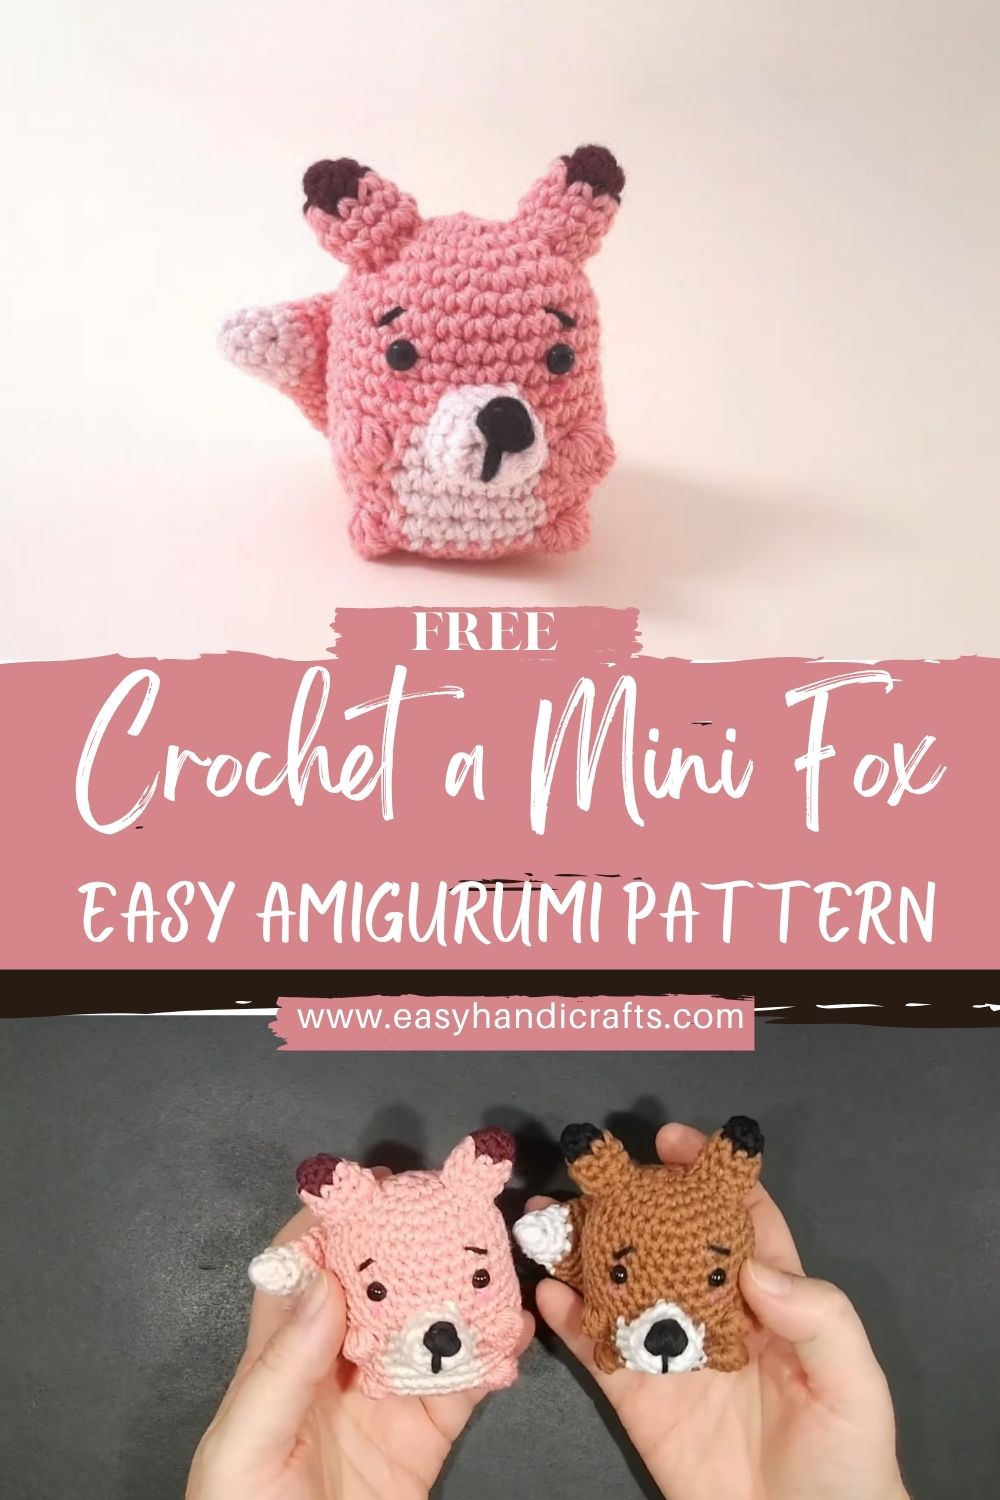
Since a fox has clear features, pointy ears, a fluffy tail, and a bright body, crocheting a mini version feels extra rewarding. First, the round body comes together like magic. Next, the ears and tail add personality. Finally, the face details bring the whole toy to life.
Materials Needed (Exact Measurements)
- Yarn (worsted weight / medium #4):
- Orange yarn: 20–25 g (body, head, outer ears, tail)
- White yarn: 10–15 g (muzzle/face patch, belly optional, tail tip, inner ears optional)
- Black yarn: 2–3 g (nose, mouth, small details)
- Crochet hook: 3.0 mm (recommended for tight amigurumi stitches with #4 yarn)
- Alternatively, use 3.5 mm if stitches feel too tight; however, aim for a firm fabric.
- Safety eyes (optional): 6 mm (or 7 mm for a slightly cuter “big-eyed” look)
- Stuffing: Polyfill, about 10–15 g
- Yarn needle: 1 (blunt tip for sewing pieces)
- Stitch marker: 1 (or a small scrap of yarn)
- Keychain ring (optional): 25 mm split ring (if making a keychain)
Skill Level: Beginner
Making Time (Overview)
Total estimated time: 1.5 to 2.5 hours (depending on sewing speed and experience).
Step-by-Step Instructions
Stitches & Notes (quick and beginner-friendly)
- MR = magic ring
- sc = single crochet
- inc = increase (2 sc in the same stitch)
- dec = invisible decrease (single crochet decrease)
- Work in continuous rounds unless stated otherwise.
- Use a stitch marker to track the first stitch of each round.
Body (Main Shape of the Fox)
Making time: about 35–50 minutes
Start with the head
- Round 1: 6 sc in MR (6)
- Round 2: inc in each stitch (12)
- Round 3: (sc, inc) x6 (18)
- Round 4: (2 sc, inc) x6 (24)
- Round 5: (3 sc, inc) x6 (30)
At this point, the head should look like a neat little bowl. If the circle is ruffling, the hook may be too big. If it’s cupping too hard, loosen the tension slightly.
Increase and decrease to shape the body
Next, the head is gently shaped and then extended into a small body.
- Round 6: sc in each stitch (30)
- Round 7: sc in each stitch (30)
- Round 8: (3 sc, dec) x6 (24)
- Round 9: (2 sc, dec) x6 (18)
Now the neck starts forming. After that, the body widens again to create a cute, round tummy.
- Round 10: (2 sc, inc) x6 (24)
- Round 11: (3 sc, inc) x6 (30)
- Round 12: sc in each stitch (30)
- Round 13: sc in each stitch (30)
Stuff the body lightly as you go
At this stage, add stuffing gradually.
- Round 14: (3 sc, dec) x6 (24)
- Round 15: (2 sc, dec) x6 (18)
Stuff firmly but not overstuffed, focusing on smoothing the shape. Meanwhile, keep the bottom slightly flatter so the fox sits nicely. - Round 16: (sc, dec) x6 (12)
- Round 17: dec x6 (6)
Fasten off, cut yarn, and close the opening. Then weave in the end neatly.
Tail and Ears
Making time: about 25–35 minutes
Crochet the tail
Tail (orange; add white tip near the end):
- Round 1: 6 sc in MR (6)
- Round 2: (sc, inc) x3 (9)
- Round 3: sc in each stitch (9)
- Round 4: (2 sc, inc) x3 (12)
- Round 5–7: sc in each stitch (12)
Next, switch to white for the fluffy tip:
- Round 8: sc in each stitch (12)
- Round 9: (2 sc, dec) x3 (9)
Lightly stuff the tail—just enough to keep it puffy. - Round 10: (sc, dec) x3 (6)
Fasten off, leaving a long tail for sewing.
Attach the tail: Sew it to the back of the body, slightly above the bottom center. For a playful look, angle it a little to one side.
Make the ears
Make 2 ears (orange; optional white inner ear piece later).
Ear (outer):
- Round 1: 4 sc in MR (4)
- Round 2: (sc, inc) x2 (6)
- Round 3: (2 sc, inc) x2 (8)
- Round 4: sc in each stitch (8)
Fasten off, leaving a long tail for sewing. Fold the ear slightly at the base to create a gentle point.
Optional inner ear (white, make 2):
- Chain 3, then sc in 2nd chain from hook, sc in next (2).
Fasten off, then stitch it onto the front of each ear.
Attach the ears: Pin them first on top of the head, spaced evenly. Then sew securely, stitching through multiple rounds,s so they stand up nicely.
Face and Limbs
Making time: about 25–40 minutes
Add safety eyes or embroider details
If using 6 mm safety eyes, place them between Rounds 6 and 7 of the head area, about 5–6 stitches apart.
However, if the fox is for a child under 3, skip safety eyes and embroider sleepy eyes instead.
Make the legs and arms
Arms (make 2, orange):
- Round 1: 6 sc in MR (6)
- Round 2–4: sc in each stitch (6)
Lightly stuff or leave unstuffed for a softer look. Fasten off, leaving a long tail for sewing.
Legs (make 2, orange):
- Round 1: 6 sc in MR (6)
- Round 2: inc in each stitch (12)
- Round 3: sc in each stitch (12)
- Round 4: (2 sc, dec) x3 (9)
Stuff the foot lightly. Then continue: - Round 5–6: sc in each stitch (9)
Fasten off, leaving a long tail for sewing.
Attach legs near the bottom front, spaced evenly so the fox sits balanced. Next, sew arms slightly higher on the sides.
Face & Assembly
Making time: about 20–30 minutes
Attach the facial features neatly
Muzzle/face patch (white):
- Round 1: 6 sc in MR (6)
- Round 2: inc in each stitch (12)
- Round 3: (sc, inc) x6 (18)
Fasten off, leaving a long tail.
Sew the muzzle centered under the eyes. Meanwhile, add a pinch of stuffing under the patch if a slightly raised snout is desired.
Nose and mouth (black yarn):
- Embroider a small triangle or “dot” nose on the top center of the muzzle.
- Next, stitch a simple smile: one short vertical line down, then two small curved lines.
Assemble everything to complete the f.ox
- Sew the muzzle first (easier to center).
- Next, attach the eyes (or embroider them).
- Then sew ears, checking symmetry from the front.
- After that, attach legs, ensuring the fox sits evenly.
- Later, sew arms so they look like they’re resting on the belly.
- Finally, attach the tail.
Beginner-friendly assembly tips:
- First, pin everything (or use scrap yarn to baste) before sewing permanently.
- Next, step back and check the face from a distance. Smallall shifts make a big difference.
- Finally, sew with small, tight stitches and pull gently so seams disappear into the fabric.
Optional keychain: Stitch the split ring into the top of the head between ear bases using strong thread or doubled yarn.
Special Features
- Texture: Soft, smooth body with crisp contrast between orange, white, and black details
- Expression: Cute, playful face with big eyes and a tiny nose
- Size: Great for a mini plush or a small keychain (typically 8–10 cm / 3–4 in tall with worsted yarn)
Sizing Tips
Yarn and hook choice changes everything. Worsted-weight yarn and a 3.0 mm hook, the fox stays small and firm. If chunky yarn is used, the fox becomes much bigger, even with the same stitch counts. Likewise, a larger hook creates looser stitches and a bigger plush, but stuffing may show through, so a smaller hook is usually best for amigurumi.
Finishing Tips
- For neat stitching, use invisible decreases instead of regular decreases.
- For secure knots, hide the ends by weaving them through several stitches, then trim close.
- For balanced stuffing, add small amounts often; then shape with fingers as rounds close.
- For clean edges, keep tension steady and avoid yanking the yarn after each stitch.
Common Mistakes to Avoid
- Loose stitches or uneven tension: stuffing can peek through, so tighten up or size down the hook.
- Incorrect placement of ears or tail: pin first, then double-check symmetry.
- Inconsistent shaping: count stitches each round so increases and decreases stay on track.
- Skipping stitch markers: rounds drift quickly, so mark the first stitch every time.
Variations & Customization Ideas
- Switch colors for a different fox: brown, cream, or even a fun pink or blue version.
- Add accessories: a tiny scarf, a mini hat, or a small flower stitched near one ear.
- Create a fox family: make one with sleepy eyes, one with a wink, and one with extra-big ears.
- Change the tail: add a longer tail by repeating a few mid-rounds before decreasing.
Tutor Suggestions (Beginner Confidence Boosters)
- First, practice single crochet in the round with a small circle before starting the fox.
- Next, keep tension even by resting your hands and resetting the grip when stitches get tight.
- Meanwhile, remember that slightly uneven rounds often disappear after stuffing and shaping.
- Finally, treat sewing as the “finishing magic”; it’s the step that turns simple shapes into a character.
Conclusion
A tiny crochet mini fox is a sweet, satisfying project because the parts are simple, the shaping is forgiving, and the finished look is irresistibly cute. After the first fox is finished, it becomes easy to experiment with different yarn colors, playful expressions, and little accessories. Next time a quick gift idea is needed, this amigurumi mini fox is ready to shine. With steady stitches and a bit of patience during assembly, a pocket-sized fox friend can be made that looks handmade in the very best way.