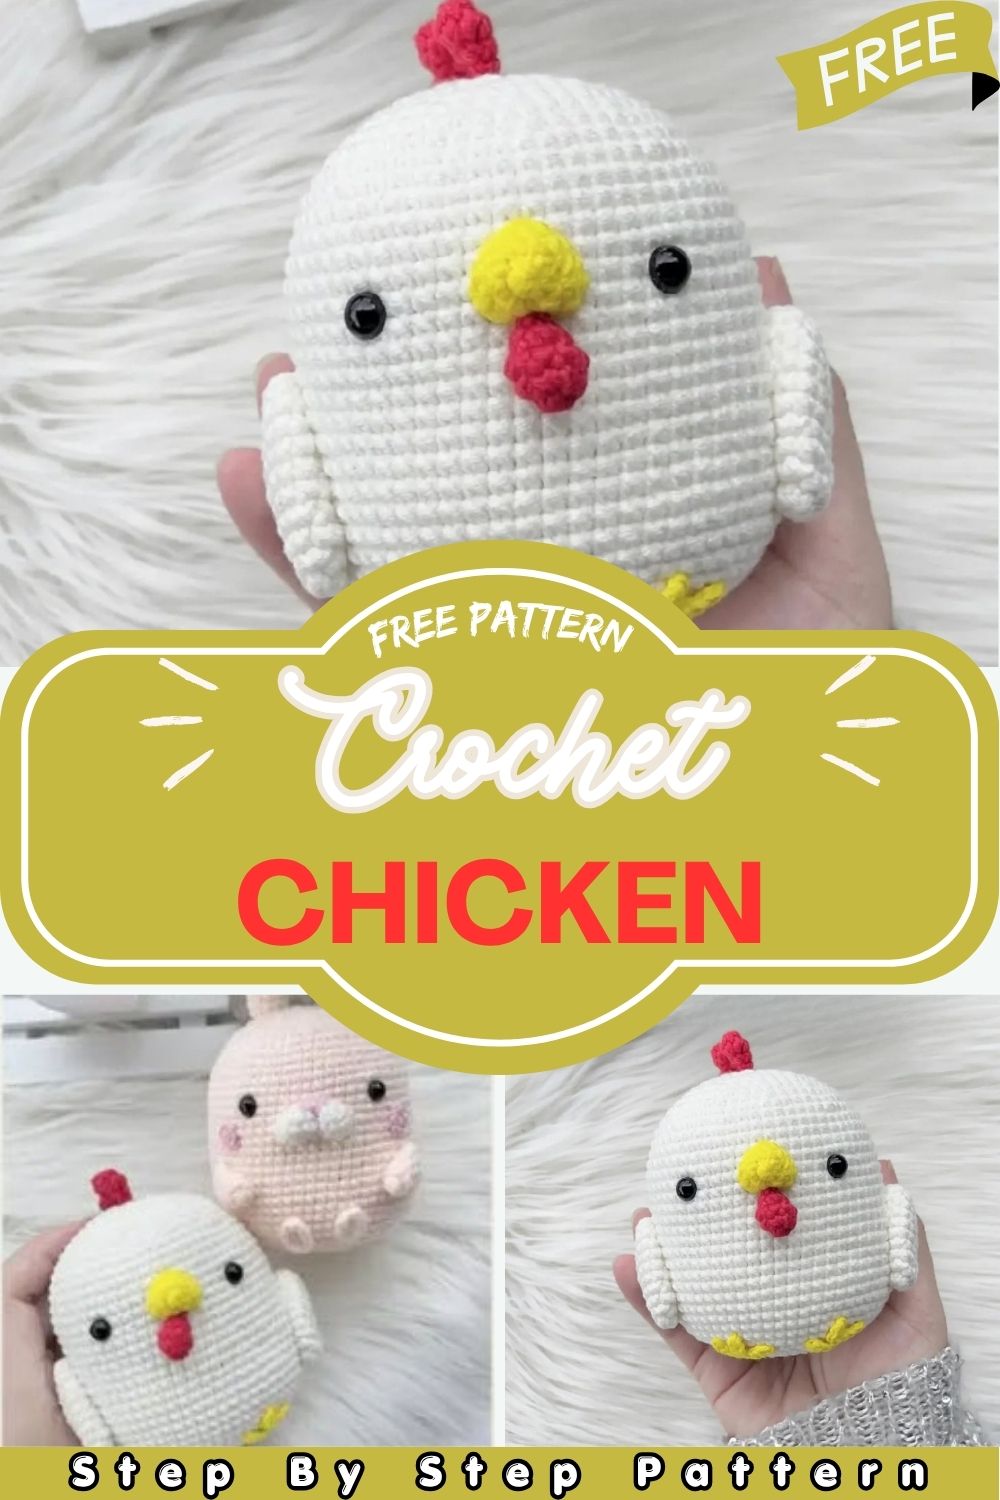
Make This Adorable Crochet Chicken Amigurumi Pattern Stuffed in 1 Hour
Fluffy, round, and ridiculously charming this little Adorable Crochet Chicken Amigurumi is the kind of project that makes you wonder why you did not start it sooner. Grab your hook and some cream white yarn and let’s get this adorable bird made.
Some projects just have a way of making you smile the entire time you are working on them and this chubby little Adorable Crochet Chicken Amigurumi is absolutely one of those. Built in one continuous piece from head to body, she has the most satisfying shape once all that stuffing goes in. Her tiny yellow beak, soft red wattles, quirky little comb, and three fingered feet give her so much personality that it is almost unreal for something made of yarn. Whether you are crocheting her as an Easter decoration, a farmhouse shelf piece, or just because chickens are genuinely underrated crochet subjects this Adorable Crochet Chicken Amigurumi pattern delivers every single time.
Supplies
- Cream white Milkcotton yarn (4 ply)
- Red Milkcotton yarn (4 ply)
- Yellow Milkcotton yarn (4 ply)
- 2.2 mm crochet hook
- 5 mm safety eyes
- Polyester fiberfill
- Tapestry needle
- Stitch marker
- Scissors
Abbreviations
- BLO — Back loop only
- BO — Bind off
- dec — Decrease
- FLO — Front loop only
- INV BO — Invisible bind off
- inc — Increase
- MR — Magic ring
- rep — Repeat
- sc — Single crochet
- sl st — Slip stitch
- st — Stitch
Head and Body
Yarn: Cream white
- R1: 6 sc in MR (6)
- R2: inc × 6 (12)
- R3: (sc, inc) × 6 (18)
- R4: sc, inc, (2 sc, inc) × 5, sc (24)
- R5: (3 sc, inc) × 6 (30)
- R6: 2 sc, inc, (4 sc, inc) × 5, 2 sc (36)
- R7: (5 sc, inc) × 6 (42)
- R8: 3 sc, inc, (6 sc, inc) × 5, 3 sc (48)
- R9: (7 sc, inc) × 6 (54)
- R10: 54 sc (54)
- R11: 4 sc, inc, (8 sc, inc) × 5, 4 sc (60)
- R12–21: 60 sc (10 rounds) (60)
- R22: (19 sc, inc) × 3 (63)
- R23–28: 63 sc (6 rounds) (63)
- R29: (19 sc, dec) × 3 (60)
- R30: 60 sc (60)
Insert safety eyes between R16–17 with 12 sts apart.
- R31: 4 sc, dec, (8 sc, dec) × 5, 4 sc (54)
- R32: (7 sc, dec) × 6 (48)
- R33: 3 sc, dec, (6 sc, dec) × 5, 3 sc (42)
- R34: (5 sc, dec) × 6 (36)
- R35: 2 sc, dec, (4 sc, dec) × 5, 2 sc (30)
- R36: (3 sc, dec) × 6 (24)
- R37: sc, dec, (2 sc, dec) × 5, sc (18)
- R38: (sc, dec) × 6 (12)
- R39: dec × 6 — cut yarn and close gap (6)
Beak
Yarn: Yellow
- R1: 6 sc in MR (6)
- R2: (sc, inc) × 3 (9)
- R3: (2 sc, inc) × 3 (12)
- Sc 2 sts further and make an INV BO.
Wattles
Yarn: Red
- R1: 4 sc in MR (4)
- R2: inc × 4 (8)
- R3: 8 sc — stuff lightly (8)
- R4: dec × 4 — close the gap (4)
Comb
Yarn: Red
- R1: 6 sc in MR (6)
- R2: 6 sc — cut yarn and INV BO (6)
Repeat R1–2 two more times so you have 3 parts total. Do not cut yarn on the last part.
- Join the second part, sc 3. Join the first part, sc 6. Continue to the second part, sc 3. Then sc 4 on the last part.
- Do not stuff. Flatten open ends together so they lie flat. Align 9 sts side by side, ch 1 then sc 9 through both matching sts together.
Tail
Yarn: Cream white
- R1: 6 sc in MR (6)
- R2: (sc, inc) × 3 (9)
- R3: sc, inc, (2 sc, inc) × 2, sc (12)
- R4: 2 sc, inc, sc, inc × 4, sc, inc, 2 sc (18)
- R5: 18 sc (18)
- R6: sl st 6, sc 12 — cut yarn and INV BO (18)
Wings (Make 2)
Yarn: Cream white
- R1: 6 sc in MR (6)
- R2: (sc, inc) × 3 (9)
- R3: sc, inc, (2 sc, inc) × 2, sc (12)
- R4: (3 sc, inc) × 3 (15)
- R5: 15 sc (15)
- R6: 2 sc, inc, (4 sc, inc) × 2, 2 sc (18)
- R7–10: 18 sc (4 rounds) (18)
- R11: (sc, dec) × 6 (12)
- R12: dec × 6 — do not stuff, cut yarn and close gap (6)
Legs (Make 2)
Yarn: Yellow
Finger 1: Ch 4, sl st to 2nd st from hook, sl st 2. Do not cut yarn.
Finger 2: Ch 4, sl st to 2nd st from hook, sl st 2. Do not cut yarn.
Finger 3: Ch 4, sl st to 2nd st from hook, sl st 2. Then sl st to the first ch of Finger 1.
Assembly
1 – Face Details
- Sew the beak to the centre of the face between R13–17, aligned between the eyes.
- Sew wattles directly below the beak, hanging naturally downward.
- Sew the comb to the very top centre of the head, standing upright.
2 – Body Details
- Sew wings to each side of the body between R19–27, flat and even on both sides.
- Sew tail to the back of the body between R25–30, angled slightly upward.
3 – Final Touches
Leg Placement
- Sew legs to the bottom of the body between R30–33, spaced evenly so she sits balanced and upright.
Last Check
- Weave in all ends securely deep into the stuffing, check every sewn piece feels firm, and give your chicken a once-over before calling her done!
Finishing Tips
Small details at the end make a huge difference to the overall finish:
- Shape the comb carefully: The comb has three separate parts that need to be joined and flattened just right. Take your time with this step, rushing it is how it ends up looking lopsided on the head.
- Stuff the body gradually: Because the head and body are worked in one piece, stuff firmly as you decrease so the final shape stays round and full all the way through.
- Pin wings before sewing: Wings that are even a little off centre look very obvious on a round body. Pin both in place at the same time and compare before sewing either one down.
- Keep wattles lightly stuffed: Overstuffed wattles stick out too much and lose their natural droopy look. A tiny pinch of stuffing is genuinely all they need.
- Check leg balance before sewing: Stand her up and test which leg position lets her sit most naturally before committing to sewing. A well-balanced chicken is a happy chicken.
Common Mistakes and How to Avoid Them
Stitch Count Issues
- Losing count on longer rounds: Rounds 12 through 28 are long and repetitive. Place a marker and count every single round without skipping one missed stitch in these rounds throws off the whole shape.
Shaping and Stuffing
- Uneven head shape: If the head looks lumpy rather than round, the stuffing was not packed evenly as you went. Push it into the edges firmly with a pencil or stuffing tool rather than just dropping it in from the top.
- Comb pieces not lying flat: If the three comb parts are not properly flattened before crocheting them together the whole thing ends up bulky and stiff. Flatten firmly before joining.
Assembly Mistakes
- Beak sitting off centre: Always count the stitches carefully before sewing the beak down. An off-centre beak is the first thing anyone notices on a finished amigurumi face.
- Legs not balanced: If she tips to one side the legs are uneven. Test her balance before sewing and adjust the position until she sits flat without tipping.
Customization and Variations
Color Variations
Cream white is classic but honestly this chicken looks amazing in almost any color. Try a soft yellow all over for a baby chick vibe, or go bold with a deep terracotta body and contrasting comb for something a little more dramatic. Pastel versions in lilac or mint make incredibly sweet Easter decorations that stand out from anything you would find in a shop.
Size Changes
Going up to a 3 mm or 3.5 mm hook with a slightly thicker yarn will give you a noticeably chunkier chicken without changing a single stitch in the pattern. She scales up really well and a bigger version makes an even more impressive shelf display piece.
Detail Changes
Swap the plain cream body for small embroidered feather details using a contrast yarn color for a more textured look. You can also skip the wattles entirely for a cleaner simpler finish, or add a tiny embroidered wing detail instead of the crocheted wings if you prefer a flatter more graphic style.
Gifting Ideas
This little Adorable Crochet Chicken Amigurumi is one of those handmade gifts that genuinely surprises people. Here are some fun ways to give her:
- Easter basket gift: Tuck her into a small wicker basket with some tissue paper and mini eggs for the most charming handmade Easter gift anyone has ever received.
- Farmhouse decor gift: For anyone who loves rustic or cottagecore aesthetics, a handmade chicken sitting on a kitchen shelf is genuinely the perfect housewarming gift.
- Kids’ room decoration: Make her in soft pastel colors and gift her as a nursery decoration she looks adorable sitting on a shelf next to books and other toys.
- Mother’s Day gift: A handmade amigurumi takes real time and skill to make, pair it with a handwritten card and it becomes one of the most thoughtful Mother’s Day gifts possible.
- Just because gift: Sometimes a friend just needs a tiny handmade chicken in their life for no particular reason at all. Box her up, drop her off, and enjoy the reaction.
Conclusion for ( Adorable Crochet Chicken Amigurumi)
There is something really satisfying about a project that starts as a simple magic ring and ends up being a fully formed, personality-packed little chicken sitting on your palm. Every round of this pattern builds toward that final result and the moment all the pieces come together beak, comb, wattles, wings, and those three-fingered feet it just clicks into something genuinely special.
Make her once and she will not be the last one. Different colors, different sizes, lined up on a shelf together once you figure out how fun she is to stitch up, stopping at just one feels almost impossible.