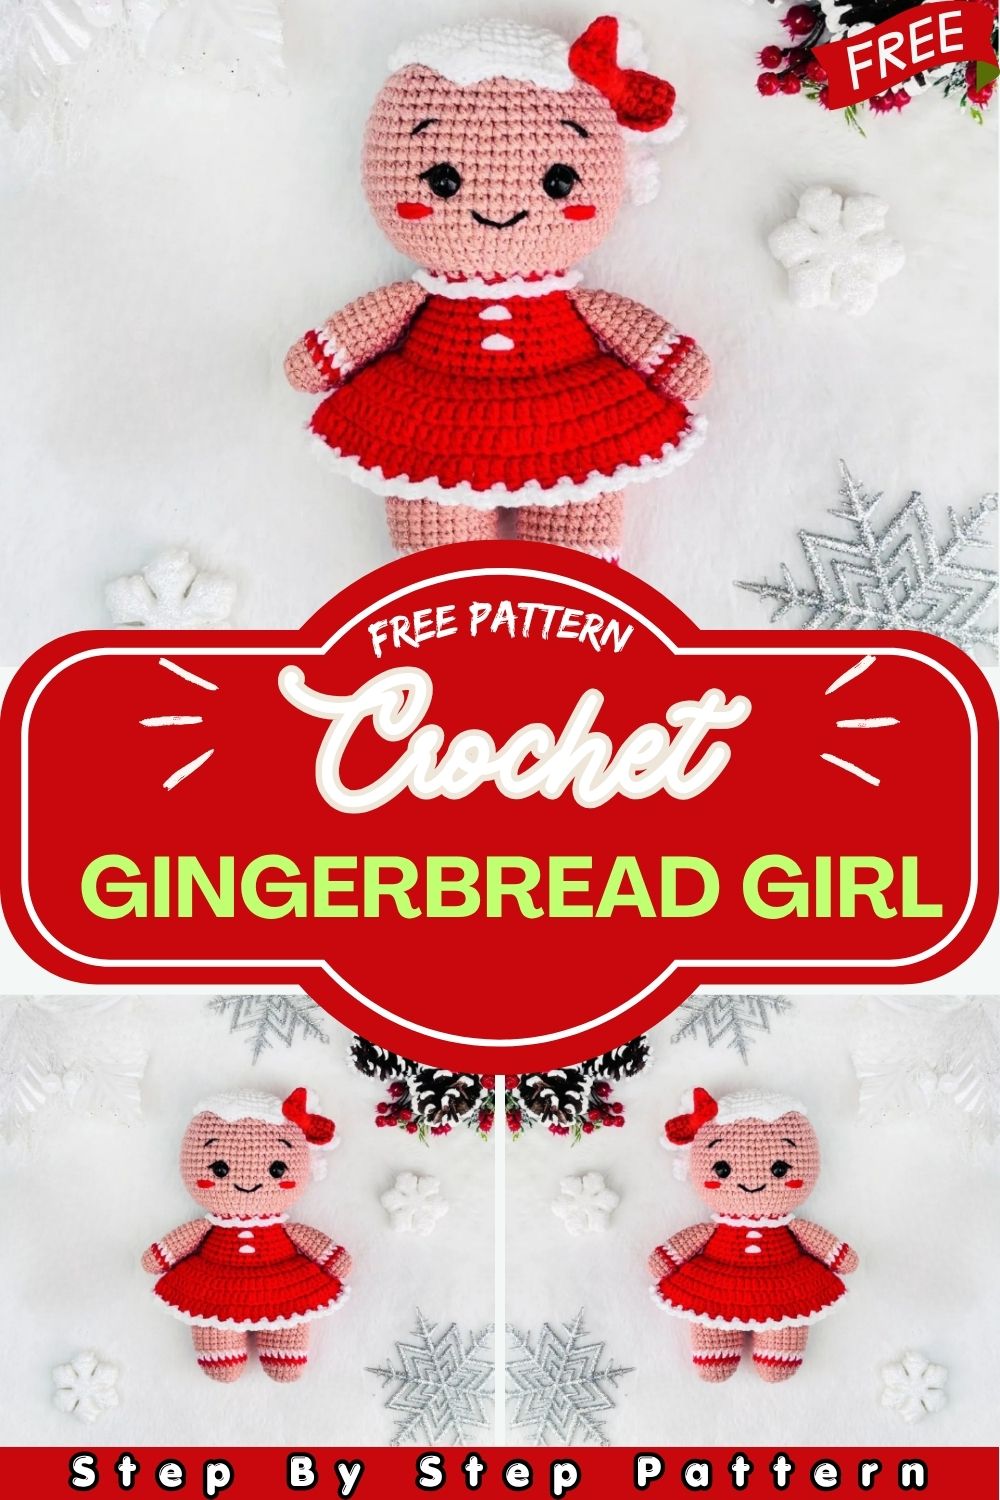
Crochet Gingerbread Girl Amigurumi Pattern For Your Cutest Holiday Project Yet
Ready to crochet the most charming Crochet Gingerbread Girl Amigurumi you have ever seen? Standing 15–16 cm tall, this beginner-friendly amigurumi doll is full of festive details and makes the sweetest handmade gift this holiday season!
Sometimes the most magical holiday projects come in the smallest packages and this adorable Santa girl amigurumi is proof of that! With her flowing red dress, white collar, curly ponytail and rosy little cheeks, she is bursting with festive charm from head to toe. Standing 15–16 cm tall, this pattern is rated easy to medium and is perfect for anyone who loves making handmade dolls. Whether you keep her as a holiday decoration or gift her to someone special, this little Santa girl is guaranteed to bring festive joy to every home she enters.
Materials and Tools
- Sport yarn:
- Beige – Alize Cotton Gold 446
- Red – Alize Cotton Gold 56
- White – Alize Cotton Gold 55
- Black thread for embroidering eyebrows and mouth
- Safety eyes 7–8 mm
- Crochet hook 2 mm
- Polyester fiberfill stuffing
Finished size is approximately 15–16 cm (6″) tall. Difficulty level: easy to medium. US terminology is used throughout.
Abbreviations
- sc — Single crochet
- inc — Increase (2 sc in same stitch)
- dec — Decrease
- dc — Double crochet
- hdc — Half double crochet
- sl st — Slip stitch
- ch — Chain
- MR — Magic ring
- BLO — Back loop only
- FLO — Front loop only
Arms (Make 2)
Yarn: Beige – stuff only the lower half
- R1: 6 sc in MR (6)
- R2: 6 in (12)
- R3–4: 12 sc (2 rounds) (12)
- Change to red:
- R5: 12 sc (12)
- Change to white:
- R6: 12 sc (12)
- Change to beige:
- R7–13: 12 sc (7 rounds) (12)
- R14: (4 sc, dec) × 2 (10)
- R15: Crochet 4 sc to align color changes at the center of the arm. Flatten and work 5 sc through both layers to close.
Fasten off, leave a tail for sewing. Sew arms to sides of body at R17.
Legs (Make 2)
Yarn: Beige – stuff as you go
- R1: 6 sc in MR (6)
- R2: 6 in (12)
- R3: (sc, inc) × 6 (18)
- R4: (5 sc, inc) × 3 (21)
- R5: 21 sc (21)
- Change to red:
- R6: 21 sc (21)
- Change to white:
- R7: 21 sc (21)
- Change to beige:
- R8–12: 21 sc (5 rounds) (21)
Left leg: Fasten off and cut yarn. Right leg: Do not fasten off continue to the body.
Body
Yarn: Beige – stuff as you go
- R1: 6 sc more on right leg, join left leg, 21 sc on left leg, 21 sc on right leg place marker here (42)
- R2: (6 sc, inc) × 6 (48)
- R3–8: 48 sc (6 rounds) (48)
- R9: (6 sc, dec) × 6 (42)
- Change to red:
- R10: 42 sc (42)
- R11: BLO — 42 sc (42)
- R12: (5 sc, dec) × 6 (36)
- R13–14: 36 sc (2 rounds) (36)
- R15: (4 sc, dec) × 6 (30)
- R16–17: 30 sc (2 rounds) (30)
- R18: (3 sc, dec) × 6 (24)
- Change to beige:
- R19: BLO — 24 sc (24)
Stuff the body firmly, especially the neck. Do not cut beige yarn — continue to head after finishing the dress.
Dress
Collar
Attach white yarn to the front loops left in R24. Work with the body turned upside down:
- (ch 3, skip 1st, sc in next st) × 12
- Sl st, fasten off, hide thread inside.
Optional: Embroider two white buttons under the collar.
Skirt
Attach red yarn to the front loops left in R11. Work with the body turned upside down:
- R1: ch 2, (2 dc, inc dc) × 14, sl st (56)
- R2: ch 2, 56 dc, sl st (56)
- R3: ch 2, (3 dc, inc dc) × 14, sl st (70)
- R4: ch 2, 70 dc, sl st (70)
- Change to white:
- R5: (ch 3, skip 1 st, sc in next st) × 35, sl st — fasten off, hide thread inside.
Head
Yarn: Beige – stuff as you go
- R1: FLO — (2 sc, inc) × 8 (32)
- R2: (3 sc, inc) × 8 (40)
- R3: 2 sc, inc, (4 sc, inc) × 7, 2 sc (48)
- R4: (5 sc, inc) × 8 (56)
- R5–12: 56 sc (8 rounds) (56)
- R13: (5 sc, dec) × 8 (48)
- R14–15: 48 sc (2 rounds) (48)
Insert safety eyes between R8 and R9 with 8 sc apart. There must be 6 sc visible between them.
- R16: 3 sc, dec, (6 sc, dec) × 5, 3 sc (42)
- R17: (5 sc, dec) × 6 (36)
- R18: 2 sc, dec, (4 sc, dec) × 5, 2 sc (30)
- R19: (3 sc, dec) × 6 (24)
- R20: sc, dec, (2 sc, dec) × 5, sc (18)
- R21: (sc, dec) × 6 (12)
- R22: 6 dec (6)
Stuff the head firmly. Close the opening and hide the yarn inside.
Face Embroidery
- Eyebrows: embroider with black thread in R12 – 2 st long, 9 st apart.
- Mouth: embroider in R6 – 4 st long.
- Lashes: optional black embroidery.
- Cheeks: embroider with red yarn between R6 and R7 – 3 st long.
Hair
Yarn: White
Wig
- R1: 8 sc in MR (8)
- R2: 8 in (16)
- R3: (sc, inc) × 8 (24)
- R4: (3 sc, inc) × 6 (30)
- R5: (4 sc, inc) × 6 (36)
- R6: 36 sc (36)
- R7: (5 sc, 4 hdc in one st) × 6 (54)
Sl st, fasten off, leave la ong tail for sewing. Sew the wig to the top of the head.
Curls
Make ch 22, crochet 20 inc dc starting from 3rd ch from hook. Repeat two more times — total 3 curls. Fasten off, leave a tail for sewing. Sew all three curls to one side of the wig to form a ponytail.
Ribbon
Yarn: Red
- R1: Ch 11, work 10 sc starting from 2nd ch from hook (10)
- R2–5: Ch 1, turn, 10 sc (4 rounds) (10)
Fasten off, hide thread. Thread the needle through the ribbon, wrap the yarn around the center a few times, and secure with a knot. Sew ribbon in front of ponytail.
Finishing Tips
Every little detail counts when it comes to making your Santa girl look her absolute best. Keep these tips in mind:
- Stuff the neck firmly: The neck area tends to go floppy if not stuffed well enough. Pack it firmly so the head sits upright and straight.
- Align color changes carefully: When switching yarn colors on the arms and legs, always check that the stripes line up neatly before fastening off.
- Pin before sewing: Always pin the arms, legs and wig in place before sewing permanently to make sure everything looks balanced and even.
- Embroider face last: Always finish the full assembly before embroidering the face so you can position the features exactly where they look best.
- Hide all yarn ends securely: Weave in every end deep inside the stuffing so nothing comes loose over time, especially on a display piece.
Customization and Variations
Color Variations
This Crochet Gingerbread Girl Amigurumi pattern is made in classic red and white but the color possibilities are truly endless. Try deep green and gold for a more traditional Christmas feel, or soft lilac and silver for a winter fairy look. You can also use pastel pink and cream to give her a softer, more delicate style year-round.
Outfit and Hair Changes
If you want to give her a completely different look, swap the red dress for a blue or purple version and she transforms from a Santa girl into a little winter princess instantly. For the hair, try brown or golden yellow yarn instead of white for a different character entirely. You can also skip the ponytail curls and make two simple braids instead for a fun variation.
Gifting Ideas
This Crochet Gingerbread Girl Amigurumi makes the most heartwarming handmade gifts for so many special occasions. Here are some lovely ways to present her:
- Christmas gift: Place her in a festive gift box with tissue paper and a handwritten tag for a truly personal holiday surprise.
- Holiday decoration: Sit her on a mantle, shelf, or wrapped gift box as a charming seasonal display piece.
- Teacher gift: A handmade doll is a thoughtful and unique end-of-year gift that any teacher would treasure.
- New baby gift: Make her in soft pastel colors and gift her as an adorable nursery keepsake for a newborn.
- Secret Santa gift: She makes a creative and impressive secret Santa present that nobody would expect but everyone would love.
Conclusion
This Crochet Gingerbread Girl Amigurumi is more than just a crochet project she is a tiny handmade piece of holiday magic that takes skill, love, and creativity to bring to life. From her carefully striped arms to her flowing red skirt and curly white ponytail, every detail of this doll is worth the effort.
Make her a keepsake, a gift, or simply for the joy of crocheting something truly beautiful this festive season.