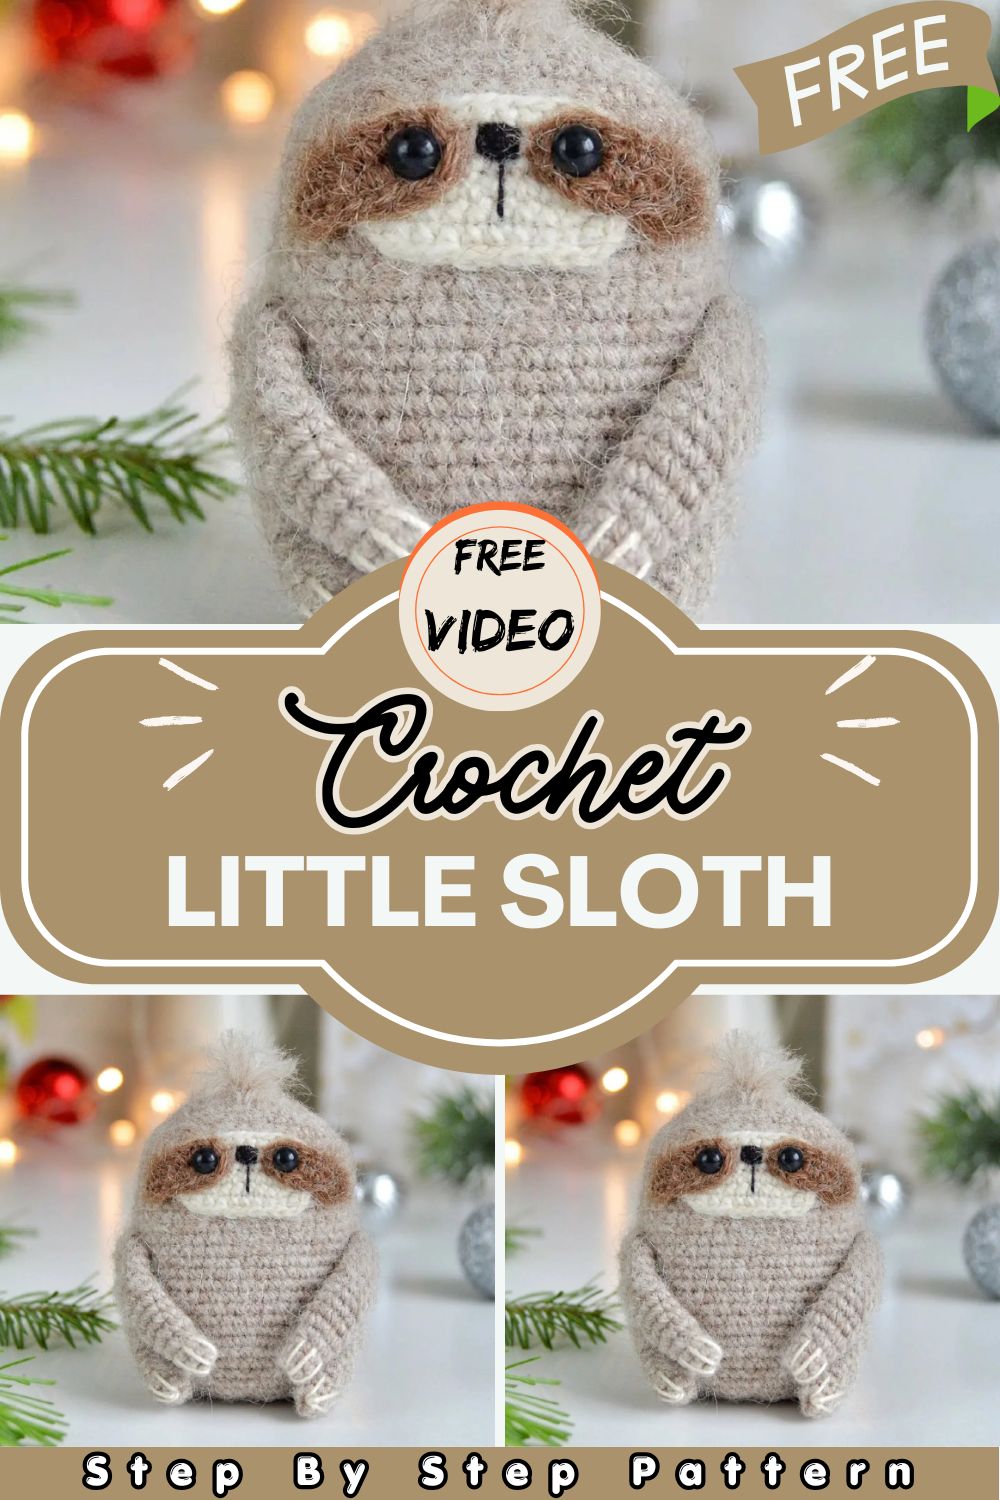
Awesome Crochet Little Sloth Amigurumi Pattern for Home Accents
If you are searching for a fun and rewarding crochet project, this adorable Crochet Little Sloth Amigurumi is just the one! Sweet, simple, and surprisingly quick to finish, it makes the most heartwarming handmade gift or a charming accent piece for your home all year long.
Have you ever crocheted something so cute that you just could not put it down? That is exactly what happens with this tiny sloth amigurumi! This sweet little pattern comes together beautifully whether you choose a soft fluffy yarn or a smooth everyday one. The stitches are simple, the steps are clear, and the finished result is so irresistibly cute that you will absolutely want to make one for everyone you know.
Why You’ll Love This Project
Honestly, this Crochet Little Sloth Amigurumi is one of those projects that just makes you smile the whole way through. First of all, it is small enough to finish in one cozy evening. Additionally, it looks so impressive once finished that everyone will think it took you much longer than it actually did.
Moreover, the chubby little body, the sweet embroidered nose, and those tiny clawed paws all come together so perfectly. As a result, you will find it very hard to stop at just one. Therefore, get ready, a whole family of sloths may not be far behind!
Materials You’ll Need
Before you pick up your hook, gather everything together for a smooth crocheting experience.
Yarn: You will need three colors of your choice. For a fluffy finish, go with Drops Nord or Drops Alpaca. On the other hand, for a smooth and clean look, YarnArt Jeans, Drops Safran, or YarnArt Ideal all work beautifully.
Other supplies:
- Crochet Little Sloth Amigurumi hook to match your yarn (1.5mm or 1.75mm Clover recommended)
- Yarn needle and sewing needle
- Black thread for embroidering the nose (e.g., YarnArt Canarias)
- A Small amount of ivory yarn for embroidering the claws
- Button eyes, 5mm diameter, with black sewing thread
- Polyester fiberfill
- A small piece of Velcro tape if using fluffy yarn
Finished Size:
- Drops Alpaca / Drops Nord: approximately 7cm (2.8 inches)
- YarnArt Jeans: approximately 8cm (3.2 inches)
Skill Level: Easy – if you are comfortable with basic stitches like single crochet, increase, decrease, and magic ring, you are completely ready for this pattern!
Abbreviations & Stitches Used
Here is a quick reference so you are never confused mid-round:
- MR — Magic ring
- ch — Chain stitch
- st(s) — Stitch(es)
- sl st — Slip stitch
- sc — Single crochet
- hdc — Half double crochet
- inc — Increase (2 sc in the same stitch)
- dec — Decrease (crochet 2 stitches together)
- rnd(s) — Round(s)
- (…) × n — Repeat instructions in brackets n times
- (n) — Total number of stitches in the round
Work in continuous rounds unless otherwise instructed.
Face (in lighter/contrast color)
First, start with the face piece. This gives your sloth its sweet signature look.
Rnd 1: 9 ch, start in the second chain from hook: 1 inc, 6 sc, 3 sc in the last st, turn and continue on the other side of the chain, 7 sc — (18)
Continue crocheting in a spiral.
Rnd 2: 2 inc, 6 sc, 3 inc, 6 sc, 1 inc — (24)
Rnd 3: (1 sc, 1 inc) × 2, 6 sc, (1 sc, 1 inc) × 3, 7 sc, 1 inc, sl st — (30)
Fasten off, leaving a long tail for sewing.
Eye Spots — Make Two (in a darker color)
Next, crochet the two eye spots. These give your sloth that adorable sleepy expression.
7 ch, start in the second chain from hook: 1 inc, 4 sc, 3 sc in the last st, turn and continue on the other side of the chain, 5 sc — (14)
Fasten off, leaving a long tail for sewing.
Arms — Make Two
Rnd 1: 6 sc in MR
Rnds 2–3: 6 sc (2 rounds)
Rnd 4: (1 sc, 1 inc) × 3 — (9)
Rnds 5–13: 9 sc (9 rounds)
Rnd 14: 8 sc
Do not stuff the arms. Simply fold and crochet 4 sc joining both sides together. Fasten off, leaving a long tail for sewing.
Legs — Make Two
1: 6 sc in MR
2: 6 sc
3: (1 sc, 1 inc) × 3 — (9)
Rnds 4–5: 9 sc (2 rounds)
Rnd 6: (2 sc, 1 inc) × 3 — (12)
Rnds 7–9: 12 sc (3 rounds)
Rnd 10: 9 sc
Similarly, do not stuff the legs. Fold and crochet 6 sc joining both sides together. Fasten off, leaving a long tail for sewing.
Body (main color)
Building the Base (Rnds 1–7)
First of all, start the body the same way as the face piece.
Rnd 1: 9 ch, start in the second chain from hook: 1 inc, 6 sc, 3 sc in the last st, turn and continue on the other side of the chain, 7 sc — (18)
Continue crocheting in a spiral.
2: 2 inc, 6 sc, 3 inc, 6 sc, 1 inc — (24)
3: (1 sc, 1 inc) × 2, 6 sc, (1 sc, 1 inc) × 3, 7 sc, 1 inc — (30)
4: (2 sc, 1 inc) × 2, 6 sc, (2 sc, 1 inc) × 3, 8 sc, 1 inc — (36)
5: (3 sc, 1 inc) × 2, 6 sc, (3 sc, 1 inc) × 3, 9 sc, 1 inc — (42)
6–7: 42 sc (2 rounds)
Shaping the Belly (Rnds 8–20)
Next, continue shaping the belly of your sloth. This is where that adorable, chubby shape starts to form!
8: 4 sc, 1 inc, 20 sc, 1 inc, 16 sc — (44)
9–10: 44 sc (2 rounds)
11: 5 sc, 1 inc, 21 sc, 1 inc, 16 sc — (46)
12: 46 sc
13: 6 sc, 1 inc, 22 sc, 1 inc, 16 sc — (48)
14: 48 sc
15: 7 sc, 1 inc, 23 sc, 1 inc, 16 sc — (50)
16–20: 50 sc (5 rounds)
Closing the Body (Rnds 21–32)
Finally, start decreasing to close the body neatly.
21: 7 sc, 1 dec, 23 sc, 1 dec, 16 sc — (48)
22–23: 48 sc (2 rounds)
24: 7 sc, 1 dec, 22 sc, 1 dec, 15 sc — (46)
25: 46 sc
26: 2 sc, (1 dec, 3 sc) × 3, 8 sc, (1 dec, 3 sc) × 3, 6 sc — (40)
27–28: 40 sc (2 rounds)
29: (3 sc, 1 dec) × 8 — (32)
30: (2 sc, 1 dec) × 8 — (24)
31: (1 sc, 1 dec) × 8 — (16)
At this point, stuff the body tightly. However, make sure it does not become too round – the sloth should keep a slightly flat and chubby shape.
32: 8 dec — (8)
Add a little extra fiberfill if needed. Therefore, cut the yarn leaving a long tail. Close the remaining hole by weaving yarn through the front loops of all 8 stitches and pulling tightly. Finally, hide the yarn tail inside.
Assembly & Finishing
Step 1 — Attach the Face
Now comes the most exciting part! First, sew the face piece onto the body, making sure it sits centered and neat. Additionally, place the eye spots over the face with their outer corners directed slightly downward.
Step 2 — Add the Eyes & Nose
Next, sew the button eyes firmly over the eye spots. Then, embroider the nose centered between the eyes at the same level. As a result, your sloth will already start looking incredibly sweet!
Step 3 — Sew on Arms & Legs
After that, sew on the arms and legs in their natural positions. Moreover, embroider three small claws on each paw using ivory yarn for that realistic finishing touch.
Step 4 — Final Details
Finally, make a little tuft of hair on top of the head. Simply take a piece of main yarn, pull a loop through using your hook under the first row, then cut the ends to your desired length and fluff them out. Furthermore, if you used fluffy yarn, gently run a piece of velcro tape over the toy to bring out that gorgeous fluffy texture.
Customization & Variation Ideas
One of the best things about this pattern is how easy it is to make each sloth unique. Here are some fun ideas to get your creativity going:
- Change the yarn texture — use Drops Alpaca for a fluffy sloth or YarnArt Jeans for a smooth finish, both look stunning
- Play with colors — try classic grey and brown, soft pastels, or festive holiday tones for a seasonal twist
- Make it a Christmas ornament — additionally, attach a ribbon to the top and hang your sloth on the tree for the sweetest decoration
- Create a whole family — furthermore, make sloths in different sizes by changing your hook size and yarn weight
- Gift it with a tag — tuck your finished sloth into a little gift box with a handwritten note for a truly thoughtful present
- Add a tiny scarf or hat — as a result, your sloth goes from simply cute to absolutely irresistible!
Perfect for Gifts & Home Accents
This tiny Crochet Little Sloth Amigurumi is, therefore one of those handmade treasures that fit every occasion perfectly. First, it makes a wonderful gift for a friend who needs a little pick-me-up. Moreover, it looks absolutely charming sitting on a shelf as a sweet home accent.
Additionally, because it is so small and quick to make, you can easily crochet a whole batch for holiday gifting. Consequently, you will never be stuck searching for a last-minute handmade gift again. After all, handmade always feels more meaningful and this little sloth carries all that love in every single stitch.
Conclusion
So there you have it your very own Crochet Little Sloth Amigurumi, ready for its first adventure! Whether you made it as a gift or simply treated yourself, this tiny handmade treasure is sure to bring a smile to everyone who sees it. Therefore, grab your hook, pick your favorite yarn colors, and let the crocheting begin.