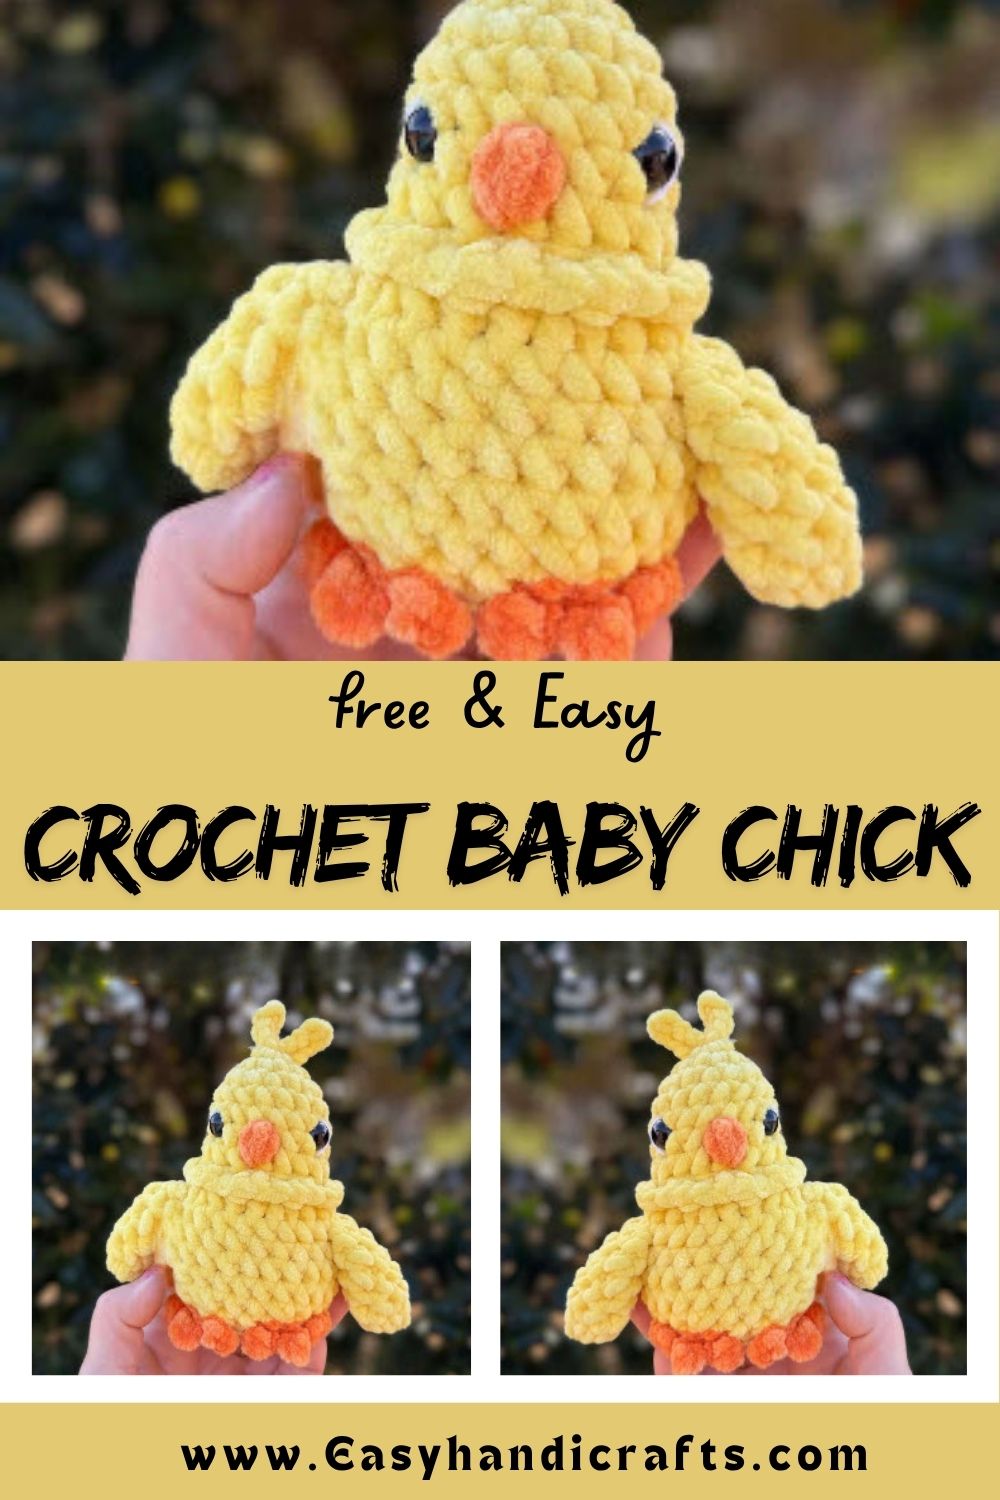
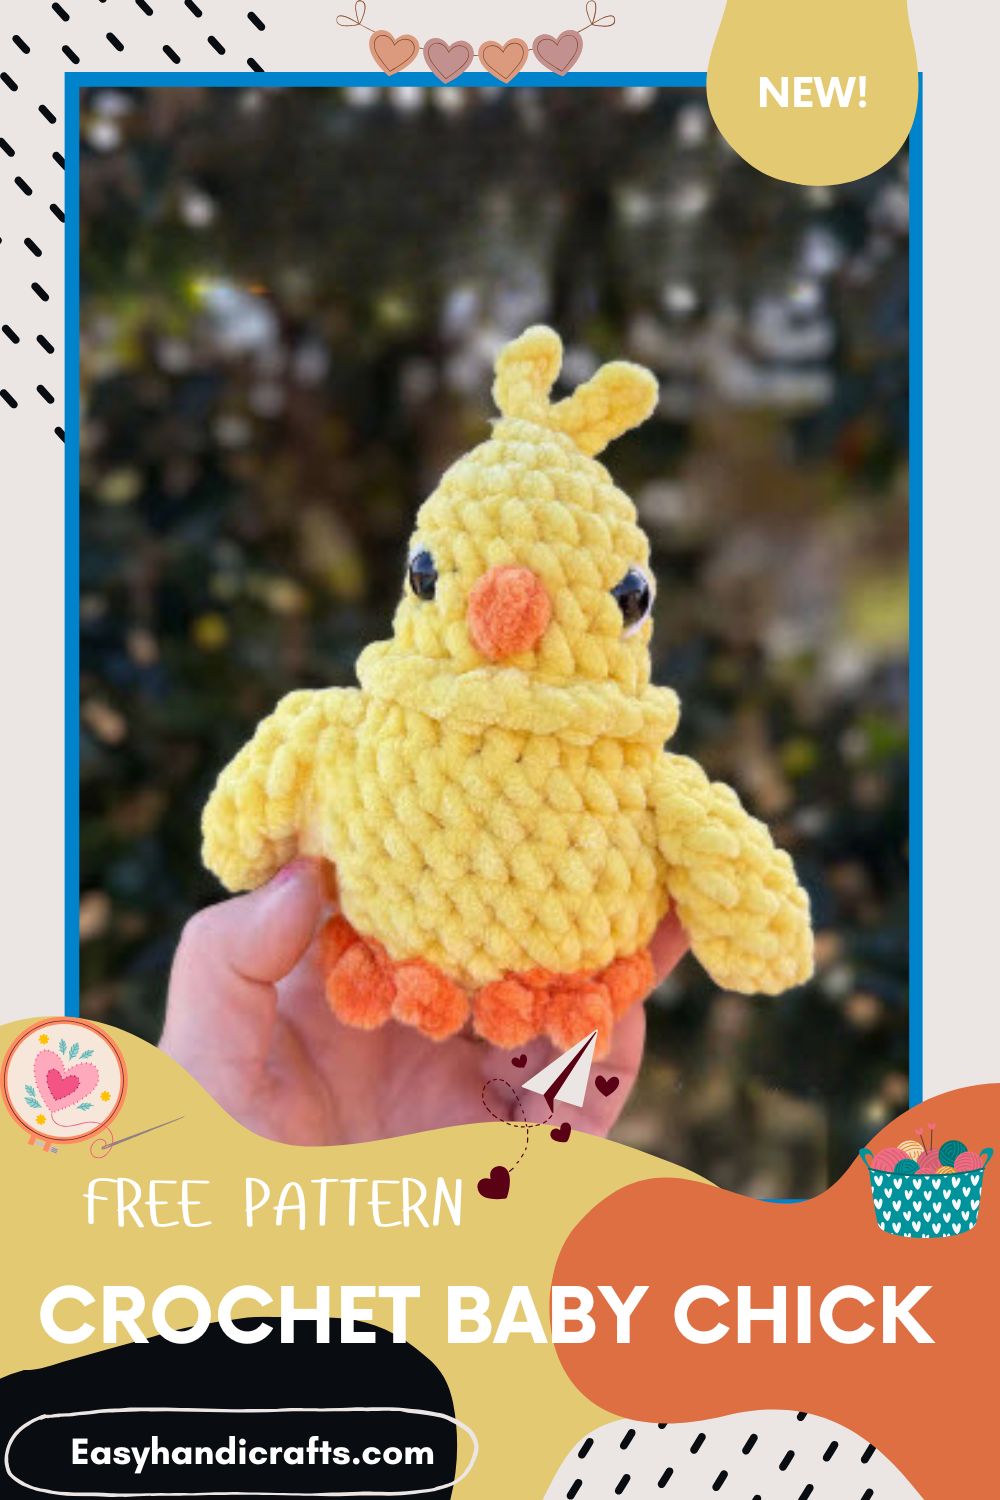
Elegant Crochet Baby Chick Amigurumi Pattern for Beginners
Spring lands in your yarn basket with this Crochet Baby Chick Amigurumi. Soft yellow fluff, tiny orange feet, and feathered wings make this beginner pattern impossible to resist making again soon.
Crocheting a baby chick amigurumi feels like capturing sunshine in yarn form. This Crochet Baby Chick Amigurumi pattern uses super bulky yarn and a simple hook, so beginners finish quickly without sacrificing detail. Fluffy feathers, safety eyes, and a chunky beak give this project personality, making it perfect for nurseries or thoughtful handmade gifts.
Skill Level
This Crochet Baby Chick Amigurumi pattern suits confident beginners who are comfortable with magic rings, increases, and decreases. Bulky yarn works up fast, needing only basic amigurumi stitches, simple shaping, and steady patience.
Pattern Overview
- Worked entirely in super bulky (#6) yarn on a 4.5mm hook, so the whole chick stitches up in a single sitting.
- Head and body are crocheted as one continuous piece, keeping the silhouette smooth without a visible seam.
- Wings are made separately, then joined directly into the body during Round 10 for a seamless attachment.
- A bobble-stitch beak, safety eyes, and optional feather details give the finished chick real character.
- Feet are added with quick chain loops, letting the chick sit upright once stuffed.
- Optional neck, head, and tail feathers add texture without requiring any advanced skills.
Special Techniques
- Bobble Stitch (BO3): Used for the beak, this stitch bundles three double crochets into one stitch, leaving four loops on the hook before finishing together for a raised, 3D look.
- Color Changes: Switching between yellow and orange mid-round for the beak requires carrying or cutting yarn cleanly to avoid visible strain on the stitches.
- Joining Wings Mid-Round: Instead of sewing wings on afterward, this pattern crochets through both wing and body stitches simultaneously in Round 10, creating a sturdier, flatter join.
- Surface Crochet: The optional neck feathers use surface single crochet directly into existing stitches, adding texture without altering the base shape.
- Chain Loop Feet: Small chain-and-slip-stitch loops form feet without any separate stuffing or shaping, keeping this section beginner-friendly.
Materials
- Yarn: Super Bulky (#6). Premier Parfait Chunky used here 50g Sunshine (yellow), 5g Tangerine (orange)
- Hook: 4.5mm
- Tapestry needle, stitch markers, scissors, fiberfill
- Two 12mm safety eyes
- White yarn/thread (optional, for eye detail)
Abbreviations
R: round | MR: magic ring | sc: single crochet | dc: double crochet | inc: increase, 2sc into one stitch | dec: decrease, crochet 2sc together | slst: slip stitch | st(s): stitch(s) | ch(s): chain(s) | YO: yarn over | BLO: back loop only | BO3: bobble stitch 3 (3dc, 4 loops on the hook) | (3sc, inc) 4 times: repeat what is in parentheses 4 times
Wings (Make 2)
Starting with yellow yarn
R1: 4sc in a MR (4) R2: 4inc (8) R3–R6: 8sc around (4 rounds)
No stuffing is needed
Fold opening in half, and 4sc across to close the opening. We will be crocheting the wings to the body later using those same 4sc stitches. Fasten off, cut and hide the thread.
Repeat steps above to make the 2nd wing
Head & Body
Crochet the head and body as one piece
Starting with yellow yarn (working top of head)
R1: 6sc in a MR (6) R2: 6inc (12) R3: (3sc, inc) 3 times (15) R4: (4sc, inc) 3 times (18) R5: 18sc around
In R6, we are creating the beak with BO3.
R6: (yellow) 8sc, (orange) BO3, (yellow) 9sc (18) Fasten off orange
R7: 18sc around
Attach the eyes between R5 and R6, 6 stitches apart.
R8: 18sc around Add stuffing R9: 1sc, inc, (2sc, inc) 5 times, 1sc (24)
In Round 10, we are going to crochet in the wings. You may need to adjust R10 from how it’s written.
Recommendations Use stitch markers to decide placement. Adjust R10 as needed. Keep a span of 8sc between the wings, in front and back of the body.
R10: 4sc, 4sc across wing to join wing to body, 8sc, 4sc across wing to join wing to body, 4sc (24) R11–R13: 24sc (3 rounds) R14: (2sc, dec) 6 times (18) R15: 18sc around
Add stuffing
R16: BLO (1sc, dec) 6 times (12) Final Stuffing Don’t overstuff the bottom — you want the bottom flat, so the baby chick will sit up.
R17: 6dec (6) Fasten off, sew closed, and weave in ends.
Head and Body Complete!
Feet
Using orange yarn
Use pins to mark feet positions on R15. Center 3 pins for each foot with 2 visible stitches between the feet.
stitch 1: sc, ch2, sc in 2nd chain from hook, slst. stitch 2: sc, ch2, sc 2nd chain from hook, slst. stitch 3: sc, ch2, sc 2nd chain from hook, slst.
Fasten off, cut and hide threads.
Repeat steps for 2nd foot.
Feathers
Head Feathers
Using yellow yarn
On top of the head, inside MR of R1: ch4, 3 slst back down chain, slst.
Repeat step twice for 2 feathers. Fasten off, cut and hide threads.
Tail Feathers
Using yellow yarn
Use 2 pins to mark 2 stitches on R14, centered on the back of the chick.
In stitch 1: ch6, 5sc back down chain In stitch 2: slst, ch6, 5sc back down chain
Fasten off, cut and hide threads.
Neck Feathers (Optional)
Using yellow yarn
Surface single crochet on R8, starting in a stitch on the back of the neck.
(slst, hdc inc) all the way around.
Fasten off, cut and hide threads.
Eye Detail (Optional)
Using white thread/yarn
This is optional, but it helps the safety eyes stand out better, depending on yarn color.
Embroider white thread to the outer edge of each eye.
Fasten off, cut and hide thread.
Customization and Variation
- Swap Sunshine yellow for pale cream or buttercream tones to make an “Easter egg” chick with a softer, pastel finish.
- Skip the tail and neck feathers entirely for a cleaner, rounder chick that reads more like a plain baby bird toy.
- Add a small crocheted bow or flower to the head feathers for a girl-themed version, or a bow tie under the beak for a boy-themed one.
- Use a smaller hook and thinner yarn for a mini keychain-sized chick, adjusting stitch counts isn’t needed since the pattern scales naturally with gauge.
- Try two-tone wings by switching yarn color halfway through Rounds 3–6 for a speckled feather effect.
Common Mistakes
- Forgetting to fasten off the orange yarn after the beak, which leaves a stray strand tangled into the following rounds.
- Placing the safety eyes too close together or too high, which changes the chick’s expression from cute to startled.
- Overstuffing the bottom of the body, which stops the finished chick from sitting flat and upright.
- Rushing Round 10 without adjusting stitch placement, causing the wings to sit unevenly or too far forward.
- Skipping stitch markers when placing the feet, which often results in feet that are too close together or crooked.
Finishing Tips
- Weave in every yarn tail through several stitches, then trim close to the fabric so nothing pokes through the fluffy yarn.
- Steam bulky yarn lightly with a handheld steamer to relax curling stitches without flattening the fuzzy texture.
- Fluff the feathers gently with your fingers or a slicker brush after finishing to give them a softer, more natural look.
- Check that the chick balances on a flat surface before calling it done, adjusting stuffing at the base if it tips forward.
- Store finished chicks away from direct sunlight to keep the yellow yarn from fading over time.
Gifting Ideas
- Pair the chick with a small basket of Easter eggs for a handmade spring gift set.
- Attach a gift tag with the recipient’s name for a personalized baby shower present.
- Bundle it with a matching bunny or lamb amigurumi for a farmyard-themed nursery gift.
- Wrap it in tissue paper inside a mason jar for a charming, ready-to-gift presentation.
- Offer it as a teacher or coworker gift around springtime, since the compact size keeps shipping and wrapping simple.
Conclusion
Honestly, this Crochet Baby Chick Amigurumi proves that beginner patterns can still feel polished and full of personality. Bulky yarn keeps the project fast, while the feathers, feet, and bobble beak add charm worth showing off. Once finished, it makes a sweet addition to any nursery shelf or spring gift table.