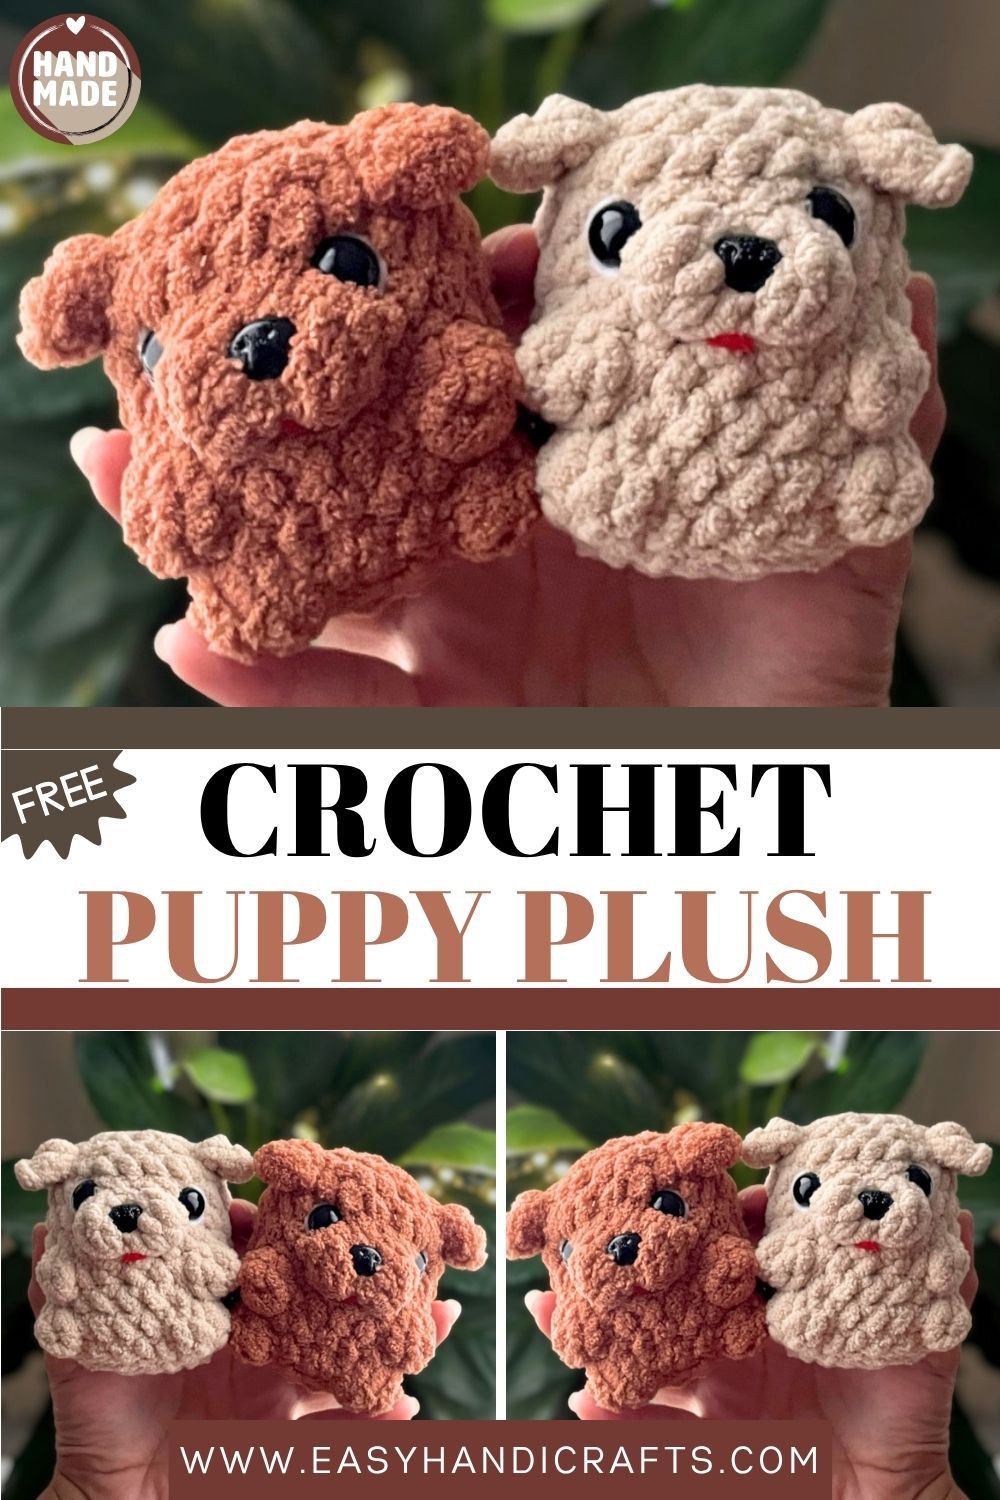
Chubby Crochet Puppy Plush | Beige & Brown Fluffy Dog | Handmade Gift
This chubby little puppy is round, fluffy, and crocheted from nose to curly tail the most huggable handmade dog you will ever make!
There is a reason puppies make everyone instantly happy, and this chubby crochet version is no exception. This pattern creates a delightfully round, squishy dog plush with ears crocheted directly into the body during construction, two adorable bubble stitch paws on the front, a tiny curled tail worked right into the body, and the most expressive little face you will ever embroider onto an amigurumi. Furthermore, the bubble stitch paw details give this puppy a three-dimensional texture that sets it apart from standard round amigurumi designs. In addition, the ears are created using a clever chain technique worked directly within specific rounds rather than sewn on separately afterward. This means the finished puppy has a seamlessly integrated look that feels polished and professional from every angle. The white-eye border embroidery and optional red tongue detail are the final touches that bring this little dog’s face to life. Whether you make this puppy in classic beige and brown, a spotted pattern, or any color combination that speaks to you, the finished result is a handmade plush that looks like it belongs in a boutique gift shop window.
Skill Level
Intermediate. Basic single crochet in continuous rounds is the main skill needed. Additionally, bubble stitch paws and in-round ear construction add satisfying new techniques. Both are easy to learn with one short practice attempt beforehand.
Materials You Will Need
Yarn:
- Chenille yarn weight 5 or 6 — beige, brown, or any color you prefer
Other Supplies:
- Crochet hook — 5.5mm
- Safety eyes — 12mm
- Safety nose — 12mm
- White embroidery thread for eye border detail
- Red embroidery thread for tongue (optional)
- Polyfill stuffing
- Yarn needle
Abbreviations
- AM — Magic Ring
- PB — Single Crochet
- PA — Double Crochet
- AUM — Increase (2 sc in same stitch)
- DISM — Invisible Decrease
- PD — Slip Stitch
- BO — Bubble Stitch (4 double crochet bobble)
- CAD — Chain
Important: Read the full pattern before starting. The ears in V3 are worked inside brackets. All ear stitches are made into the chains themselves.
Pattern: Head
V1: 6 pb in AM (6)
V2: (1 aum) x6 (12)
V3: (1 pb, 1 aum) x2, [3 cad (1 pb, 1 pma)], (1 pb, 1 aum) x2, 1 pb, [3 cad (1 pb, 1 pma)], 1 aum, 1 pb, 1 aum (18)
Work the ear stitches into the chains themselves. Each ear uses chain 3 with 1 sc and 1 hdc worked back down. This creates a small pointed ear sitting naturally on the head.
V4: (5 pb, 1 aum) x3 (21)
V5: 21 pb (21)
Placing the Eyes and Nose
Insert safety eyes between V5 and V6. Place them on either side of where the snout begins. Insert the safety nose centered between the two bubble stitches planned for V6. Always use pins to check placement from all angles before locking anything permanently in place.
Pattern: Snout and Paws
V6: 10 pb, 1 BO, 1 BO, 9 pb (21)
The two adjacent bubble stitches form the puppy’s front paws. They sit side by side at the base of the face.
V7: 21 pb (21)
V8: 8 pb, 1 BO, 5 pb, 1 BO, 6 pb (21)
The two bubble stitches here are spaced further apart. They add texture and depth to the lower face area.
V9: 21 pb (21)
Pattern: Tail and Body Close
V10: 1 pb, colita [3 cad (2 pb)], 7 pb, 1 BO, 5 pb, 1 BO, 6 pb (21)
The tail is inside the brackets at the start of V10. Chain 3 and work 2 sc back down the chain. This creates a small curled tail built directly into the round. No separate sewing is needed.
V11: (1 pb, 1 dism) x7 (14)
V12: 7 dism (7)
Stuff the body firmly before closing. Leave a long tail. Weave it through the remaining 7 stitches and pull tight to close the hole completely.
Face Details
Eye Border
Embroider around each safety eye using white embroidery thread. A single layer of white stitches around the outer edge creates a bright, realistic highlight. This small detail makes the eyes look expressive and alive.
Tongue Detail
Embroider the tongue below the nose using red thread if desired. A small flat oval or simple V stitch works perfectly. This optional touch adds a playful, sweet character to the finished face.
Customization and Variation Ideas
- First, use two different yarn colors, lighter for the body and darker for the ear and paw areas. This mimics real dog breed coloring very naturally.
- Additionally, try a spotted pattern by switching colors every few rounds. This creates a fun Dalmatian-inspired version with the same base construction.
- Moreover, add a tiny crocheted bow between the ears. It takes only minutes and gives the finished puppy a boutique gift-ready feel.
- Furthermore, use a fluffy boucle chenille yarn for extra texture. The finished puppy will look even softer and more huggable than a standard version.
- Also, embroider a small heart on the forehead using contrasting yarn. This kawaii detail adds personality without any extra construction steps.
- Finally, make puppies in three sizes using different yarn weights. All three use the same pattern, scaled up or down for a complete puppy family.
Common Mistakes to Avoid
- First, misreading the V3 ear construction: Ear stitches go into the chains, not the body stitches. Read this section carefully before starting V3.
- Additionally, locking eyes before checking placement: Always pin first. The eye and nose positions define the entire expression of the finished face.
- Also, pulling bubble stitches too tight: Each BO should sit raised and round. Tight tension flattens the bobble and removes the paw effect completely.
- Furthermore, missing the tail in V10: Mark the tail position with a stitch marker before beginning V10. It is easy to pass by accident during a long round.
- Moreover, understuffing the body: Stuff firmly before V11 and V12. A loosely stuffed body loses its chubby, round shape quickly with handling.
- Finally, using thin embroidery thread for eye borders: Use a full strand of white thread. A single thin strand disappears completely against chunky chenille yarn.
Finishing Tips
- First, after closing the hole, knot the tail twice and weave through at least three direction changes. Chenille yarn needs extra anchoring to stay secure.
- Additionally, squeeze and reshape the body immediately after closing. This settles the stuffing into a perfectly round, even shape before it sets.
- Moreover, lift each bubble stitch gently with a tapestry needle after finishing. A light outward nudge restores any bobble that flattened during the closing rounds.
- Furthermore, keep the tongue embroidery stitches tight and even. Loose stitches shift with handling and look untidy very quickly on chenille.
- Also, press the ears gently between your fingers after V3. Chenille responds well to light hand-shaping while still warm from being worked.
- Finally, photograph from directly in front at eye level. This captures the face, bubble paws, and curled tail all together in one balanced image.
Gifting Ideas
- First, place the puppy in a small gift box with soft tissue paper. The compact, round shape fits perfectly in almost any box size.
- Additionally, pair with a small embroidered ribbon collar. This personal touch makes the finished gift feel genuinely considered and special.
- Moreover, these puppies are wonderful gifts for dog lovers of every age. From children to adults, everyone appreciates a beautifully made, handmade plush.
- Furthermore, make the puppy in the same colors as the recipient’s real dog. A personalized portrait plush carries emotional value that no store-bought gift can match.
- Also, include a small tag with the yarn brand and color details. Crafting recipients always appreciate knowing what materials were used.
- Finally, these puppies sell well at craft markets. The chenille texture, bubble paws, and integrated ears together create a display piece that draws attention instantly.
Conclusion
This chubby crochet puppy teaches genuinely useful skills while staying enjoyable from start to finish. The integrated ears, in-round tail, and bubble stitch paws all work together to create a result that looks far more detailed than the stitch count suggests. Therefore, read V3 carefully, mark your tail position in V10, and take time with the face embroidery. In addition, stuff firmly and close neatly. A well-finished base makes every detail look better. In conclusion, this little puppy is ready to be made in your favorite colors and given to someone who will love it completely.
Happy crocheting! Cannot wait to see your chubby puppy come to life.