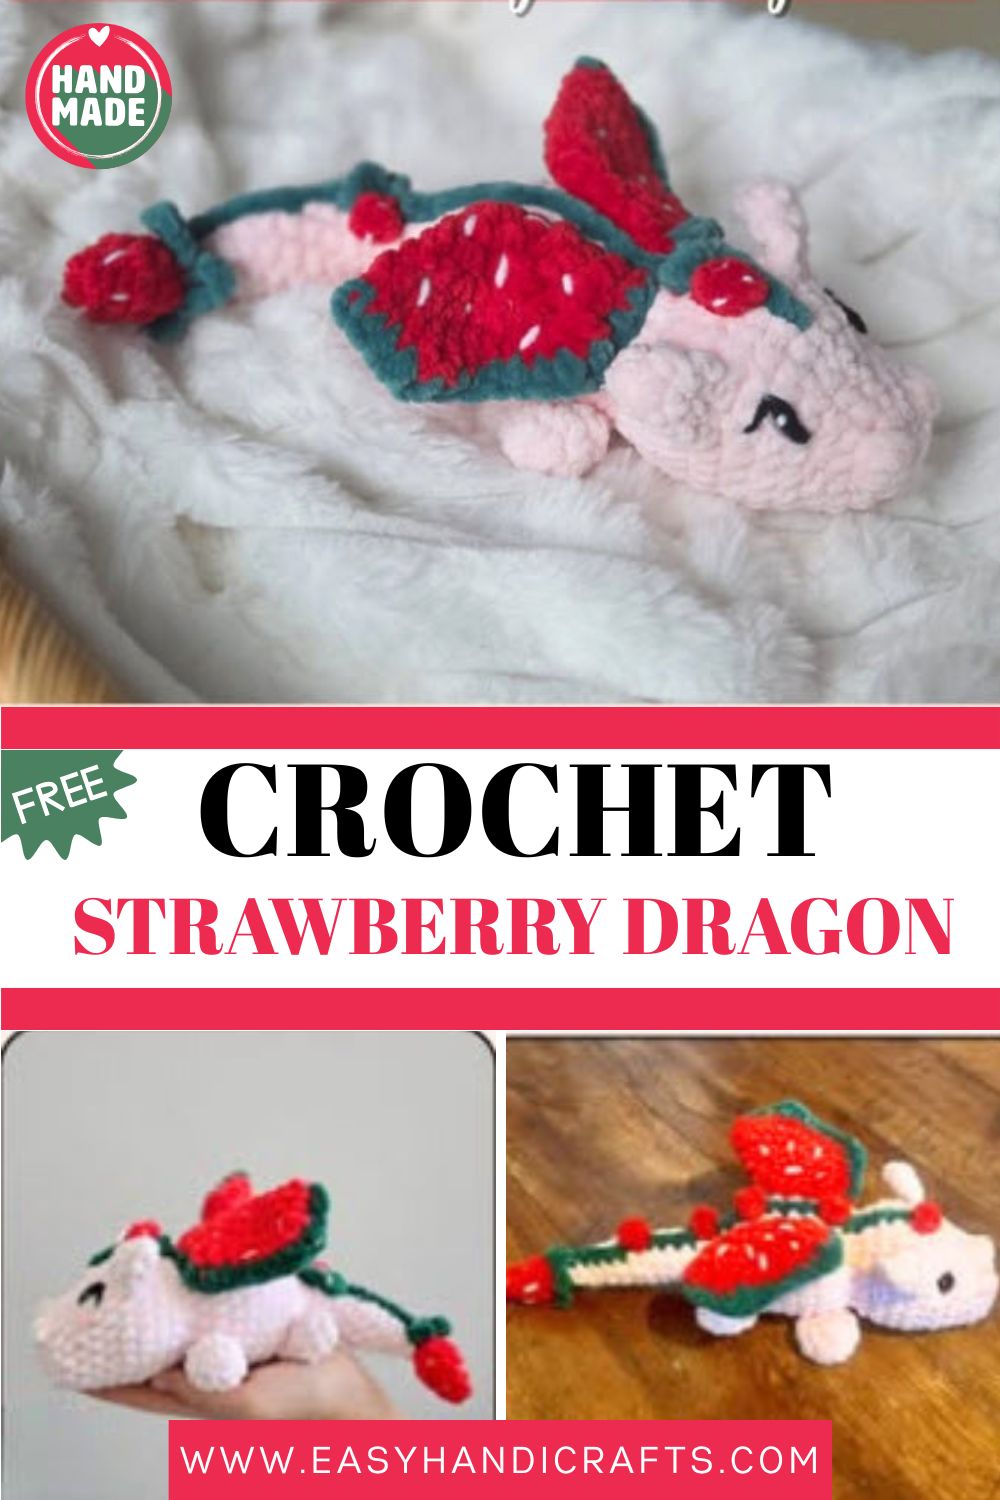
Crochet Strawberry Dragon Amigurumi Pattern for Cuddly Forest Friend
Half berry, half dragon, all squish. This little Crochet Strawberry Dragon Amigurumi forest friend is what happens when a strawberry patch sprouts a tail, wings, and a sleepy smile and somehow it turns out to be the sweetest thing you’ll make all season.
This easy crochet pattern brings a soft strawberry dragon to life, complete with a leafy vine running down its back, tiny berries dotted along the spine, and red wings speckled with seeds. It’s a cuddly, decorative make that looks far trickier than it actually is. Grab your yarn and let’s get started.
Skill Level
This is a confident beginner to intermediate make. You’ll use bobble stitches, color changes, a few different stitch heights, and some crochet-as-you-go joining, plus a little embroidery — nothing scary, just a handful of skills coming together.
Pattern Overview
A quick look at what you’re making before you start:
- What you’ll make: a chunky strawberry dragon with a tail, wings, ears, four limbs, and a berry-dotted vine.
- Yarn: super bulky weight in pink, green, red, and white.
- Hook and eyes: a 4.5 mm hook; eyes can be 14 mm safety eyes or embroidered (as in the sample).
- Construction: the body is worked in one piece from tail to head, with the ears joined as you go.
- The extras: a crocheted vine, bobble-stitch strawberries, a stuffed tail tip, and embroidered seeds.
- What gets sewn on: the arms, legs, and wings are made separately and attached at the end.
Special Techniques
A few techniques give this dragon its personality:
- Bobble stitch (BO): forms the little raised strawberries and adds texture.
- Color changes: swapping pink, green, and red builds the berry-and-vine look.
- Mixed stitch heights: sc, hdc, and dc together shape the curved wings.
- Crochet-as-you-go ears: the ears join straight into a head round instead of being sewn.
- Surface embroidery: white “seeds” are stitched onto the wings, berries, and tail tip.
Materials
- Hook: 4.5mm crochet hook
- Yarn: hobbii honey bunny (category 6/super bulky)
- hint of pink
- shamrock
- tomato
- white acrylic yarn
- Stuffing
- Sewing needle
- Optional: 14mm safety eyes (but I embroidered eyes)
Abbreviations
- MR = magic ring
- SC = single crochet
- INC = increase
- DEC = decrease
- HDC = half double crochet
- DC = double crochet
- SLST = slip stitch
- BO = bobble 4 loops
Legs & Arms — make 4 (don’t stuff)
Using pink yarn
R1: 6sc in MR
R2: inc x6 (12)
R3: 12sc (12)
R4: dec x6 (6)
Fold & 3sc across to close Fasten off & leave a long tail for sewing
Ears — make 2 (don’t stuff)
Using pink yarn
R1: 3sc in MR (3)
R2: inc x3 (6)
R3: 6sc (6)
Fold & 3sc across to close Fasten off. (You do not need a long taill)
Wings — make 2
Using red yarn
R1: 6sc in MR (6)
Fold & we will crochet it closed R2: inc x6 (12)
R7: 3sc, 2dc, 5sc, 2dc, 3sc) (15)
R3: (1sc, inc) * 6(18)
Fasten off and tie ends R4: (2sc, inc) * 6(24)
R5: (3sc, ln(c)) * 6(30)
R6: (1sc,sist, hdc, 2dc, hdc, 1sc, sist, 1sc, hác, 2dc, hdc, 1sc, sist) x2 (30)
CC to green
note: leave a long tail of red sticking out for sewing later.
Details
using white acrylic yarn, embroider on the “seeds” by threading yarn through both sides of the wings, across 1 stitch at a time.
Body — begin with the tail
Using pink yarn
R1: 3sc in MR (3)
R2: inc x3 (6)
R3: 6sc (6)
R4: (1sc, inc) x3 (9)
R5-R12: 9sc (9) (8 rounds)
the body is crocheted from the tail to the head continue with the body
R13: (1sc, inc x3) x2, 1sc (15)
R14: 3sc, inc x2, 2sc, inc, 2sc, inc x2, 3sc, (20)
R15: 4sc, (inc, 2sc) x2, inc x2, (2sc, inc) x2 2sc (26)
R16: 26sc (26)
R17: 10sc, (inc, 1sc) x4, 8sc (30)
- Add stuffing & continue as you go R18-R21: 30sc (30) (4 rounds)
R22: 5sc, (dec, 1sc) x6, dec, 5sc (23)
R23: 3sc, (dec, 1sc) x6, 2sc (17)
continue with the head
R24: 3sc, (inc, 1sc) x6, 2sc (23)
R25: 3sc, (inc, 1sc) x9, 2sc (32)
R26-R27: 32sc (32) (2 rounds)
Tips to attach the ears
Place the ears on top of the head. Line up your next stitch with where we did 3sc closed on the ear. Hook through the first stitch on the ear, then through the next stitch in the head. Single crochet as normal. Continue this for the next stitch.
Body continued — attach the ears
R28: 12sc, (3sc with ear & head), 6sc, (3sc with ear & head), 8sc (32)
Round 28: you may need to adjust ear placement depending on tension R29: 7sc, dec, 3sc, dec, 1sc, dec, 2sc, dec, 1sc, (dec, 3sc) x2 (26)
R30: 26sc (26)
R31: 9sc, dec, 2sc, dec x2, 2sc, dec, 5sc (22)
R32: 7sc, (dec, 1sc) x4, 3sc (18)
R33: 18sc (18)
Insert safety eyes between rows 30 & 31 about 5 visible stitches apart Round 34: you may need to adjust the bobbles depending on tension R34: 7sc, dec, bo (4 loop), 1sc, dec, 1sc, bo (4 loop), dec, 1sc (15)
R35: dec x2, 1sc, dec x 5 (8)
Fasten off & pull through remaining 8 loops. Tie & hide ends
Strawberry Vine
VINE Crochet the vine using green yarn from the top of the head down to the tail. The vine is made with 1sc. Whenever you want a “strawberry”: (ch2, slst into the same stitch) x3, then continue 1sc down. At the tip of the tail (in the MR), (ch4, slst into same stitch) x4 Fasten off & hide tail ends.
STRAWBERRIES Make a strawberry at each place you did the (ch2, slst) x3. Using red yarn, make a 5 loop bobble stitch into the back of the dragon. Fasten off and hide ends. Do not place one at the end of the tail.
STRAWBERRY TAIL TIP Using red yarn:
R1: 3sc in mr (3)
R2: inc x3 (6)
R3: 6sc (6)
R4: inc x6 (12)
Stuff R5: dec x6 (6)
Fasten off and pull yarn through remaining 6 loops. Leave a long tail. (1) Using white yarn, embroider on seeds (2) the back of the tail where we have (ch4) x4.
Sew the Legs & Arms
The legs & arms are sewn on the sides of the “belly” of the dragon. Sew the legs at the back of the body, angled slightly outwards. Make sure they are equally spaced apart from the tail Sew the top of the arms in line with the row where the neck begins.
Sew on the Wings
Make sure the green vine of the wing is pointed down & sew half of one wing down on each side of the body. This allows you to angle the wings upward when you are done.
Assembly
Most of this Crochet Strawberry Dragon Amigurumi comes together right on the hook. The body, head, and ears are all worked as one. The detailed sewing steps are in the two sections just above; here’s the build order at a glance:
- Crochet the body from tail to head, joining the ears in as you go.
- Make the four limbs, two wings, the vine, the berries, and the tail tip separately.
- Sew the legs to the back of the body, evenly spaced from the tail.
- Attach the arms in line with the row where the neck begins.
- Sew on each wing with the green vine pointing down so the wings angle upward.
- Add the eyes (or embroider them), then stitch all the white seeds on last.
Common Mistakes
A few spots that trip people up on this one:
- Rushing the wings. They mix several stitch heights, so read each round slowly and check your stitch count.
- Stuffing at the wrong time. Start adding stuffing at R17 of the body and keep going as the head closes leave it too late and you can’t reach inside.
- Misplaced ears. Line them up where you closed them with 3 sc, and nudge the placement to suit your tension.
- Eyes set too high or low. Place them between rows 30 and 31, about five stitches apart, before the head narrows.
- Uneven vine and berries. Space the strawberries evenly down the back so the vine reads clearly instead of looking crowded.
Important Remarks
- This Crochet Strawberry Dragon Amigurumi is decor first, so it looks lovely on a shelf, in a nursery, or tucked among your potted plants.
- Embroidered eyes (as in the sample) are the safest option if it’s a gift for a small child.
- Super bulky yarn keeps it quick and squishy; a lighter weight simply gives you a smaller dragon.
- Stuff firmly but evenly so the round body and head keep their shape.
- The vine and berries are what give this dragon its charm, so take your time placing them neatly.
Conclusion
And there’s your Crochet Strawberry Dragon Amigurumi a cuddly little forest friend with berries on its back and a smile that’s hard not to return. It takes a bit of patience with all those pieces, but each part is simple on its own, and the finished dragon is pure charm. Make one for a windowsill, a gift, or your own growing crochet menagerie. Happy hooking, and enjoy your new berry-loving friend.