Adorable Crochet Teddy Bear Burger Amigurumi Pattern
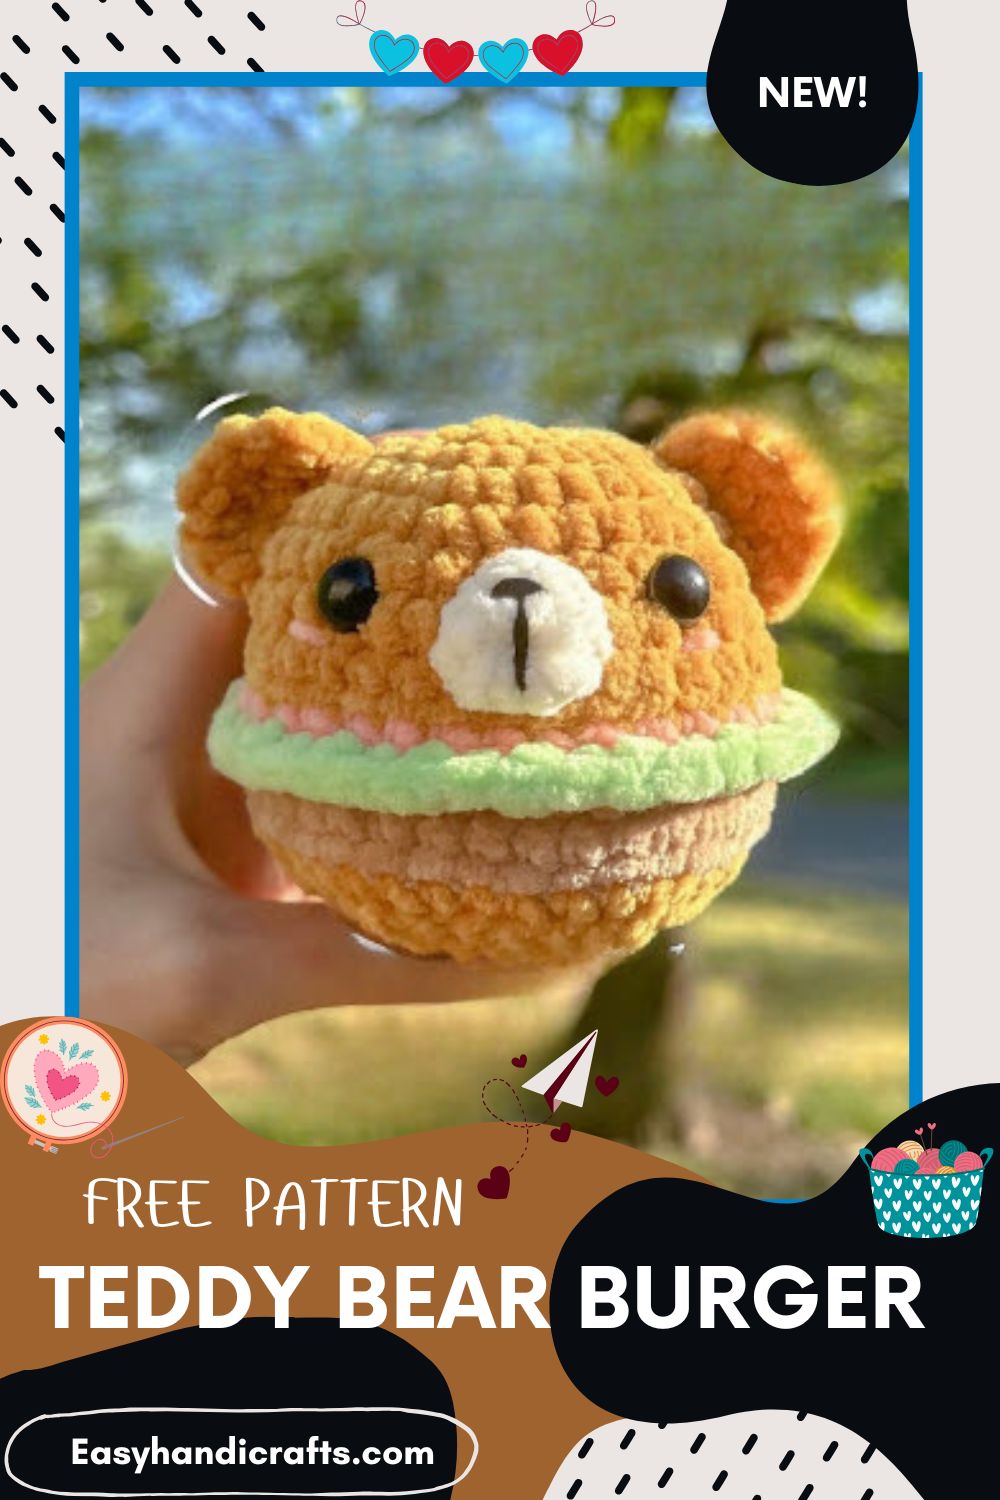
This Crochet Teddy Bear Burger mixes two internet-loved trends into one squishy amigurumi. A fluffy bun, red tomato layer, and meaty patty stack into a bear-shaped head. Beginners with basic skills can finish this quirky bear-ger in one relaxed afternoon session.
Bear-gers took over crochet feeds for good reason, and this pattern shows exactly why. It turns a plain teddy bear head into a tiny burger stack, complete with a sesame-style bun top, an invisible-decrease bottom bun, and a layered tomato slice between the halves. Honestly, the color-switching rounds look trickier than they actually are. Every increase and decrease follows a predictable rhythm, so beginners can keep pace easily.

Skill Level
Rated beginner-friendly with light intermediate touches. Crocheters should know magic ring, single crochet, increase, and decrease before starting. Comfort switching yarn colors mid-round makes the process smoother.
Materials Needed
- 4-5mm crochet hook (4.25mm recommended)
- Chunky yarn (Premier Yarns Parfait Chunky or Himalaya Dolphin Baby Yarn)
- 12mm safety eyes
- Black embroidery thread
- Yarn needle
- Scissors
Abbreviations
- MR: Magic Ring
- Ch: Chain
- Sc: Single Crochet
- Inc: Increase (two sc in one stitch)
- Dec: Decrease (one sc through two stitches, invisible decrease technique)
- St: Stitch
- Slst: Slip Stitch
- R: Round
Pattern Overview
- The head starts as a standard amigurumi sphere, built entirely in the bun color for the first eight rounds.
- Rounds nine through eleven switch colors twice, layering tomato and meat shades using back-loop-only stitches for texture and definition.
- The bottom half returns to bun color, decreasing steadily while eyes and stuffing go in at the halfway point of the shaping.
- A separate lettuce ruffle attaches directly into the front loops left open from round nine, giving the burger its signature frilled edge.
- A tiny nose piece and two curved ears finish the bear-ger’s face and overall silhouette, tying the whole design together.
- Every component uses the same chunky yarn weight, so proportions stay balanced across the entire finished build.
- The pattern reads top to bottom in build order, matching exactly how the piece stacks once assembled.
- Total finished height lands close to four inches once fully stuffed, making it a satisfying desk-sized project.
- No sewing Crochet Teddy Bear Burger pattern pieces are needed beyond the ears, nose, and lettuce ruffle, keeping the seaming light and quick.
- Color changes happen at the start of a new round each time, so joins stay hidden along a single seam line.
- Read through every round once before starting, since the color switches happen back to back near the middle of the head.
Special Techniques
- Back loop only (BLO) stitching creates the ridge lines separating each burger layer without needing extra seams or sewing.
- The lettuce ruffle uses alternating sc and hdc stitches within the same round, giving it a wavy, frilled restaurant-style edge.
- Invisible decrease keeps the lower bun rounds smooth, avoiding the small gaps that regular decreases sometimes leave behind on amigurumi pieces.
- Ears use a turned, chained increase row instead of a standard round, producing a flatter, more natural teddy ear curve.
- Safety eyes get placed between rounds six and seven, six stitches apart, before the head closes up completely for stuffing.
- Working front loops only for the lettuce keeps the tomato round’s back loops free, preserving the ridge line underneath it.
- Switching colors mid-project works best when the old color gets dropped and carried loosely inside the next few rounds.
- A stitch marker on round one helps track round starts once the piece grows dense with color changes later on.
- Weaving color tails along the inside of the head as you go saves a big cleanup job at the very end.
Common Mistakes
- Skipping the front-loop-only step for the lettuce ruffle often results in a messy, uneven attachment point along the seam.
- Under-stuffing before closing the bottom bun rounds leaves the finished head looking flat instead of pleasantly rounded and firm.
- Forgetting to orient the head downward before starting the lettuce round can flip the entire burger stack upside down by accident.
- Rushing color changes without weaving in ends first creates visible knots along the tomato and meat seams later on.
- Placing the eyes too close together throws off the bear-ger’s expression, so six-stitch spacing matters more than it first seems.
- Pulling the invisible decrease too tight on the bottom bun can pucker the fabric, so keep tension even throughout.
- Attaching the ears too low on the head changes the proportions, making the bear-ger look more like a plain patty.
- Mixing up front and back loops between the tomato and meat rounds blurs the ridge lines that define each layer.
- Cutting the tail too short after finishing off leaves too little yarn to sew the piece onto the head securely.
- Ignoring stitch counts at the end of each round lets small errors carry forward into the trickier color-change rounds.
Assembly
- Begin the head in bun color, working rounds one through eight as a standard sphere increase pattern from a magic ring.
- Switch to tomato color for round nine, working back-loop-only single crochet all the way around for a clean ridge.
- Move to meat color for rounds ten and eleven, keeping round eleven in both loops for a solid, sturdy patty layer.
- Return to bun color for round twelve, then begin decreasing through round thirteen while stuffing the head firmly and evenly.
- Insert safety eyes between rounds six and seven, spaced six stitches apart, before finishing the remaining decrease rounds.
- Complete rounds fourteen through sixteen, closing the last eight stitches, then finish off with a long tail for sewing.
- Work the lettuce piece into the tomato round’s front loops, keeping the head face-down while attaching it around the ring.
- Crochet the small nose circle from a magic ring, embroider a black nose on top, then sew it between rounds six and seven.
- Make two ears using the chained increase method, then stitch them onto the head between rounds three and seven on either side.
- Weave in every loose end securely, checking that the bun, tomato, and meat layers sit flush against each other.
- Give the finished bear-ger a gentle shape check, smoothing stuffing toward any soft spots before setting it aside to rest.
- Photograph the finished piece in natural light against a plain background for the best online sharing results later.
Important Remarks
- Chunky yarn substitutes work fine as long as the gauge stays close to the original hook and yarn pairing used here.
- Save leftover scraps from the tomato and meat colors, since the lettuce and nose pieces only need small amounts each.
- Safety eyes should always go in before final stuffing, since adjusting them afterward stretches the surrounding stitches out of shape.
- Block the finished piece lightly if the layers look uneven after stuffing, letting the stitches settle into place overnight.
- Keep spare safety eye backs on hand, since they can be fiddly to secure firmly on the first attempt.
- Store finished pieces away from direct sunlight, since bright chunky yarn colors can fade with prolonged light exposure over time.
Conclusion
This Crochet Teddy Bear Burger amigurumi proves that crochet trends can stay playful without turning genuinely complicated to make. The layered color-changing rounds teach useful BLO skills while building something fun to display or gift. Trust me, once the lettuce ruffle clicks into place, the rest of the bear-ger comes together fast and satisfying, leaving you with a burger buddy worth showing off to friends, family, or fellow crochet enthusiasts online.