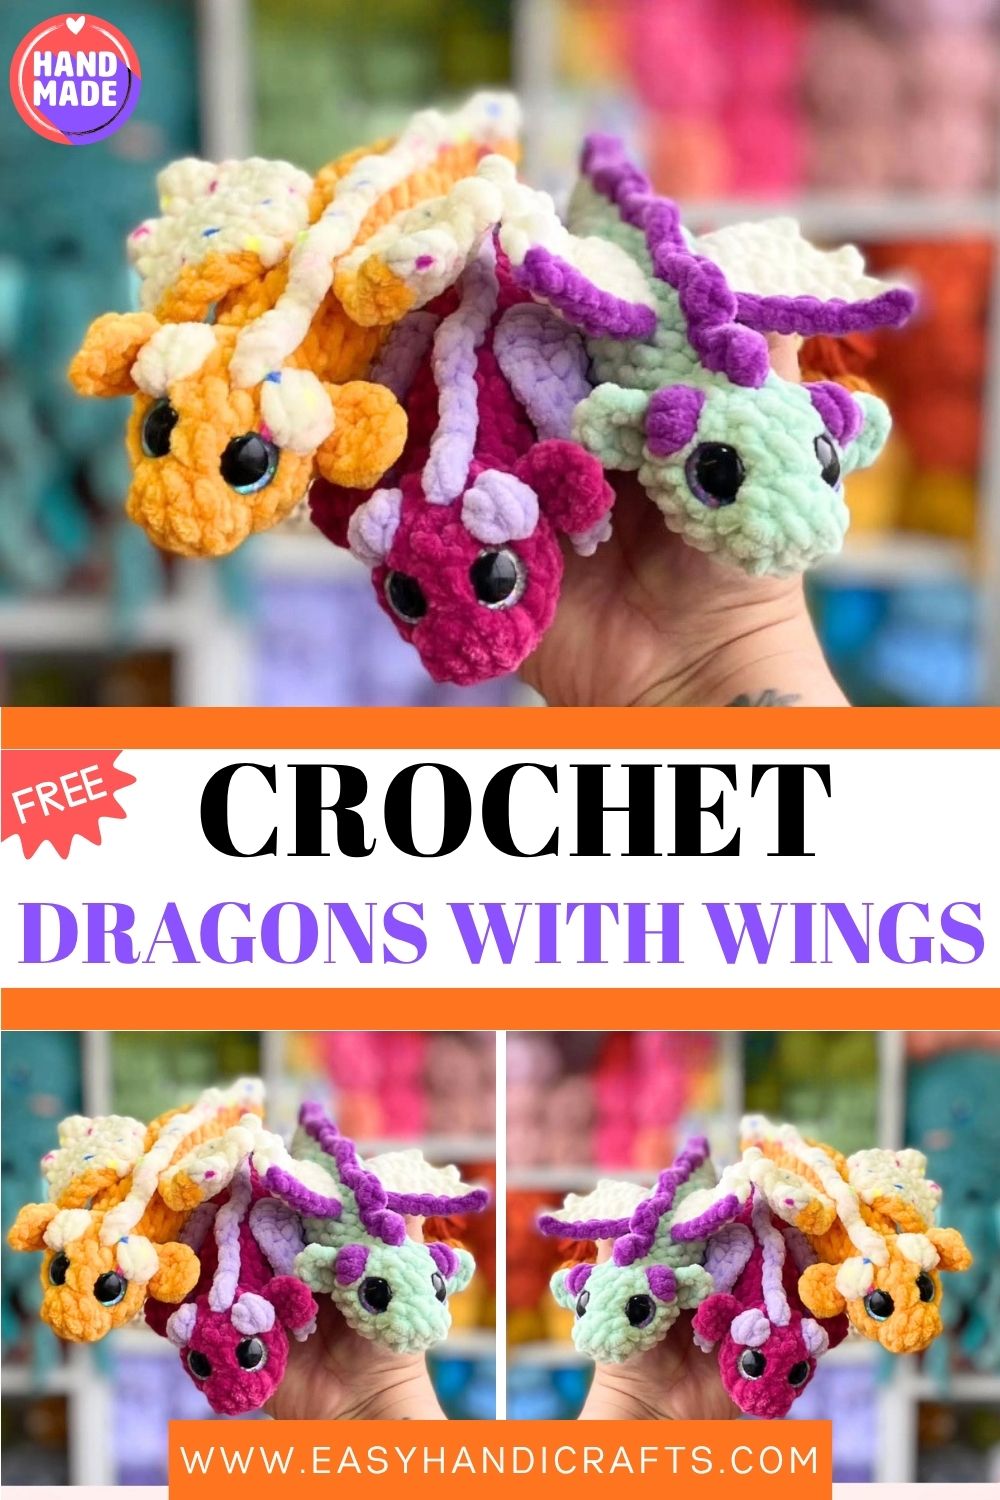
Tiny Handmade Dragons With Wings — Pastel Crochet Plush For Fantasy Lovers
Three baby dragons. One hand. Zero chance I’m letting go Orange sprinkle, hot pink & mint all handmade, all winged, all looking at me with those big glossy eyes like they already know they’re coming home with me. Which one is yours?
Dragons have always captured the imagination. This tiny crochet dragon brings that magic right into your hands. It is soft, squishy, and full of personality. Furthermore, the body, head, and tail are all worked as one continuous piece. This means the overall construction is clean and seamless from start to finish. In addition, the wings are worked in turning rows rather than rounds. As a result, they have a natural flat shape that looks elegant and realistic when sewn onto the body. The bobble stitch horns and arm details add dimension without requiring advanced skills. Moreover, the back spikes are added last using a simple surface crochet technique that runs from tail to head. Every single detail works together to create a finished dragon that looks genuinely impressive. Whether you make this in soft green and pink, golden yellow and cream, or any pastel combination you love, this little dragon is a project that fantasy lovers and crochet makers alike will treasure completely.
Skill Level
Intermediate. Single crochet in continuous rounds forms the main body. Additionally, turning row wing construction, bobble stitch details, and surface crochet spikes introduce satisfying new techniques at a comfortable pace.
Materials You Will Need
Yarn:
- Super bulky yarn size 6 in your chosen colors
- Body color for the main head, body, and tail
- Second color for arms, legs, horns, and wing accents
- Wing color for the main wing panels
Other Supplies:
- Crochet hook — 5.5mm or 6mm
- Safety eyes — 14mm
- Fiber filling stuffing
- Stitch marker
- Scissors
- Yarn needle
Bobble stitch notes:
- BO for horns — 3 dc bobble
- BO for arms and legs — 5 dc bobble
Abbreviations
- MR — Magic Ring
- SC — Single Crochet
- DC — Double Crochet
- DEC — Decrease (invisible)
- INC — Increase
- FO — Fasten Off
- FLO — Front Loops Only
- BLO — Back Loops Only
- SLST — Slip Stitch
- CH — Chain
- STS — Stitches
- BO — Bobble Stitch
- () — Total stitches at the end of the round
Pattern: Head, Body, and Tail
Using body color yarn. Start with a slipknot.
R1: Chain 4, turn. Starting in the second chain from the hook: inc, sc, inc. Continue on the other side of the chain: 3 sc (8)
R2: 8 sc around (8)
R3: 8 in (16)
R4: 16 sc around (16)
R5: 3 sc, BO, 3 sc, BO, 8 sc (16)
The two bobble stitches in R5 form the dragon’s horns. Use the second color yarn and the 3dc bobble for these. Insert safety eyes between R3 and R4, approximately 4 stitches apart.
Begin stuffing at this point and continue adding stuffing gradually as you work downward.
R6: (2sc, dec) x4 (12)
R7: 2sc, 3 dec, 4sc (9)
R8: 2sc, 3 inc, 4sc (12)
R9: (2sc, inc) x4 (16)
R10: 13sc, BO, 2sc (16)
R11: BO, 15sc (16)
R12–14: 16 sc around for 3 rounds (16)
R15: 14sc, BO, sc (16)
R16: sc, BO, 14sc (16)
R17: (2sc, dec) x4 (12)
R18: (4sc, dec) x2 (10)
R19–21: 10 sc around for 3 rounds (10)
Stuff the tail loosely from this point. A loosely stuffed tail bends and curves naturally rather than staying stiff and straight.
R22: 6sc, dec, 2sc (9)
R23: 9 sc around (9)
R24: 7sc, dec (8)
R25: 8 sc around (8)
R26: 6sc, dec (7)
R27: 7 sc around (7)
R28: 5sc, dec (6)
R29–32: 6 sc around for 4 rounds (6)
R33: 4sc, dec (5)
R34–38: 5 sc around for 6 rounds (5)
Fasten off and close the hole securely.
Pattern: Ears — Make 2
Using body color yarn. Start with a magic ring.
Work into the MR: 2sc, dc, chain 1, dc, 2sc (6)
Slip stitch into the next stitch. Fasten off and leave a tail for sewing.
Sew each ear under the horns, between rounds 5 and 6 on each side of the head.
Pattern: Wings — Make 2
Work in turning rows, not continuous rounds. Use the wing color yarn. Start with a slipknot.
Row 1: Chain 8, turn. Row 2: 7sc, ch1, turn (7)
5sc, leave last 2 stitches unworked, ch2, turn (5)
: 6sc, ch1, turn (6)
4sc, leave last 2 stitches unworked, ch2, turn (4)
5sc, continue working toward the starting tail. Make sc into every hole you find, approximatelyy 5 stitches. Continue working on the other side of your work. Change to the second color yarn. Work 6sc, slst into next stitch.
Fasten off and leave a long tail for sewing.
Sew each wing between rounds 10 and 14, approximately 4 stitches apart on each side of the body.
Pattern: Spikes
Insert your hook between the last two rounds of the tail. Yarn over and pull through. Chain 1.
Work from the tail toward the head along the spine:
2sc, [(hdc, chain 2, hdc) into same stitch, 3sc] x7, (hdc, chain 2, hdc) into next stitch.
Fasten off and weave in all ends. The spikes run in a single line from the tail tip all the way up the back to the head, creating the dragon’s signature dorsal ridge.
Customization and Variation Ideas
- First, try a deep teal body with silver wing accents for a water dragon variation that looks dramatic and completely different from the pastel original.
- Additionally, use a gradient yarn for the tail section. The color shifts naturally through the long tapering rounds and creates a beautiful ombre effect without any color change work.
- Moreover, add extra spike repeats along the spine for a longer, more elaborate dorsal ridge that gives the dragon a fiercer, more detailed silhouette.
- Furthermore, make the wings slightly larger by adding two extra turning rows before the final edging row. Bigger wings give the dragon a more dramatic, fantasy-inspired proportion.
- Also, try making a miniature version using fingering-weight yarn and a 2mm hook. A tiny dragon sitting in the palm of a hand is an incredibly charming display piece.
- Finally, create a matched pair in complementary colors, a green and pink dragon alongside a golden and cream dragon, which makes a stunning fantasy duo for any shelf display.
Common Mistakes to Avoid
- First, stuffing the tail too firmly: A tightly stuffed tail becomes stiff and straight. Stuff it loosely from R19 onward so it can curve and bend naturally into the characteristic dragon tail shape.
- Additionally, placing eyes after R5: The safety eyes must go in between R3 and R4 while the head is still open enough to reach inside. Mark the position with pins first and lock them before continuing.
- Also, working the wings in rounds instead of rows: The wings are specifically worked in turning rows. Working them in rounds creates a tube shape instead of a flat wing panel.
- Furthermore, skipping the color change on the wing edging: The second color accent on the wing edge is what gives the wing its distinctive two-tone look. Missing this step results in a flat, single-color wing that loses much of its charm.
- Moreover, adding spikes before the body is fully assembled: Always complete and stuff the body, attach all pieces, and check the overall balance before working the spine spikes. The spike line needs to run straight from tail to head.
- Finally, using the wrong bobble for horns versus limbs: Horns use a 3dc bobble while arms and legs use a 5dc bobble. Using the same bobble for both makes the horns too large and the limbs too small relative to the body.
Finishing Tips
- First, when sewing the wings onto the body, pin both in place simultaneously before sewing either one down. Checking symmetry from the front saves a great deal of unpicking later.
- Additionally, after attaching all pieces, gently bend the tail into a curved position and hold it there for a moment. Super bulky yarn has enough body to hold a gentle curve once shaped by hand.
- Moreover, use matching body color yarn to sew on the ears and matching wing color to finish the wing seams. Invisible joins make the finished dragon look professionally constructed.
- Furthermore, when working the spine spikes, keep your tension consistent across each (hdc, ch2, hdc) repeat. Uneven tension creates spikes of different sizes, which disrupt the clean ridge line along the back.
- Also, photograph the finished dragon from slightly above and at a three-quarter angle. This viewpoint shows the wings, spikes, face, and tail curl all together in one beautifully composed image.
- Finally, weave every yarn end in through at least three direction changes before trimming. Super bulky yarn ends work loose quickly without thorough securing.
Gifting Ideas
- First, display the finished dragon perched on a small piece of driftwood or a decorative branch for a gift presentation that looks like a scene from a fantasy illustration.
- Additionally, pair the dragon with a small handwritten scroll tied with ribbon describing the dragon’s name and magical powers. This playful personal touch makes the gift genuinely unforgettable.
- Moreover, these dragons make wonderful gifts for anyone who loves fantasy fiction, gaming, or mythology. A handmade dragon carries a level of magic and intention that no mass-produced toy can replicate.
- Furthermore, make a dragon in each recipient’s favorite color for a personalized gift that feels completely tailored and thoughtful from the very first stitch.
- Also, create a small display set of three dragons in different color combinations and present them together on a wooden tray as a fantasy collection that looks stunning on any shelf.
- Finally, these dragons sell exceptionally well at craft fairs, fantasy conventions, and handmade markets. The wings, spikes, and long curling tail create immediate visual impact from across any display table.
Conclusion
This tiny crochet dragon is one of those patterns that feels genuinely special from the very first foundation chain. The seamless head-to-tail construction, the flat turning row wings, and the surface crochet spine spikes all work together to create a finished piece that looks like it took far more skill than it actually required. Furthermore, the loose tail stuffing technique is a small but important detail that transforms the finished dragon from stiff to fluid and lifelike. Therefore, mark your eye position carefully, stuff the tail loosely, and take your time with the spike line along the spine. In addition, choose colors that excite you. This dragon looks beautiful in every palette imaginable. In conclusion, this tiny handmade dragon is waiting to spread its wings and find its forever home.