Crochet Toast Piggy | Kawaii Mini Food Plush Handmade
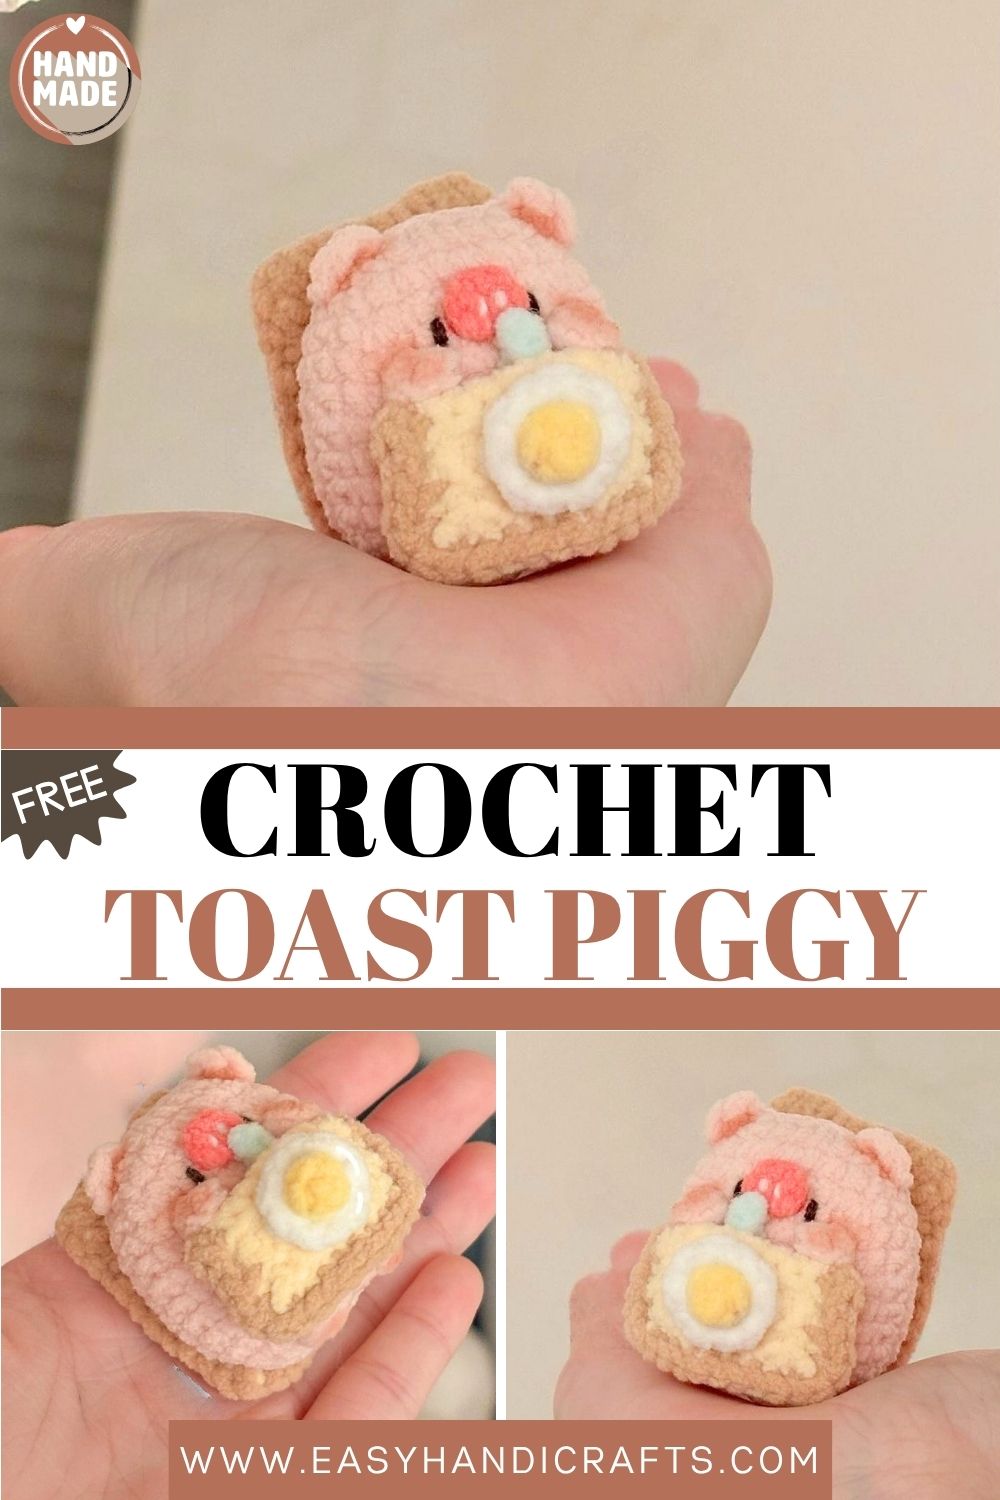
This squishy little piggy sitting inside a toasted sandwich is the most delightfully ridiculous kawaii plush you will ever crochet!
Now and then, a crochet pattern comes along that makes you smile before you even pick up your hook. This kawaii toast piggy is exactly that kind of project. A round, squishy pink pig nestled snugly between two pieces of crocheted toast, complete with a tiny fried egg, a runny drop detail, and the most adorable little ears and snout you have ever sewn onto anything. Furthermore, the construction is refreshingly straightforward. The pig body is built on a foundation chain for a naturally oval shape, while the bread slices are worked in simple flat rows and joined with a darker brown border to create the toasted effect. In addition, the tiny nose, drop detail, and egg yolk are all worked with a finer yarn or smaller hook so they sit proportionally on the finished piece without overwhelming it. The result is a handmade plush that is equal parts funny, charming, and completely original. Whether you display this piggy sandwich on a shelf, give it as a gift to someone who loves food and kawaii aesthetics, or simply make it because it is impossible to resist, this pattern delivers a finished piece that genuinely stops people in their tracks.
Skill Level
Beginner to intermediate. Foundation chain construction, basic increases and decreases, and simple flat row techniques are all that is needed. Additionally, the tiny detail pieces introduce useful scale-down skills using finer yarn or a smaller hook.
Materials You Will Need
Yarn:
- Light pink for the pig body
- Pink for the pig details
- Light blue for accent details
- Yellow for the egg yolk
- White for the egg white
- Light yepig’s for the bread
- Brown and dark brown for the toast border
- Any preferred colors welcome — this pattern is fully customizable
Other Supplies:
- Crochet hook — standard size for main pieces
- Smaller hook or two-strand yarn for the nose and drop detail
- Yarn needle for sewing and embroidery
- Polyfill stuffing
Important note: Every round in this pattern begins with a slip stitch and one chain. This is not written into each round description. Keep this in mind throughout the entire pattern.
Abbreviations
- MR — Magic Ring
- SC — Single Crochet
- INC — Increase (2 sc in same stitch)
- DEC — Decrease (invisible)
- HDC — Half Double Crochet
- CH — Chain
- ST — Stitch
- SLST — Slip Stitch
Pattern: Pig Body
Using light pink yarn
R1: Chain 8. Starting from the second stitch: 6 sc, 3 sc in one stitch, 5 sc, 1 inc (16) R2: 1 inc, 5 sc, 3 inc, 5 sc, 2 inc (22) R3: 22 sc (22) R4: 1 sc, 1 inc, 5 sc, (sc, inc) x3, 5 sc, (sc, inc) x2 (28) R5–11: 28 sc for 7 rounds (28) R12: 1 sc, 1 dec, 5 sc, (sc, dec) x3, 5 sc, (sc, dec) x2 (22) R13: 22 sc (22)
Stuff the pig body firmly at this point.
R14: 11Decc (11)
Add more stuffing if needed before closing. Leave a long tail to sew the opening closed.
Pattern: Ears Make 2
Using light pink yarn
Chain 3. Starting from the second stitch: 1 sc, 3 sc in one stitch, 1 inc.
Leave a long tail for sewing. The small, rounded shape creates a simple but perfectly proportioned pig ear that sits naturally on the top of the body.
Pattern: Nose
Using pink yarn, pull two strands apart,t or use a smaller hook
R1: 4 sc in MR, pull closed.
Leave a long tail for sewing. The reduced yarn weight or smaller hook keeps the nose proportionally small against the pig’s body.
Pattern: Drop Detail
Using light pink or pink yarn, the same fine yarn as the nose
Chain 3. Starting from the second stitch: 1 sc, 3 sc in one stitch.
Leave a long tail for sewing. This tiny teardrop shape adds a charming detail to the pig face that gives it an even more kawaii expression.
Pattern: Hands and Legs Make 4
Using light pink yarn
Chain 3. On the third stitch, work 1 HDC.
Fasten off and leave a tail for sewing. All four limbs are made identically in this simple one-stitch construction that keeps them small and proportional.
Pattern: Bread Make 2 Pieces for Each Toast Slice
Using light yellow yarn
Chain 10. Starting from the second stitch: 9 sc, turn, and 9 sc. Continue for 10 rows total.
Each completed rectangle forms one half of a bread slice.
Pattern: Bottom Toast
Place two bread rectangles together and sew around the entire edge using darker brown yarn. Work 3 sc in each corner, stitch to keep the corners square and neat. This darker border creates the toasted crust effect around the edges.
Pattern: Top Toast
Fold one bread rectangle in half and sew the folded edges together using darker brown yarn. Work 3 sc in each corner stitch as before. The folded construction gives the top toast slice a slightly thicker, more dimensional appearance that sits naturally over the pig.
Pattern: Egg White
Using white yarn
R1: 5 sc in MR (5) R2: inc, dc inc, inc, dc inc, inc (irregular increase round)
The combination of regular increases and double crochet increases creates an irregular, organic shape that mimics the uneven spread of a real fried egg white.
Pattern: Egg Yolk
Using yellow yarn
R1: 5 sc in MR (5)
Pull the magic ring closed tightly for a small, neat circular yolk. Fasten off and leave a tail for sewing or gluing onto the egg white.
Assembly
There is no single correct way to assemble this sandwich piggy. Place the pig body between the two toast pieces and arrange the egg, limbs, ears, nose, and drop detail in positions that feel balanced and charming to you.
Glue the toast pieces to the pig body for a quick and secure bond, or sew them on if you prefer a fully stitched finish. Sew the ears on top of the pig head, the nose at the center of the face, and the four limbs peeking out from the sides and bottom of the sandwich. Place the egg on top of the upper toast or beside the pig face,e depending on your preferred arrangement.
Embroider small eyes and any additional face details using an ag yarn needle and embroidery thread.
Customization and Variation Ideas
- First, change the pig color entirely. Aa lavender pig in a purple toast sandwich or a mint green piggy in a matcha-colored bread creates completely different kawaii aesthetics using the same base pattern.
- Additionally, add a tiny crocheted slice of cheese between the toast layers using yellow yarn for an extra food detail that makes the sandwich even more elaborate.
- Moreover, make the egg yolk in orange yarn instead of yellow for a more realistic fried egg color that photographs beautifully against the light toast.
- Furthermore, add embroidered blush circles on the pig’s cheeks using pink thread after assembly. This single detail transforms the expression from cute to absolutely irresistible.
- Also, try making a matching series of food plushies using the same construction approach. Aa burger piggy, a taco piggy, or a pancake piggy all follow the same oval body base with different food elements surrounding it.
- Finally, use a variegated light brown yarn for the bread,d so the color shifts naturally across the rows and creates a more realistic baked bread texture without any extra technique.
Common Mistakes to Avoid
- First, forgetting the starting slip stitch and chain: Every round begins with a slst and ch1 that is not written into the pattern notes. Missing this at the start of any round throws off the entire stitch count for that section.
- Additionally, making the nose and drop too large: These pieces must be worked with finer yarn or a smaller hook. Using the same yarn and hook as the main body creates oversized details that overwhelm the pig face completely.
- Also, skipping the 3 sc in corner stitches on the toast: These corner increases are what keep the bread rectangles flat and square. Without them, the corners curl inward,d and the toast loses its characteristic straight-edged shape.
- Furthermore, stuffing too early: The pig body needs to be stuffed firmly at R13 before the final decrease round. Waiting until after R14 makes it very difficult to get enough stuffing in through the small remaining opening.
- Moreover, gluing the assembly before everything is positioned: Lay out all finished pieces first and check the overall arrangement before applying any glue. Glue bonds quickly, and repositioning after the fact is very difficult with yarn pieces.
- Finally, pulling the egg yolk magic ring too loose: A loose center on the yolk creates a visible hole that looks untidy against the white egg base. Pull the ring firmly and completely closed before fastening off.
Finishing Tips
- First, after stuffing and closing the pig body, give it a firm squeeze and reshape it into an even oval before the fiberfill settles. The foundation chain construction naturally creates a flatter oval shape that fits perfectly between the toast slices.
- Additionally, when sewing on the ears, angle them very slightly outward rather than straight up. This small adjustment gives the pig a more relaxed, characterful expression.
- Moreover, use a fine embroidery needle for the eye stitching. A thick needle leaves visible entry holes in the yarn that are especially noticeable on the smooth pig face.
- Furthermore, if the toast rectangles curl slightly after finishing, press them gently under a heavy book for a few minutes before assembly. Flat bread pieces make for a much neater finished sandwich.
- Also, photograph the finished toast piggy from slightly above and at a slight angle. This viewpoint shows both the pig face and the toast layers simultaneously for the most complete and appealing image.
- Finally, weave in every yarn end through at least three direction changes before trimming. The small scale of this project means any loose ends are immediately visible against the finished surface.
Gifting Ideas
- First, package the finished toast piggy in a small kraft paper bag tied with twine for a presentation that feels artisan and handmade without requiring any elaborate wrapping effort.
- Additionally, pair the plush with a small jar of real jam or honey for a breakfast-themed gift set that is funny, thoughtful, and completely original.
- Moreover, these kawaii food plushies make wonderful gifts for food lovers, kawaii collectors, and anyone who appreciates genuinely creative handmade work that goes beyond standard amigurumi designs.
- Furthermore, make a matching set of three food plushies: toast piggy, egg piggy, and pancake pigg,y and present them together on a small wooden serving board for a display set that looks like a handmade kawaii breakfast spread.
- Also, attach a small handwritten tag describing each ingredient in the sandwich for a humorous and personal touch that makes the gift even more memorable.
- Finally, these plushies sell extremely well at craft fairs and pop-up markets where the food element and kawaii design together create immediate stopping power at any display table.
Conclusion
This kawaii toast piggy is the kind of project that reminds you exactly why crochet is so joyful. The combination of a simple oval pig body, flat bread slices, and tiny food details creates a finished piece that is genuinely unlike anything else in the amigurumi world. Furthermore, the free-form assembly approach means every single toast piggy turns out slightly different and entirely personal to the maker. Therefore, remember the starting slip stitch on every round, keep your nose and drop pieces small, and have fun arranging the sandwich however it feels right to you. In addition, do not overthink the egg placement. There is no wrong answer when you are building a sandwich around a pig. In conclusion, this little piggy went to the toaster and came out absolutely perfect.