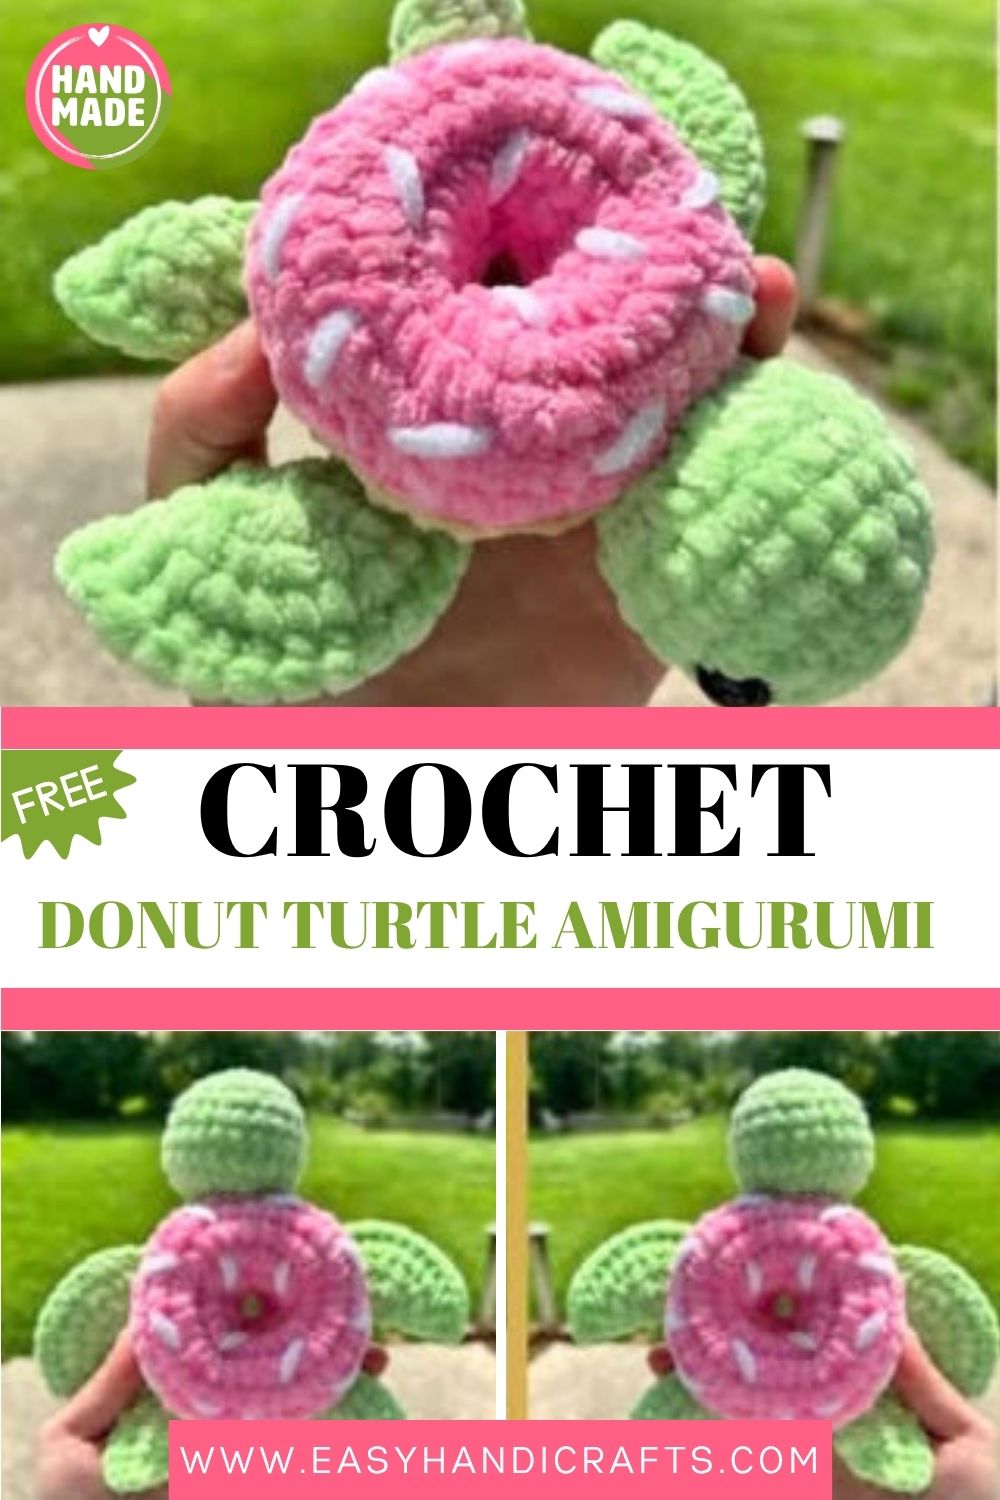
Stylish Crochet Donut Turtle Amigurumi Pattern for Keepsakes
Some crochet projects bring a smile to your face before they’re even finished, and this Crochet Donut Turtle Amigurumi is one of them. A charming mix of a sweet, icing-topped donut and an adorable little turtle, it makes for a creation that feels playful, soft, and endlessly huggable.
If you love unique and playful amigurumi designs, this pattern is sure to win you over. The Donut Turtle works up fast with chunky yarn, so you’ll see beautiful results quickly without long, tiring rounds. Honestly, it can make a wonderful gift or a charming little decoration to brighten up any shelf. Beginners can follow along with ease, while experienced crafters will love this fresh, fun twist on the classic turtle design.
Pattern Overview
Before you grab your hook, here is a quick look at what you will actually make. Each piece is simple on its own, yet they come together into something charming.
- A frosted donut base that forms the round turtle shell.
- A friendly green head with safety eyes for a sweet little face.
- Two front fins and two back fins that give it the classic turtle look.
- White sprinkles are scattered across the top for a tasty finishing touch.
- A compact, chunky size thanks to super bulky yarn and a 5.00mm hook.
In short, you build five main parts and then sew them together. After that, a few sprinkles bring the whole thing to life.
Special Techniques
This Crochet Donut Turtle Amigurumi project stays beginner friendly, but a couple of small techniques really help. Once you get comfortable with them, the rest feels smooth and easy.
- Magic circle for tight, clean starts with no center hole.
- Continuous rounds worked with a stitch marker so you never lose your spot.
- Folding fins in half and crocheting across both layers for a sturdy edge.
- Stuffing as you sew so the donut keeps a smooth, plump shape.
- Surface sprinkle stitches added with white yarn for that frosted donut effect.
None of these are hard. With a little practice, they quickly become second nature.
Skill Level
This pattern sits at an easy to confident beginner level. You only need basic stitches, simple shaping, and a bit of patience for sewing all the pieces together neatly.
Materials You Will Need
Gather everything first, since it keeps the whole process relaxed and quick. Here is your simple supply list.
- #6 super bulky yarn in tan, green, white, and pink (or any frosting and sprinkle colors you like)
- H hook / 5.00mm
- 14mm safety eyes
- Scissors
- Stitch marker
- Yarn needle
- Stuffing
Abbreviations
These short codes show up all through the pattern. Keep them handy as you stitch.
- MC: Magic Circle
- RND: Round
- CH: Chain
- SC: Single Crochet
- ST: Stitch
- INC: Increase
- DEC: Decrease
- FO: Fasten Off
Donut Turtle Pattern
Now for the fun part. Work through each section slowly, and check your stitch counts as you go.
Donut
With pink, leaving a long tail.
- Rnd 1: Ch 15, sc in 1st ch (counts as first st). (4 sc, inc) x3 (18)
- Rnd 2: (2 sc, inc) x6 (24)
- Rnd 3: (3 sc, inc) x6 (30)
- Rnd 4: (4 sc, inc) x6 (36)
- Rnd 5–6: Sc around (36)
- FO. Leave a long tail for sewing.
Repeat the same piece for the bottom of the donut in tan, then cut those tails short.
Head
With green.
- Rnd 1: 6 sc in MC
- Rnd 2: inc x6 (12)
- Rnd 3: (sc, inc) x6 (18)
- Rnd 4: (2 sc, inc) x6 (24)
- Rnd 5–7: Sc around (24)
- Insert eyes between Rnds 4 & 5, on either side of the head.
- Rnd 8: (2 sc, dec) x6 (18)
- Stuff the head.
- Rnd 9: (sc, dec) x6 (12)
- Rnd 10: dec x6
- FO, leaving a long tail for sewing.
Front Fins (Make 2)
With green.
- Rnd 1: 8 sc in MC
- Rnd 2: inc x8 (16)
- Rnd 3: (sc, inc) x8 (24)
- Rnd 4: (sc 3, inc) x6 (30)
- Fold in half, then crochet 15 sc across both sides. FO and leave a tail for sewing.
Back Fins (Make 2)
With green.
- Rnd 1: 6 sc in MC
- Rnd 2: inc x6 (12)
- Rnd 3: (sc, inc) x6 (18)
- Fold in half, then crochet 9 sc across both sides. FO and leave a tail for sewing.
Once all your pieces are ready, lay them out before you start sewing. This quick step lets you see the final look early on. It also makes it easier to spot any piece that needs more stuffing or a tidier edge. Trust me, a few minutes here saves real time later.
Common Mistakes
Even simple patterns have a few traps. Watch out for these, and your finished turtle will look clean and tidy.
- Skipping the stitch marker. It is easy to lose your place in continuous rounds, so always mark the first stitch.
- Under stuffing the donut. Too little stuffing makes the shell look flat and floppy.
- Adding eyes too late. Once you close the head, you cannot fix eye placement, so set them between Rnds 4 and 5.
- Sewing fins unevenly. Without pinning first, the fins can end up crooked and mismatched.
- Pulling sprinkle stitches too tight. Tight stitches pucker the top, so keep them loose and relaxed.
Assembly
Here is where your pieces finally become a turtle. Take your time, since neat sewing makes a big difference.
- Sew the donut together. With wrong sides facing, use the pink tail to join the top and bottom, then stuff firmly as you sew around.
- Keep the shape even. Work slowly so the donut stays round and plump on every side.
- Attach the fins. Sew them to the bottom of the turtle with the rounded side facing up.
- Pin before you sew. Pinning the fins first helps keep everything uniform and balanced.
- Add the head. Sew it to the body, placed neatly between the two front fins.
- Finish with sprinkles. Using white yarn, stitch small sprinkles sporadically across the top of the donut.
Important Remarks
A few quick notes will help your project turn out just right. Keep these in mind from start to finish.
- Stick to the right hook. A 5.00mm hook with super bulky yarn gives the dense fabric you want.
- Play with colors. Swap the frosting and sprinkle shades to match any style or season.
- Mind your tails. Leave them long where the pattern says, and trim them short everywhere else.
- Double-check the eyes. Confirm placement between Rnds 4 and 5 before you stuff the head.
- Think about safety. This is a sturdy Crochet Donut Turtle Amigurumi , yet the safety eyes mean it is best kept away from very young babies.
Conclusion
And that is your finished Crochet Donut Turtle Amigurumi ready to charm anyone who sees it. This little guy is proof that crochet can be both quick and full of personality. Because it uses super bulky yarn, you can finish it in a single cozy afternoon. So whether you are making it for yourself, a friend, or a small shop listing, it always feels special. The chunky stitches also make it sturdy enough to handle plenty of love.
Try different frosting colors, mix up the sprinkles, and make each one your own. You could even make a matching set in soft pastel shades. Honestly, once you make one, you will probably want a whole batch.