Free Crochet Sally Patchwork Doll Amigurumi Easy Pattern
Bring a little gothic charm to your shelf with this Crochet Sally Patchwork Doll amigurumi. She is stitched in soft chenille, full of mismatched color, and surprisingly approachable once you settle into the rhythm.
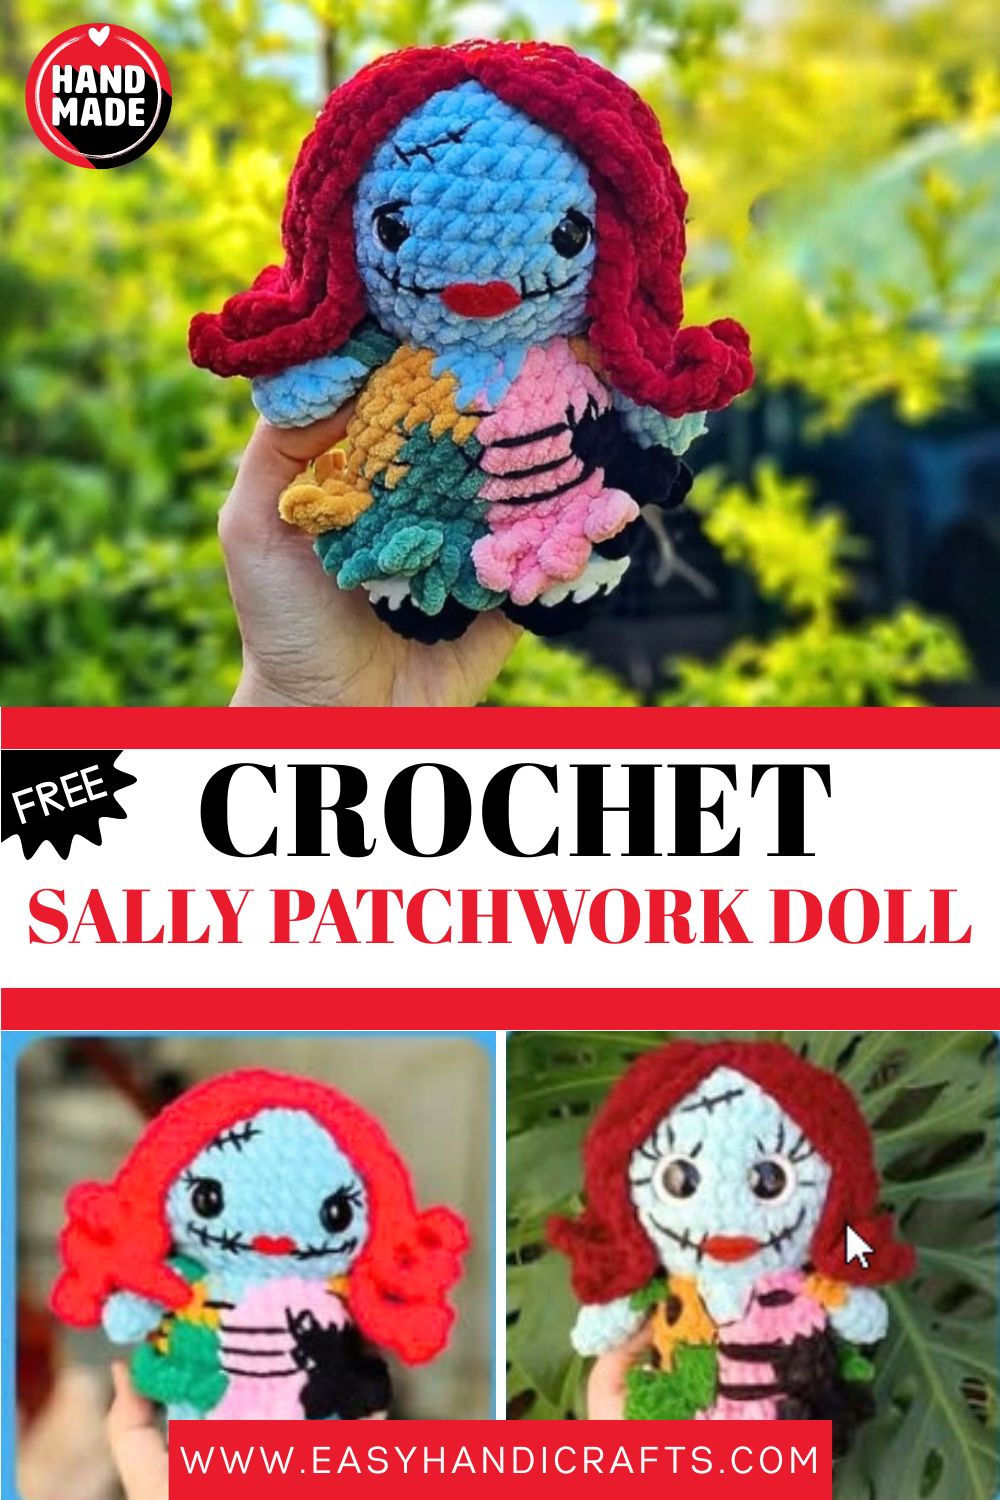
There is something irresistible about a patchwork doll with clashing colors and a stitched-on smile. This Crochet Sally Patchwork Doll pattern walks you through making Sally from the magic ring up round head, layered dress body, two little arms, and that signature flowing red hair. So grab your chenille, get comfortable, and let’s stitch something charming together.
Crochet Sally Patchwork Doll
Skill Level
This one sits comfortably at the intermediate mark. You will be juggling color changes, shaping, and a fair bit of finishing work, so a little experience with amigurumi helps before you dive in here.
Pattern Overview
Here is a quick map of what you are building:
- Head – a rounded sphere in light blue chenille, with safety eyes and a softly stuffed face.
- Body – the showpiece. It starts at the feet, joins both legs, then climbs up through Sally’s patchwork dress, switching color row by row.
- Arms (x2) – two small folded limbs, one with a green sleeve and one with a yellow sleeve.
- Dress edges – a crochet border worked into the body to mimic the dress’s raggedy hem.
- Hair – a small red cap with long looped locks arranged around the head.
Special Techniques
A few methods show up repeatedly, so it helps to know them ahead of time:
- Color changes (cc): the dress is built from constant mid-round switches. Finish the last yarn-over of the previous stitch in the new color for clean transitions.
- Back/front loop work (BLO / FLO): used on the body and legs to create ridges and pick up stitches watch which loop each round calls for.
- Joining two legs: after the feet are made, you crochet across both pieces and the connecting chains to merge them into one body.
- Invisible join: closes color sections neatly so no bulky seam shows through the chenille.
- Looped locks: long chains worked back along themselves create Sally’s dangling strands of hair.
Materials
- Hook: 5mm
- Light blue chenille (size 4 medium)
- Red chenille (size 4 medium)
- Green chenille (size 4 medium)
- Pink chenille (size 4 medium)
- Yellow chenille (size 4 medium)
- Black chenille (size 4 medium)
- White chenille (size 4 medium)
- Black cotton/acrylic yarn
- White cotton/acrylic yarn
- Safety eyes (12mm)
- Red felt
- Stuffing
- Tapestry needle
- Stitch markers
- Scissors
- Fabric glue
Abbreviations
- R: round
- st: stitch
- mr: magic ring
- ch: chain
- sc: single crochet
- sl st: slip stitch
- inc: increase
- dec: decrease
- BLO: back loop only
- FLO: front loop only
- FO: fasten off
- cc: change color
Notes
This Crochet Sally Patchwork Doll pattern is worked in continuous rounds. Use a stitch marker to keep track of the beginning of each round, and stuff firmly but evenly as you go for a clean, rounded shape.
Pattern
Head
Use light blue yarn.
- R1: 8sc in a mr (8)
- R2: 8inc (16)
- R3: (sc, inc)x8 (24)
- R4: (3sc, inc)x6 (30)
- R5: (2sc, inc, 2sc)x6 (36)
- R6-10: 36sc (36) — 5 rounds
- R11: (4sc, dec)x6 (30)
- R12: (3sc, dec)x6 (24)
- R13: (4sc, dec)x4 (20)
Cut yarn, leaving a long tail for sewing. Add safety eyes between R9-10, 5 visible stitches apart, and add stuffing, making sure to keep a rounded shape.
Body pt. 1
Start with black yarn.
- R1: 5sc in a mr (5)
- R2: 5inc (10)
- R3: BLO 10sc (10)
- R4: cc to white, 10sc (10)
- R5: cc to light blue, BLO 10sc (10)
Cut yarn and FO with an invisible join. With white yarn, insert the hook in the first FLO stitch of R5 and sl st all the way around, then FO with an invisible join. Make another leg, but this time don’t cut the yarn with white yarn sl st all the way around on R5 and FO with an invisible join. Go back to the light blue yarn and ch2 (pic 1).
- R6: Insert the hook in any of the first leg stitches (pic 2) and make 10sc, 2sc in the 2ch, 10sc, 2sc in the 2ch (24)
- R7: BLO all the way around — cc to green 5sc, cc to black, inc, 3sc, cc to pink, inc, 3sc, cc to green, 3sc, inc, cc to yellow, 3sc, inc, 3sc (28)
Body pt. 2
- R8: cc to green 5sc, cc to black 5sc, cc to pink 5sc, cc to green 5sc, cc to yellow 8sc (28)
Start stuffing as you go. When you stuff the feet, remember to keep them flat.
- R9: cc to green 5sc, cc to black 6sc, cc to pink 4sc, cc to green 3sc, cc to yellow 10sc (28)
- R10: cc to green 5sc, cc to black 6sc, cc to pink 4sc, cc to green 3sc, cc to yellow 8sc, cc to green 2sc (28)
- R11: cc to black 2sc, cc to yellow 5sc, cc to pink 8sc, cc to yellow 7sc, cc to green 6sc (28)
- R12: cc to black 2sc, cc to yellow sc, dec, 2sc, cc to pink sc, dec, 3sc, cc to light blue dec, sc, cc to yellow 2sc, dec, 2sc, cc to pink sc, dec, 2sc, cc to black sc (23)
- R13: with black 2sc, cc to yellow 3sc, cc to pink dec, 3sc, cc to light blue sc, dec, sc, cc to yellow 3sc, dec, cc to pink 3sc, cc to black sc (20)
Finish stuffing. Cut yarn, leaving a long tail for sewing (pic 3).
Arms (x2)
Make one green sleeve and one yellow sleeve. Start using light blue yarn.
- R1: 4sc in a mr (4)
- R2: 4inc (8)
- R3-4: 8sc (8) — 2 rounds
- R5: cc to yellow/green, 8sc (8)
- R6: fold the arm and close it, making 4sc (4)
Cut yarn, leaving a long tail (pic 4).
Dress edges
Start using green yarn. Insert the hook in the first green stitch of R7 (not the FLO stitches, pic 6).
- R1: ch4 (the first ch doesn’t count as a stitch). In the 2nd ch from the hook make sl st, sc, sc in the next stitch of the body, (3ch, sl st, sc, sc in the body)x3, (3ch, sl st, sc, cc to black, sc in the body). Continue this way, following the body’s color stitches.
Weave in the ends.
Hair
Use red yarn.
- R1: 6sc in a mr (6)
- R2: 6inc (12)
- R3: (sc, inc)x6 (18)
- R4: (ch20, starting from the 2nd ch from the hook make 19sc, sc in the next base st)x18 (18)
Assembly
This is where Sally finally comes together, so take your time:
- Sew the head to the body, adding a little fiber fill while sewing if needed, and make sure the face lines up neatly with the neck.
- Sew the arms to the body at R12-13. Watch the color pairing the green arm sits with the yellow side, and the yellow arm sits with the pink side.
- Add the lips: cut the red felt as in pic 6 and glue it onto the head between R11-12.
- Embroider the details: sew the mouth and the scar on the forehead and on the arm, then sew the eye details (pic 8) and the dress details using acrylic/cotton yarn (pic 9).
- Build the hair: sew each lock to the next, going through the front loop of the first lock and the back loop of the second, all the way down, leaving just 3 stitches. Go all the way around, leaving 4 locks free.
- Attach the hair: sew it to the head starting from one side and working around (pic 11), then sew the front locks two for each side, as shown in the photos.
Common Mistakes
A few small slips trip people up on this one:
- Losing track of color changes: with so many switches per round, count your stitches at the end of every round.
- Stuffing the feet too full: they are meant to stay flat, or Sally won’t sit or stand properly.
- Skipping BLO/FLO notes: the wrong loop changes the shape of the legs and the dress edge.
- Carrying yarn too tightly: pulling color changes too tight will pucker the dress.
- Rushing the hair: uneven locks are the biggest giveaway, so lay them out before sewing.
Important Remarks
A few things worth holding onto:
- Chenille hides stitches, so a marker is your best friend the whole way through.
- Yarn choice is flexible any size-4 yarn works if you adjust the hook and tension.
- The body is the hardest part. Once the color-change rounds are done, the rest feels easy.
- Personal use only. Do not copy, redistribute, sell, or claim this pattern as your own. You may sell physical items made from it.
Conclusion
And that’s your Sally stitched, stuffed, and dressed in her patchwork best. It is a project that rewards patience more than advanced skill, and you end up with a wonderfully expressive little doll. Don’t stress over perfectly even color changes; the slightly handmade look is exactly what gives her charm. Congrats on finishing, and tag your work so the rest of us can admire it too.