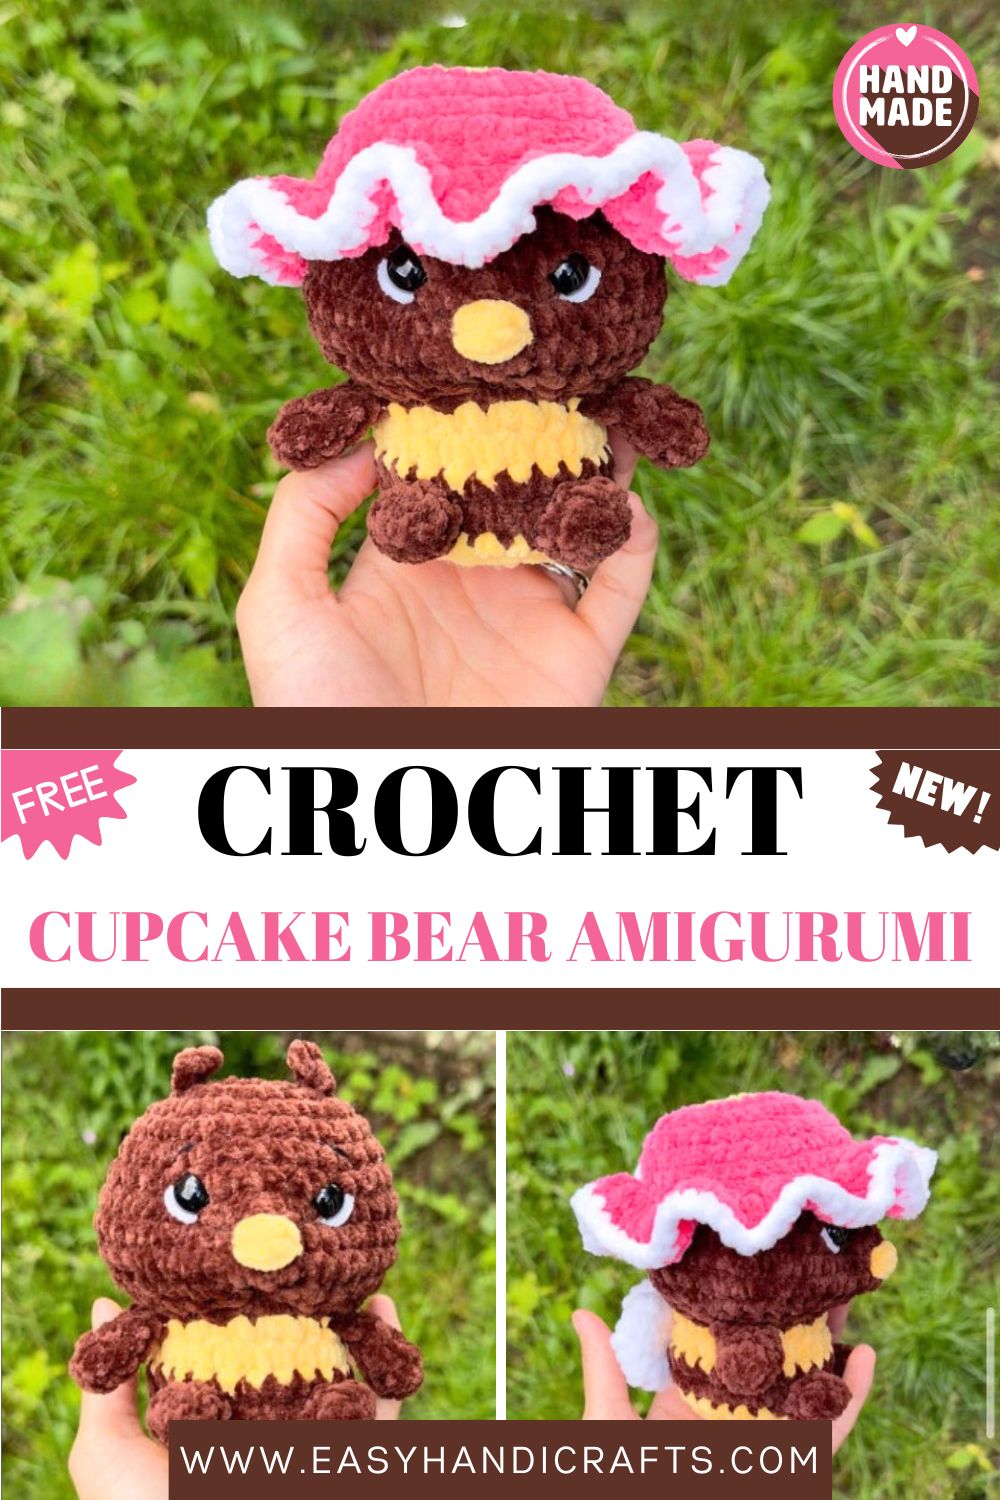
Adorable Free Crochet Cupcake Bear Amigurumi Pattern
I started this little bear just to pass the time, but the truth is, stopping at one turned out to be hard. Before I knew it, by the end of the week I’d made three of them. Sitting inside a pink cupcake hat, this chubby brown bear looks so cute and slightly goofy that it’s hard to look away. The best part? The full Free Crochet Cupcake Bear pattern is below, and you won’t have to spend anything to make it.
He’s a tiny Free Crochet Cupcake Bear in a pink-and-white cupcake hat. He’s quick, he’s squishy, and the pattern is free. If you’ve been wanting a fun little make that doesn’t eat your whole week, this is the one.
Why I Keep Coming Back to This One
Some projects just make you smile while you’re working on them, and this is Free Crochet Cupcake Bear. The chunky chenille yarn means he grows fast under your hook, so he’s perfect when you need a gift by tomorrow or you just want to finish something in one sitting for a change. So pour yourself a drink, get comfy, and let’s hook this little goofball together.
How Hard Is It, Really?
Not very. If you’re past your absolute first project and you’re comfy with a magic ring, single crochet, increases, and decreases, you’ll be totally fine here. A confident beginner is the sweet spot.
What You’ll Need
- Yarn: James C Brett Flutterby Chunky in brown, yellow, pink, and white. You’ll also want a little bit of black DK yarn for the face.
- Hook: 4.5 mm
- Safety eyes: 12 mm
- Fiberfill for stuffing
- A yarn needle for sewing everything together
- Scissors (obviously)
Abbreviations
- MR — magic ring
- sc — single crochet
- dc — double crochet
- inc — increase (2 sc in the same stitch)
- dec — invisible decrease (front loops only, 2 sc together)
- ch — chain
- BLO — back loops only
- FLO — front loops only
- CC — change colour (so cc yellow just means switch to yellow)
- FO — fasten off
- sl st — slip stitch
Let’s Make Him
Arms (you’ll need two)
In brown:
- R1: 6 sc into mr (6)
- R2–4: 6 sc (6)
Don’t stuff these. Just flatten the piece and crochet through both sides with 3 sc (3), then fasten off. You’ll attach these to the body later, so set them aside for now.
Wings
In white:
- R1: 6 sc into mr (6)
- R2: 6 inc (12)
- R3: (1 sc, inc) x 6 (18)
Fasten off the first wing. For the second one, don’t cut your yarn yet. Instead, join both wings together with 4 sc (4), then fasten off and leave a nice long tail for sewing.
Legs (two of these)
In brown:
- R1: 7 sc into mr (7)
- R2–3: 7 sc (7)
Fasten off and leave a long tail. You’ll sew these on near the end.
The Cupcake Hat
In yellow:
- R1: mr 8 (8)
- R2: 8 inc (16)
- R3: switch to pink, (1 sc, inc) x 8 (24)
- R4: (2 sc, inc) x 8 (32)
- R5–8: 32 sc (32)
- R9: working in FLO, 3 dc in each stitch all the way around (96)
- R10: switch to white, 96 sc (96)
Fasten off. That ruffly round nine is what gives the hat that frosting look, so don’t skip the front-loops bit.
Head and Body
In brown:
- R1: mr 8 (8)
- R2: 8 inc (16)
- R3: (1 sc, inc) x 8 (24)
- R4: (2 sc, inc) x 8 (32)
- R5–7: 32 sc (32)
- R8: (3 sc, inc) x 8 (40)
- R9–10: 40 sc (40)
- R11: (3 sc, dec) x 8 (32)
- R12: (2 sc, dec) x 8 (24)
- R13: (1 sc, dec) x 8 (16)
- R14: switch to yellow, (1 sc, inc) x 2, then sc, inc, sc and join arm 1 across the next 3 stitches, (inc, sc) x 2, then inc, sc, inc and join arm 2 across the next 3 stitches, sc, inc (24)
- R15: 24 sc (24)
Now pop in your safety eyes between rounds 7 and 8, leaving about 5 stitches between them.
- R16–17: switch back to brown, 24 sc (24)
- R18: switch to yellow, 24 sc (24)
- R19: working in BLO, (1 sc, dec) x 8 (16)
This is your moment to stuff him. Pack the head and body firmly, but not so much that he turns into a rock.
- R20: 8 dec (8)
Fasten off and close up that last little hole.
Putting Him Together
The antennas: Find round 3, lined up with the eyes, and poke your hook in there. Chain 3, then in the second chain from your hook, sc into each of the next 2 chains and sl st back down into round 3. Do the same thing again for the second one.
The legs: Sew them over rounds 17 and 18.
That cute squishy face: Thread your yarn through the chin and bring it up under one eye. Then go one stitch over to the right and come back out through the chin. Do the same for the other eye, then gently tug both tails until you get those little cheek dimples, and tie off. Take it slow here.
Finishing the face: Use your black yarn to stitch the nose, eyes, and eyebrows. Last but not least, sew the wings onto his back.
Make Him Yours
The best part of amigurumi is that nothing’s set in stone. A few ideas if you want to switch things up:
- Recolour the hat. Go chocolate-and-cream if you want him to look like an actual cupcake, or soft pastels for a baby-room vibe.
- Try a different yarn. Cotton or worsted acrylic with a smaller hook gives you a firmer, less fuzzy bear if that’s more your thing.
- Size him up or down. Bigger hook and chunkier yarn for a cuddle-sized version, or go tiny and turn him into a keychain.
- Skip the safety eyes. Embroider them instead if he’s headed to a baby, or size up the eyes for an extra sweet face.
- Add little extras. A bow, a felt heart on his belly, a teeny scarf. Small touches go a long way.
Stuff I Learned the Hard Way
A few things tripped me up so you don’t have to repeat my mistakes:
- Keep your tension snug. Chenille loves to hide your stitches, and loose work means stuffing peeking through the gaps.
- Count at the end of each round. I lost my place more than once and paid for it later. A quick count saves a lot of frogging.
- Don’t wait on the eyes. Once you stuff and close him up, there’s no getting back in there. Place them exactly where the pattern says.
- Mind the stuffing. Too much and he looks lumpy, too little and he flops over. Firm but still huggable is the goal.
- Read the FLO and BLO notes. Those rounds make the ruffle and the clean colour line. Work them as plain stitches and it just won’t look right.
A Few Finishing Touches
These little habits are what make him look properly handmade instead of self-made:
- Tuck all your loose ends inside the body before you close him up.
- Pin the wings, legs, and hat in place and look at him from the front before you sew anything down.
- Use matching yarn for your seams so the stitching basically disappears.
- Give the chenille a gentle fluff with your fingers if any spots got flattened.
- Shape the face a little at a time so you don’t overdo the dimples.
Who To Give Him To
He’s small, fast, and frankly hard to resist, which makes him a brilliant little gift. Some ideas:
- A baby shower or nursery present, especially in soft colours.
- A Valentine’s or “thinking of you” gift for someone with a sweet tooth.
- A birthday surprise, or even a cake topper.
- A stocking stuffer come December.
- A mini keychain version for bags and backpacks.
- A party favour if you batch a few of them.
Last Thoughts
So that’s your Free Crochet Cupcake Bear, start to finish. He’s fast, he’s friendly to newer crocheters, and you can twist him a hundred different ways, which is exactly why he’s so much fun to make. Fair warning though: once you finish one, you’ll probably want a whole little family of them. If you do make one, I’d genuinely love to see how yours comes out, so share your photos and tag your makes.