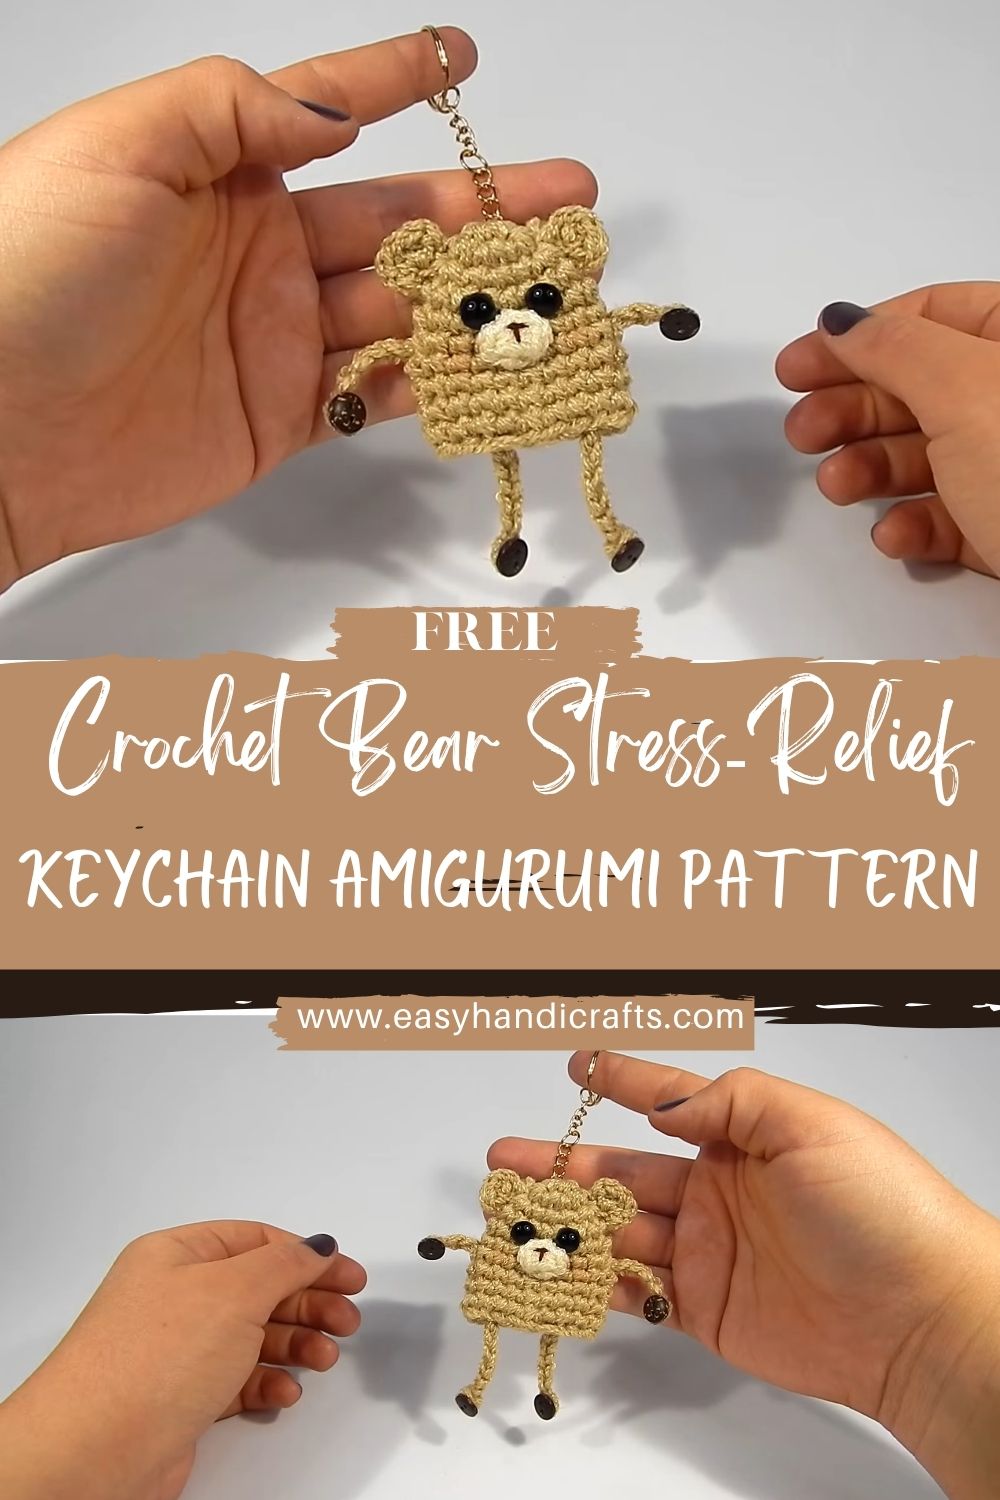
Harmonious Easy Crochet Bear Stress‑Relief Keychain Amigurumi Pattern
A tiny crochet bear keychain amigurumi is one of those sweet projects that instantly lifts the mood. It’s small enough to clip onto keys, but plush enough to squeeze during busy days like a soft little stress‑buster that fits in a pocket.
Amigurumi is the craft of crocheting small stuffed toys using tight stitches, usually in continuous rounds. It’s calming because the motions are repetitive, and it’s satisfying because the shape grows quickly right in the hands.
This easy amigurumi bear keychain tutorial breaks everything into manageable parts: body, ears, arms, legs, and a simple muzzle, so beginners can follow along without feeling overwhelmed. After that, the bear can be finished as a keychain, zipper pull, or a tiny handmade gift. The best part is the playful, rounded shape that makes it perfect for gentle squeezing.
Materials Needed
- Yarn: Soft worsted weight (#4) yarn
- Main bear color (brown/tan/cream): 20–30 g
- Muzzle color (cream or lighter shade): 5–10 g
- Optional dark yarn for nose/mouth embroidery (black/brown): 1–2 g
- Hook size: 2.5 mm–3.5 mm (smaller hook = tighter stitches and a firmer bear)
- Safety Eyes: 6–8 mm (6 mm for a tiny face, 8 mm for a more “baby bear” look)
- Stuffing: Polyester fiberfill, 10–15 g (small handful)
- Stitch markers: 1–2 pieces (to mark rounds)
- Yarn needle: For sewing parts and weaving ends
- Keychain ring + small chain: 1 set (ring about 20–25 mm is a handy size)
- Scissors
Skill Level
Beginner
Making Time (Overview)
Total time: ~1–2 hours, depending on pace
- Body: 25–40 minutes
- Ears: 10 minutes
- Arms: 10–15 minutes
- Legs: 10–15 minutes
- Face + assembly: 20–35 minutes
Step‑by‑Step Instructions
Abbreviations (simple and beginner-friendly)
- MR = magic ring
- sc = single crochet
- inc = increase (2 sc in one stitch)
- dec = decrease (single crochet 2 together; invisible decrease recommended)
- sl st = slip stitch
Helpful note: Work in continuous rounds. Move the stitch marker to the first stitch of each round.
Body (Main Shape)
1) Start with a magic ring
- First, make an MR with the main yarn color.
- Crochet 6 sc into the ring. Pull tight to close.
2) Crochet in the round (shape the body)
- Next, increase to build a rounded base:
- Round 1: 6 sc in MR (6)
- Round 2: inc x6 (12)
- Round 3: (sc, inc) x6 (18)
- Round 4: (2 sc, inc) x6 (24)
- Meanwhile, create that slightly wider “squeezy” middle:
- Round 5: (3 sc, inc) x6 (30)
- Rounds 6–9: sc around (30)
3) Decrease and stuff
- Later, begin decreasing to close the top:
- Round 10: (3 sc, dec) x6 (24)
- Round 11: (2 sc, dec) x6 (18)
- Before it closes too much, add stuffing.
- Add fiberfill in small pinches.
- Meanwhile, shape with fingers so it feels plush but firm.
- Finally, finish closing:
- Round 12: (sc, dec) x6 (12)
- Round 13: dec x6 (6)
- Fasten off, close the opening, and weave in the tail.
Body making time: 25–40 minutes
Additional Parts
A) Ears (make 2)
- First, start with an MR: 6 sc in MR (6)
- Next, round 2: inc x6 (12)
- Then, round 3: sc around (12)
- Fasten off, leave a long tail for sewing.
- Later, pinch slightly to give each ear a gentle curve.
Ears making time: ~10 minutes
B) Arms (make 2)
- First: MR 6 sc (6)
- Next: (sc, inc) x3 (9)
- Meanwhile, form a tiny tube: sc around for 4–5 rounds (9)
- Later, lightly stuff (optional—just a tiny bit for shape).
- Flatten the opening answer across to close, or simply set it closed.
Arms making time: 10–15 minutes
C) Legs (make 2)
- First: MR 6 sc (6)
- Next: inc x6 (12) (this creates a small “foot”)
- Meanwhile: sc around for 1 round (12)
- Later, shape into a short leg: (2 sc, dec) x3 (9)
- sc around for 2–3 rounds (9)
- Lightly stuff, then close the top.
Legs making time: 10–15 minutes
Face & Assembly
1) Attach safety eyes
- First, choose the bear’s front (the smoothest side).
- Next, place the safety eyes roughly in the upper half of the face area, about 5–7 stitches apart.
- Meanwhile, check symmetry by looking straight on before snapping the backs in place.
- Secure the backs firmly.
2) Crochet the muzzle (lighter yarn, make 1)
- First: ch 4
- Next: sc in 2nd ch from hook, sc in next, 3 sc in last ch
- Meanwhile, work along the other side: sc in next, sc in next, 2 sc in last stitch area to round it out
- sl st to finish, fasten off, leaving a sewing tail
This forms a small oval that sits perfectly under the eyes.
3) Add facial details
- Next, sew the muzzle centered under the eyes.
- Meanwhile, add a little stuffing behind the muzzle before sewing it fully closed (optional, but gives a puffy “teddy” look).
- Later, stitch the nose and mouth using dark yarn or embroidery thread:
- Nose: small triangle or rounded “button” shape
- Mouth: one short line down, then a tiny curve to one side (gentle expression)
4) Assemble parts
- First, sew ears to the top of the head, evenly spaced.
- Next, attach arms at the sides, slightly forward so the bear looks like it’s ready for a hug.
- Then, attach legs near the lower front for a seated look.
- Finally, add the keychain loop:
- Stitch a short yarn loop at the top center, or
- Insert the small chain through a sturdy stitch and attach the ring
Face + assembly making time: 20–35 minutes
Special Features
- Texture: Soft and cuddly—great for gentle squeezing during stressful moments.
- Expression: Round eyes plus a tiny muzzle create a sweet, calm bear face.
- Size: Compact and lightweight—ideal for a keychain, bag charm, or pocket companion.
Sizing Tips
- Thicker yarn + larger hook (3.5 mm): creates a bigger, softer bear with a squishier feel.
- Thinner yarn + smaller hook (2.5–3.0 mm): creates a mini bear that’s perfect for tiny keychains and neat stitches.
- For amigurumi, a slightly smaller hook than the yarn label suggests usually gives the cleanest, gap-free fabric.
Finishing Tips
- Keep sewn parts tight and secure, especially if the bear will be tugged as a keychain.
- Maintain even tension so the body stays smooth and round.
- Hide yarn tails by weaving through several stitches, then tucking them inside near the stuffing.
Common Mistakes to Avoid
- Loose stuffing that makes the bear floppy instead of pleasantly firm.
- Misplacing facial features too high or too low, which changes the “cute” proportions.
- Uneven limbs from mismatched stitch counts or differentiations between pieces.
- Skipping stitch mark leads to lost rounds and accidental shaping changes.
Variations & Customization Ideas
- Color swaps: pastel bears, two-tone bears, or even a “panda-style” version with contrasting ears and limbs.
- Tiny accessories: bow tie, mini scarf, little hat, or a stitched heart on the belly.
- Bigger plush style: Use blanket yarn and a larger hook to turn the keychain bear into a small cuddle toy.
- Seasonal characters: add a red hat for winter, bunny ears for spring, or a tiny pumpkin patch detail for autumn.
Tutor Suggestions
- Take extra time positioning the safety eyes; small shifts make a big difference before locking them in.
- Smooth, non-fuzzy yarn is easiest for beginners. Textured yarn can be tried later once shaping feels comfortable.
- If new to amigurumi, practice a small swatch of continuous single crochet rounds first, then start the bear with confidence.
Conclusion for (Crochet Bear Stress‑Relief Keychain)
This crochet bear keychain amigurumi is a quick, comforting project that turns basic stitches into a lovable stress‑relief companion. The rounded body makes it perfectly squeezable, and the simple face gives it that gentle teddy-bear mood that looks cute on any set of keys. After the first bear is finished, trying new colors, tiny accessories, and different expressions becomes part of the ffun One little bear often leads to a whole collection.