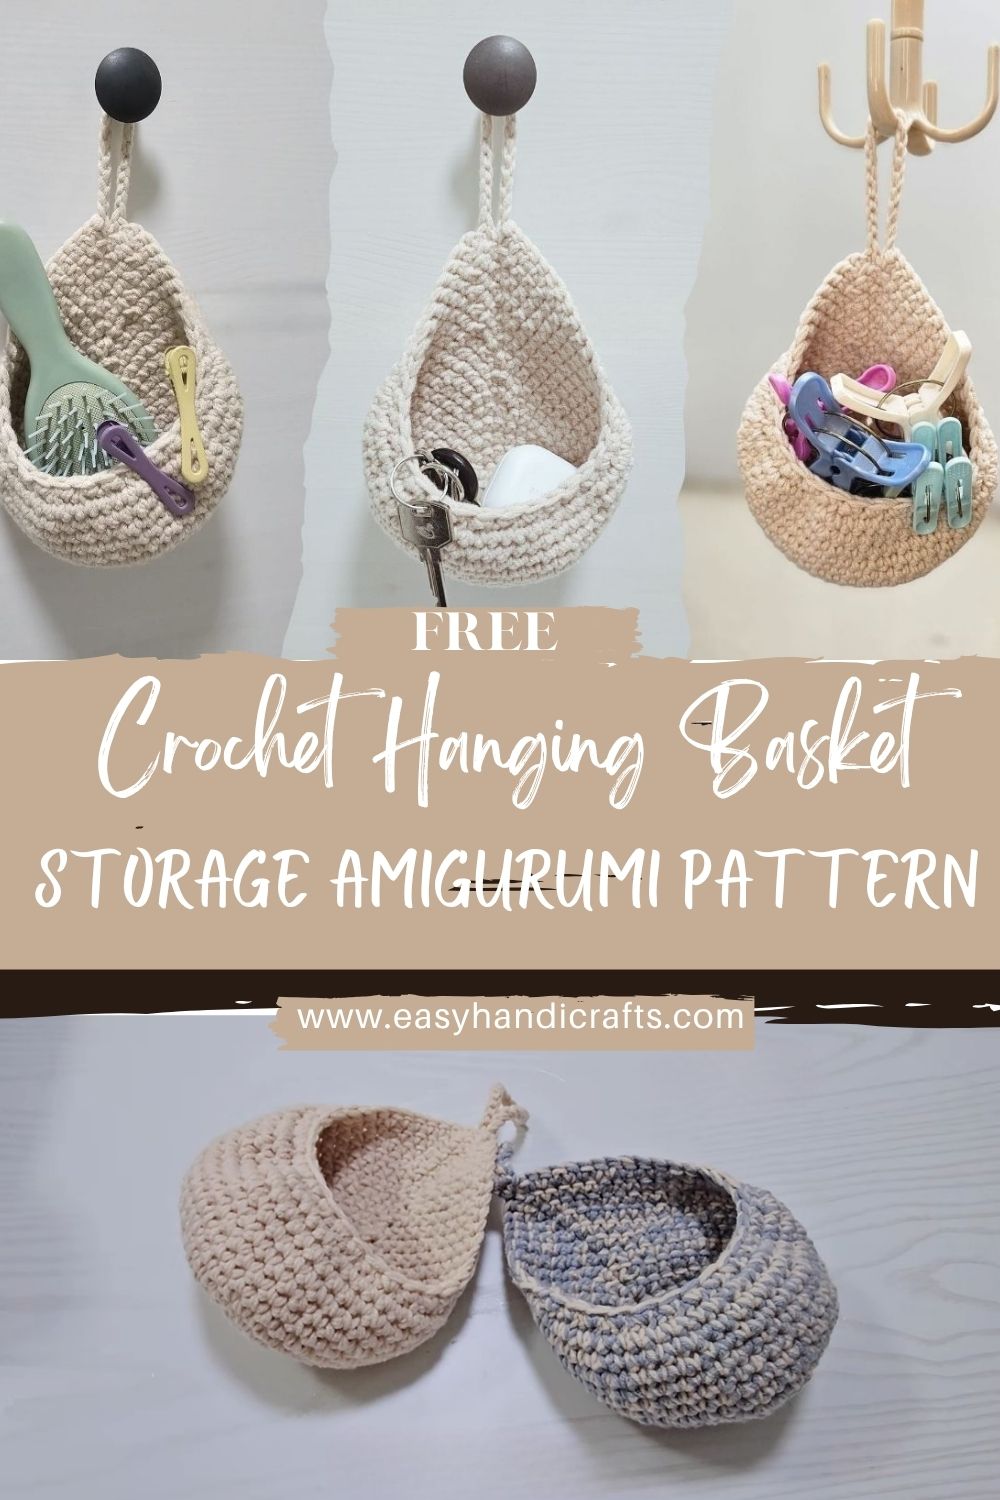
Touching Crochet Hanging Basket Storage Amigurumi Pattern for an Easy Home Organizer
A crochet hanging basket is one of those cozy home projects that feels both cute and genuinely useful. It adds soft, handmade texture to a wall, door, or shelf, while also keeping little everyday items from drifting into random drawers.
This amigurumi storage basket pattern creates a sturdy, grabbable organizer that’s perfect for keys, hair clips, charging cords, craft tools, or small bathroom essentials. Best of all, it works up quickly, so it’s an ideal, easy crochet home organizer for beginners who want something practical right away.
Amigurumi usually means tiny crocheted toys, but the same principles—tight stitches, simple shaping, and clean finishes—also work beautifully for small home storage. In other words, amigurumi isn’t only about cute characters; it can also be about making everyday life feel more organized and calm.
A hanging basket is especially satisfying because the shaping is straightforward: first, a flat base, next, tall sides, and finally, a strong strap for hanging. Meanwhile, the texture naturally becomes part of the décor, so the finished piece looks warm rather than “storage-bin plain.” This tutorial keeps the steps clear and beginner-friendly, and it leaves plenty of room for color changes, stripes, or decorative trim to make each basket feel one-of-a-kind.
Materials Needed (Exact Measurements)
- Yarn: Bulky (#5) or Super Bulky (#6) yarn for structure
- Cotton is sturdy and crisp; acrylic is soft and budget-friendly.
- Approximate amount: 100–130 g (about 60–90 m, depending on yarn thickness and basket size)
- Crochet hook: 5.0 mm–8.0 mm (match yarn; choose the smaller end for firmer walls)
- Stitch markers: 2 markers (start-of-round + strap placement)
- Yarn needle: 1 tapestry needle (for weaving and sewing strap ends)
- Scissors: 1 pair
- Optional: 1 wall hook or knob for hanging the finished basket
Skill Level
Beginner‑Friendly
Making Time (Overview)
Total time: ~2–3 hours, depending on pace, yarn thickness, and basket height.
- Basket body: 70–110 minutes
- Hanging strap: 20–35 minutes
- Optional texture/trim: 20–40 minutes
- Final finishing: 10–20 minutes
Step‑by‑Step Instructions
Before Starting (quick stitch notes)
- sc = single crochet
- hdc = half double crochet
- sl st = slip stitch
- inc = increase (2 sc in one stitch)
For structure, single crochet is the best choice. Additionally, keeping tension snug helps the basket hold its shape.
Body (Main Basket Shape)
1) Start with a Base Circle
Goal: create a flat circle that becomes the basket bottom.
- First, choose a start method:
- Option A: Magic ring (best for a tight center)
- Option B: Chain 4 and join with a slip stitch to form a ring
- Next, crochet Round 1:
- Work 6–8 sc into the ring (use 6 for super bulky yarn, 8 for bulky yarn).
- Then, grow the circle with even increases:
- Round 2: inc in each stitch
- Round 3: (sc, inc) repeat around
- Round 4: (2 sc, inc) repeat around
- Round 5: (3 sc, inc) repeat around
- Meanwhile, keep the base flat:
- If the circle starts to ruffle, there are too many increases;s skip an increase or two in the next round.
- If the circle starts to cup upward, there are too few increases; es add a few extra increases spaced evenly.
Tip for beginners: A good small hanging basket base is usually 9–12 cm (3.5–4.7 in) across, although it can be adjusted easily.
2) Build Up the Sides
Goal: turn the flat circle into a bowl shape with straight walls.
- First, create a clean “corner” round:
- Crochet 1 round in the back loops only (BLO) using sc.
This step is optional, but it helps the sides stand up neatly.
- Crochet 1 round in the back loops only (BLO) using sc.
- Next, crochet up the sides without increasing:
- Continue with sc around for 6–10 rounds, depending on desired height.
- Meanwhile, maintain even tension:
- Tight stitches create a sturdy basket that doesn’t flop.
- If the sides look wavy, check stitch counts and make sure no accidental increases slipped in.
Practical height idea: 10–14 cm (4–5.5 in) is great for clips, cords, keys, and small tools.
3) Shape the Top Edge
Goal: finish the rim so it looks clean and feels sturdy.
- After reaching the desired height, tighten the rim:
- Crochet 1–2 rounds of sc with slightly tighter tension.
- Next, add a clean finishing round (choose one):
- Option A: sl st around for a firm, subtle edge
- Option B: (sc, ch 1) repeat around for a lightly textured rim
- Finally, fasten off and leave a tail long enough to weave in securely.
Body making time: 70–110 minutes
Additional Parts
Handle / Hanging Loop
1) Create the Hanging Strap
Goal: a strap that is comfortable, strong, and doesn’t stretch too much.
- First, decion de strap length:
- For a short loop: ch 22–28
- For a longer hang: ch 30–40
(Length depends on hook placement and how low the basket should hang.)
- Next, reinforce the chain:
- sc in the second chain from the hook, then sc in each chain to the end.
- Meanwhile, thicken the strap for strength:
- ch 1, turn, then sc back across to make a strap that feels sturdy.
- Finally, fasten off, leaving long tails for sewing.
2) Attach to Basket
- First, mark two attachment points on opposite sides of the basket rim using stitch markers.
- Next, sew one strap end firmly to the first marked point using tight whip stitches.
- Then, sew the other end to the second marked point.
- Finally, test the hang by holding the strap up—adjust as needed before the weave ends.
Handle making time: 20–35 minutes
Optional Decoration Details
1) Textured Ridges
To add cozy detail without complicating the pattern:
- First, pick one or two rounds on the basket sides.
- Next, crochet those rounds in hdc for a softer ridge.
- Alternatively, use front loop only (FLO) sc for a subtle band that gives texture without bulk.
2) Accent Trim
- First, attach a contrasting yarn color at the rim.
- Next, crochet 1 round of sc (or sl st for a slimmer line).
- Finally, fasten off and weave in ends.
Decoration making time: 20–40 minutes
Face & Assembly (Neat Finishing, No Character Parts)
Although this is not a toy, clean assembly makes the basket look polished.
- First, align the handle carefully so the basket hangs evenly instead of tilting.
- Next, keep stitch counts consistent so textured ridges meet smoothly at the round join.
- Meanwhile, use invisible-looking joins by finishing rounds with a slip stitch and tightening the last loop before fastening off.
- Finally, weave in the ends thoroughly by running the yarn tails through multiple stitches in different directions to secure the finish.
Special Features
- Texture: Soft, cozy stitches with enough structure to actually hold items.
- Expression: Not a character, yet it still brings handmade charm to a wall, door, or shelf edge.
- Size: Compact and practical, perfect for clips, keys, hair accessories, or small tools that usually get lost.
Sizing Tips
- Thicker yarn + larger hook (7–8 mm): results in a bigger, more padded basket with faster progress.
- Bulky yarn + smaller hook (5–6 mm): creates a firmer organizer with tighter stitches and cleaner structure.
- Smaller yarn + smaller hook: makes a petite basket, great for earbuds, coins, or paper clips.
Additionally, height is easy to adjust—simply add or remove rounds on the side section.
Finishing Tips
- Keep stitches consistent so the basket looks even from every angle.
- Use tight stitches to help the walls stand up and hold shape.
- Weave in yarn ends neatly, especially near the rim and strap joins, for a clean “store-bought” look.
Common Mistakes to Avoid
- Loose stitch tension that causes floppy walls and a saggy shape
- Uneven increases in the base circle, creating a wobbly or ruffled bottom
- Misaligned handle attachment that makes the basket hang crooked
- Skipping stitch markers, which often leads to lost rounds and accidental increases
Variations & Customization Ideas
- Color blocking: Use two or three shades for modern stripes.
- Pom‑pom or tassel accents: add one at the basket point or strap base for playful detail.
- Matching set: make small, medium, and large baskets for different rooms.
- Personal touches: stitch initials, add a simple motif, or experiment with a textured band pattern.
Tutor Suggestions
- First, mark the start of each round to keep shaping stress-free.
- Next, adjust height anytime by adding or reducing side rounds.
- Meanwhile, try one textured round at first; later, add more once the basic shape feels comfortable.
- Finally, always check the hang alignment before declaring the strap “done,” because small shifts are easier to fix early on.
Conclusion
This crochet hanging basket pattern is a cozy way to blend creativity with real-life usefulness. It uses simple amigurumi-style shaping, so beginners can enjoy an easy rhythm for the base, sides, rim, and strap while still ending up with a basket that looks lovely on display. Most importantly, small handmade organizers like this quietly make a space feel calmer and more personal, one neatly stored little item at a time.