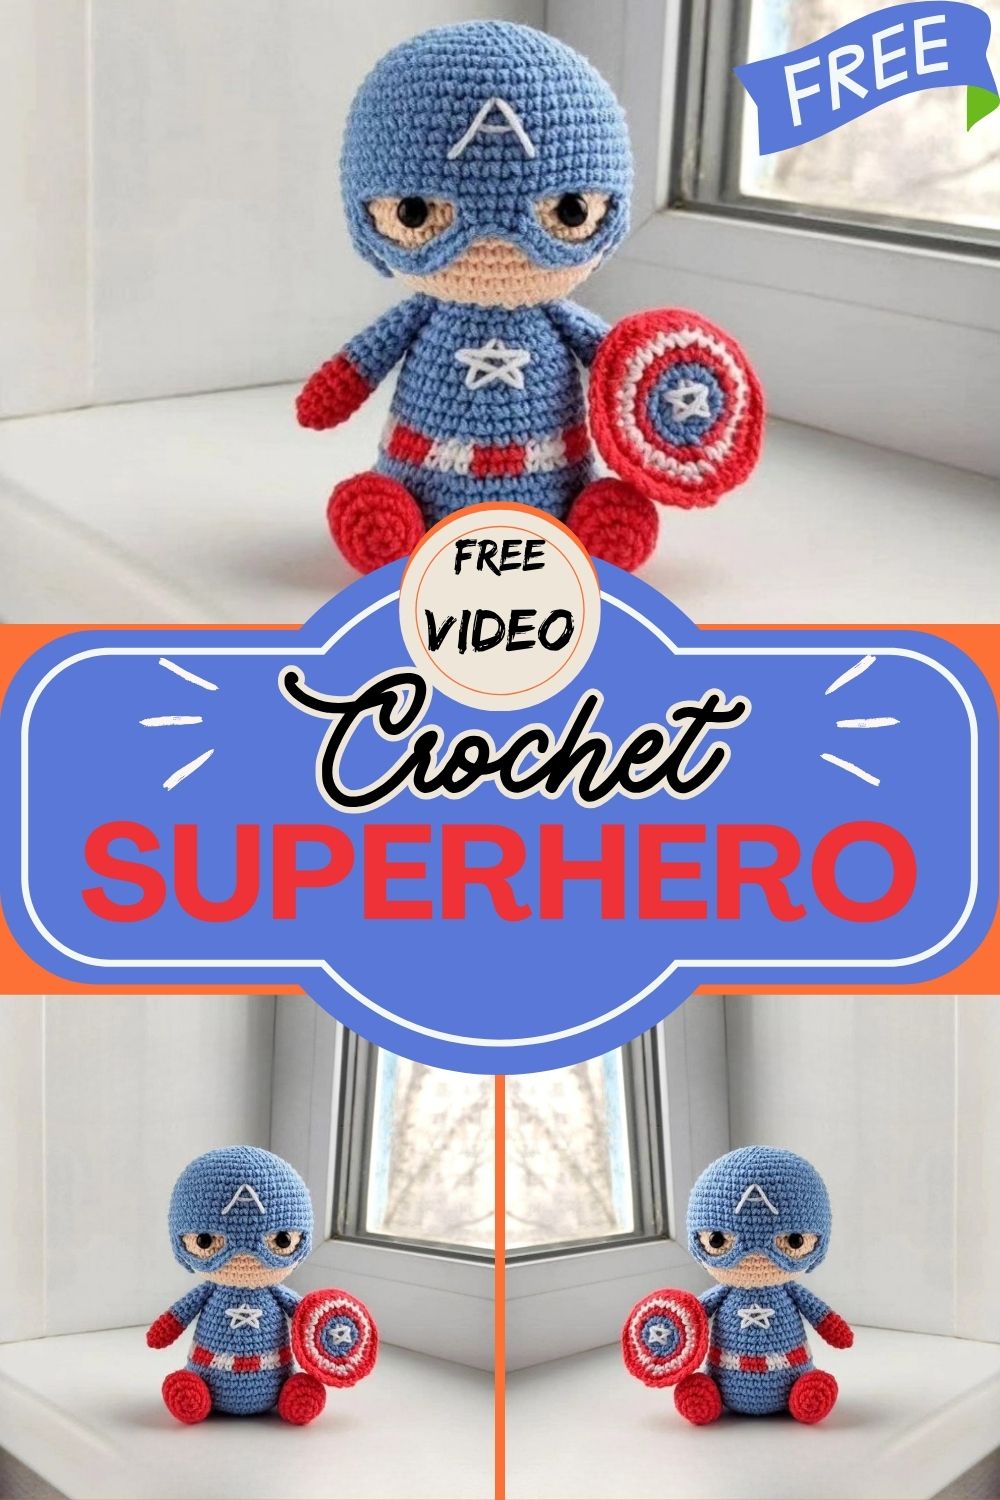
Crochet Superhero Amigurumi Pattern for Beautiful Handmade Toys
Make your favorite Crochet Superhero Amigurumi Pattern with your own hands! This free Captain America amigurumi pattern teaches you step by step how to create an adorable handmade toy that every Marvel fan will absolutely love.
Crocheting is more than just a hobby, it’s a way to create something truly special with your own hands. This free Crochet Superhero Amigurumi pattern lets you craft an adorable, detailed superhero toy that makes a perfect gift for kids, collectors, and Marvel fans alike. Handmade toys are not unique and personal, but they also encourage creativity, reduce stress, and bring pure joy to both the maker and the receiver.
Skill Level: Intermediate basic crochet knowledge and color-changing experience recommended.
Materials Needed
- Crochet Hook: 2.00 mm
- Safety Eyes: 7 mm black safety eyes
- Yarn: YarnArt Jeans (55% cotton, 45% acrylic, 50g/160m) in the following colors: Beige, Blue, Red, White
- Toy Filler (stuffing)
- Scissors
- Tapestry Needle
- Pins
- Stitch Marker
Finished Size
Approximately 13 cm / 5.1 inches tall using the materials listed above.
Important Notes
- Crochet continuously in a spiral unless otherwise specified.
- No need to close each round with a slip stitch.
- Use a stitch marker to mark the beginning of each round so you don’t lose track of your stitch count.
- Stuff the body and head firmly as you go.
Abbreviations
- MR — Magic Ring
- ch — Chain Stitch
- sl st — Slip Stitch
- sc — Single Crochet
- inc — Increase (2 sc in same stitch)
- dec — Decrease
- BLO — Back Loop Only (Through back loops only)
- st(s) — Stitch(es)
- Rnd(s) — Round(s)
- FO — Fasten Off
- (…) x n — Repeat stitches in brackets n times
Pattern Instructions
Body + Head
Start working with blue color.
Round 1: 6 sc in MR (6) Round 2: 6 inc (12) Round 3: (1 sc, inc) × 6 (18) Round 4: (2 sc, inc) × 6 (24) Round 5: (3 sc, inc) × 6 (30) Round 6: (4 sc, inc) × 6 (36) Round 7: (5 sc, inc) × 6 (42) Rounds 8–10: 42 sc (3 rounds) (42) Round 11: (5 sc, dec) × 6 (36) Rounds 12–13: Alternate red & white — (red 3 sc, white 3 sc) × 6 (36) Round 14: (4 sc, dec) × 6 (30) Round 15: 30 sc (30) Round 16: (13 sc, dec) × 2 (28) Round 17: 28 sc (28) Round 18: (12 sc, dec) × 2 (26) Round 19: 26 sc (26) Round 20: (11 sc, dec) × 2 (24) Round 21: 24 sc (24) Round 22: (2 sc, dec) × 6 (18)
➡️ Change to beige color.
Round 23: 18 sc (18) Round 24: 18 inc (36) Round 25: (5 sc, inc) × 6 (42) Round 26: (6 sc, inc) × 6 (48) Rounds 27–36: 48 sc (10 rounds) (48) Round 37: (6 sc, dec) × 6 (42) Round 38: (5 sc, dec) × 6 (36) Round 39: (4 sc, dec) × 6 (30)
➡️ Place safety eyes between rounds 30 & 31, 9 stitches apart.
➡️ Change to blue color.
Round 40: (3 sc, dec) × 6 (24) Round 41: (2 sc, dec) × 6 (18) Round 42: (1 sc, dec) × 6 (12) Round 43: 6 dec
Cut yarn and fasten off. Stuff the body firmly before closing.
Legs (Make 2)
Start working with red color.
Round 1: 6 sc in MR (6) Round 2: 6 inc (12) Round 3: inc, 3 sc, 3 inc, 3 sc, 2 inc (18) Round 4: 7 sc, 3 inc, 8 sc (21) Round 5: BLO: 21 sc (21) Round 6: 7 sc, 3 dec, 8 sc (18) Round 7: 4 sc, 4 dec, 6 sc (14) Round 8: 2 sc, 4 dec, 4 sc (10) Round 9: (3 sc, dec) × 2 (8)
➡️ Change to blue color.
Rounds 10–15: 8 sc (6 rounds) (8)
Do not stuff the leg. Fold the leg in half and work 3 sc across to close. Fasten off. Leave a long tail to sew onto the body.
Arms (Make 2)
Crochet with red color.
Round 1: 6 sc in MR (6) Round 2: (2 sc, inc) × 2 (8) Rounds 3–5: 8 sc (3 rounds) (8)
➡️ Change to blue color.
Rounds 6–13: 8 sc (8 rounds) (8)
Do not stuff the arm. Fold the arm in half and work 4 sc across to close. Fasten off. Leave a long tail to sew onto the body.
Shield
Start working with the blue color.
Round 1: 6 sc in MR (6) Round 2: 6 inc (12) Round 3: (1 sc, inc) × 6 (18)
➡️ Change to red color.
Round 4: (2 sc, inc) × 6 (24)
➡️ Change to white color.
Round 5: (3 sc, inc) × 6 (30)
➡️ Change to red color.
Round 6: (4 sc, inc) × 6 (36)
Fasten off. Leave a long tail to sew. Embroider a star on the shield.
Helmet
Start working with the blue color.
Round 1: 6 sc in MR (6) Round 2: 6 inc (12) Round 3: (1 sc, inc) × 6 (18) Round 4: (2 sc, inc) × 6 (24) Round 5: (3 sc, inc) × 6 (30) Round 6: (4 sc, inc) × 6 (36) Round 7: (5 sc, inc) × 6 (42) Round 8: (6 sc, inc) × 6 (48) Rounds 9–16: 48 sc (8 rounds) (48) Round 17: 15 sc, 10 ch, skip 6 sc, 4 sc, 10 ch, skip 6 sc, 17 sc (56) Round 18: 56 sc (56) Round 19: 13 sc, turn, ch, 28 sc (28) Round 20: turn, ch, dec, 24 sc, dec (26) Round 21: turn, ch, dec, 22 sc, dec (24)
Tip: Try the helmet on your head as you go along to check the fit.
Fasten off. Leave a long tail to sew onto the head.
Important Notes — Avoid These Common Mistakes
- Don’t skip the stitch marker — crocheting in a spiral makes it very easy to lose track of your rounds. Always mark the beginning of each round.
- Don’t understuff — make sure to fill the body and head firmly as you go, not just at the end.
- Don’t forget to try the helmet on the head as you crochet it, to ensure a perfect fit before fastening off.
- Don’t rush color changes — when switching between red, white, and blue, carry the yarn neatly to avoid loose ends showing through.
- Don’t skip pinning — always use pins to place arms, legs, and shield symmetrically before sewing to avoid a lopsided finish.
- Don’t pull safety eyes too tight — place them carefully between rounds 30 & 31, exactly 9 stitches apart, before the head is fully stuffed.
Customization Ideas
- Change the colors — Use different yarn colors to transform this pattern into any superhero you love, like Spider-Man in red and black or Superman in blue and red.
- Add a cape — Crochet a small cape and attach it to the back of the body to give your superhero an extra heroic look.
- Change the size — Use a bigger hook and thicker yarn to make a larger doll, or go smaller for a mini keychain-sized version.
- Create a whole team — Use this same base pattern to crochet an entire superhero squad and display them together as a collection.
- Personalize the chest embroidery — Instead of a star, embroider any letter or symbol on the chest to create your very own unique superhero character.
- Add accessories — Get creative and crochet tiny accessories like a bow, a hat, or a tiny weapon to make your doll even more unique and special.
- Gift wrapping idea — Place your finished amigurumi in a small box with tissue paper for a beautiful, ready-to-gift handmade present.
Assembly
Once all the pieces are crocheted, it’s time to bring your Crochet Superhero Amigurumi Pattern together! Before you begin sewing, lay all the parts: body, head, legs, arms, helmet, and shield in front of you so nothing gets missed. Take your time with each step, because neat and careful finishing is what makes your amigurumi look truly professional and polished.
Follow these steps for the best results:
- Prepare all pieces first — make sure every part is complete, fastened off, and has a long enough tail left for sewing before you begin assembly.
- Pin before you sew — use pins to position the arms, legs, and shield symmetrically on the body before attaching them permanently. This helps you avoid a lopsided or uneven finish.
- Attach the helmet — sew the helmet securely onto the head, making sure it sits evenly and doesn’t shift to one side.
- Embroider the details — once the helmet is attached, embroider a white “A” on the front of the helmet and a white star on the character’s chest. These small details bring the whole look together.
- Sew the arms and legs — attach both arms and both legs to the body evenly and symmetrically on both sides, checking the positioning carefully before securing them fully.
- Attach the shield — sew the shield onto one of the arms as the final touch, completing your superhero’s iconic look.
- Do a final check — once everything is sewn on, look over your doll from all angles to make sure all pieces are secure, even, and neatly finished.
Finishing
- Sew the helmet securely onto the head.
- Embroider a white “A” on the front of the helmet.
- Embroider a white star on the character’s chest.
- Sew the arms and legs to the body symmetrically.
- Attach the shield to one of the arms.
Conclusion
Your handcrafted Crochet Superhero Amigurumi Pattern is now complete and ready to impress! Every stitch you made tells a story of patience, creativity, and passion. Whether it becomes a cherished gift or a proud display piece, this little superhero is truly one of a kind. Keep crocheting, keep creating, and don’t forget to tag @tanyaasmile on Instagram with your finished masterpiece.