Exceptional Crochet OPE OPE No Mi Amigurumi Pattern Toy
Exceptional Crochet OPE NoMi Pattern Toy offers beginner-friendly steps, a handmade charm, and anime flair, an adorable collectible that also makes a standout gift for One Piece fans.
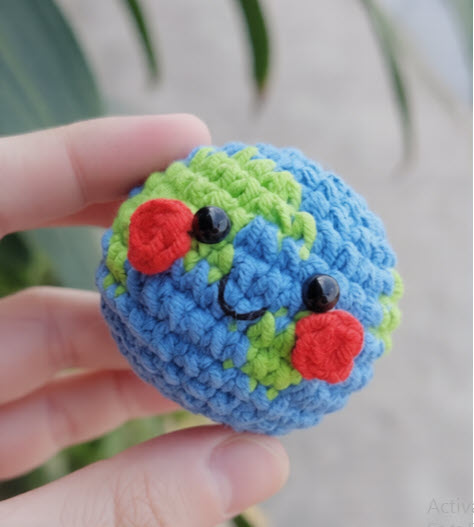
create a OPE No Mi into a tiny treasure with the Exceptional Crochet OPE No Mi Amigurumi Pattern Toy. Its plump heart shape, swirled texture, and curly stem deliver instant cuteness, while beginner-friendly rounds, clear steps, and minimal sewing keep the making relaxing and satisfying.

Customize colors, add a hanging loop, and finish in an evening. Display it as desk décor, clip it to your bag as a fun charm, or gift it to One Piece fans as a handmade collectible.

Exceptional Crochet OPE OPE No Mi Amigurumi Pattern Toy
Bring the heart-shaped OPE OPE No Mi to life as a small, squishy amigurumi. This beginner-friendly crochet pattern focuses on simple shapes, smooth transitions, and neat finishing. First, a plump heart body is created; next, a curled green stem adds character; finally, swirling surface details complete the iconic look. Because the steps are straightforward and repetitive, the project suits relaxed evenings and confidence-building practice. Moreover, the finished piece works beautifully as desk décor, a keychain charm, a bag accessory, or a thoughtful handmade gift for anime fans. Consequently, this tiny treasure combines playful style with satisfying stitches.
Necessary Materials
- Yarn:
- Main color (fruit): 50 g cotton or cotton-blend, worsted/medium (Category 4)
- Stem color (green): 10–15 g cotton or cotton-blend, worsted/medium (Category 4)
- Optional accent (swirls): Use main color or 10–15 g in a coordinating shade
- Hook:
- 3.25 mm (D) hook for firm stitches with worsted yarn
- Alternatively, 2.75–3.5 mm, depending on personal tension
- Notions:
- Safety eyes (optional for kawaii face): 6 mm
- Polyester fiberfill: approximately 20–30 g
- Stitch markers: at least 2
- Yarn needle (tapestry needle)
- Scissors
- Floral wire or craft wire: 18–22 gauge, 20–25 cm total (for shaping the stem)
- Optional: pipe cleaner for a softer core
- Optional: fabric or silicone glue for attaching decorative swirls (sewing is also possible)
- Optional: keychain ring (25–30 mm) and lobster clasp
- Optional: a small piece of felt and embroidery thread for facial details
Skill Level
Beginner/Easy. Basic amigurumi stitches (magic ring, single crochet, increase, decrease) and very simple shaping. Surface slip stitches or sewn appliqués for details are optional and explained.
Making Time (Overview)
2–3 hours total, depending on experience and embellishment choices.
- Body: 60–75 minutes
- Stem: 15–25 minutes
- Swirl details (made and attached): 40–60 minutes
- Assembly and finishing: 15–25 minutes
Step-by-Step Instructions
Before starting, remember this important note: work in continuous rounds unless stated otherwise. Mark the first stitch of each round with a stitch marker to stay on track. Because firm fabric prevents stuffing from showing, choose a hook one size smaller than the yarn recommends.
Body (Heart Shape) — 3 Clear Steps
(Making time: 60–75 minutes)
- Shape the Two Heart Lobes
- First, make Lobe A: create a magic ring, work 6 single crochets (sc) into the ring, then increase each round evenly until reaching a comfortable, palm-sized dome (for worsted yarn, aim for 24 stitches around). Afterward, work 2–3 rounds straight (no increases) for height. Fasten off, leaving a short tail.
- Next, make Lobe B the same way, but do not fasten off. Place both lobes side by side so the openings touch.
- Join the Lobes into One Piece
- Then, with the working yarn on Lobe B, single crochet across Lobe B until the gap between lobe. Continue by inserting the hook into any stitch of Lobe A, and single crochet all the way around both lobes to form one continuous round. Because the join can feel tight, move slowly and keep stitches consistent. After completing the first full round around both lobes, work 1–2 more rounds straight. This creates the gentle dip at the top of the heart.
- Decrease to Sculpt the Heart
- Next, begin shaping. Work around with evenly spaced decreases (for example, 6 sc, dec; repeat around). Then, alternate a straight round and a decrease round, gradually narrowing the piece. Meanwhile, begin stuffing the heart once the opening starts to tighten—gently pack fiberfill into both lobes first so the upper curves look full and symmetrical.
- Later, continue decreasing (for example, 4 sc, dec; then 3 sc, dec; and so on) until the opening is small. Add a final puff of stuffing so the bottom point of the heart becomes firm and well-defined. Finally, close the opening with the yarn needle using a drawstring method and secure the tail invisibly.
Beginner Tip: Because hearts look best when evenly filled, stuff a little at a time. Instead of pushing one large clump, add small tufts to avoid bumps.
Additional Parts for (Crochet OPE NoMi Pattern)
Tail (Stem)
(Making time: 15–25 minutes)
The OPE OPE No Mi features a curly stem: one side tends to curl while the other side is more upright. This simple tube is quick to crochet and easy to shape.
- Foundation: With green yarn, make a magic ring and work 6 sc into the ring. Close tightly.
- Tube: Next, continue working 6 sc in the round for 6–7 rounds to form a small tube. Slip stitch to close the final round. Fasten off, leaving a long tail for sewing.
- Long Segment: Then, make a second tube starting with 6 sc in a magic ring and continue for 16–20 rounds (or to preferred length). Slip stitch to close the final round. Fasten off, leaving a tail.
- Wire Support: Meanwhile, cut a piece of wire slightly shorter than the long segment. Fold each tip of the wire into a small loop so it won’t poke out. Insert the wire through the tube carefully. Because the wire can shift, add a bit of stuffing around it to cushion the interior.
- Shape: Later, bend one end into a soft curl and keep the other side straighter. The small tube will become the connector/cap that sits at the heart’s top.
Attachment:
- First, position the small tube horizontally across the valley between the heart lobes as a base.
- Next, place the long segment on top and slightly off-center for a natural, organic look.
- Finally, sew both pieces securely using small, neat stitches, catching both the stem and the heart fabric each time.
Optional Stabilizer: If the stem flops, add a short wire bridge from the stem’s base into the heart. Hide the entry point beneath a swirl detail later.
Heart / Accessories / Details (Swirls)
(Making time: 40–60 minutes)
The OPE Oo Mi is famous for its elegant S-shaped swirls. Two beginner-friendly methods work well:
- Method A: Surface Slip Stitch
- First, insert the hook from front to back, yarn over, and pull a loop through to the surface. Then slip stitch along a planned path, drawing graceful S shapes across the heart.
- Next, keep the tension relaxed so the stitches do not pucker the fabric.
- Finally, end each swirl by pulling the tail to the wrong side and securing with small knots and woven ends.
- Method B: Chain Appliqués
- First, make many chain strips: chain 18–22, turn, and slip stitch back through each chain to create a firm cord. Cut and secure tails.
- Next, pin each strip in an S shape onto the heart, overlapping edges slightly to cover the surface beautifully.
- Then, sew each strip with tiny whip stitches using matching thread or the same yarn. Alternatively, apply a light layer of fabric glue, press gently, and allow to dry; however, sew a few anchoring stitches for extra durability.
Placement Tips:
- Begin at the top near the stem and spiral downward, so swirls nest together naturally.
- Meanwhile, alternate big S curves with smaller ones to avoid repetition.
- Because symmetry can look stiff, offset a few swirls for a lively, organic finish.
Optional Extra: Add a tiny accessory like a mini hat charm or a small tag near the stem. Keep it lightweight so the heart holds its shape.
Face & Assembly
(Making time: 15–25 minutes)
Some like this fruit faceless; others prefer a kawaii look. Both approaches work well.
- Face (Optional):
- Placement: First, mark eye points on the lower third of the heart, centered horizontally and about 8–9 stitches apart (for a small piece).
- Safety Eyes: Next, insert 6 mm safety eyes and secure the backs before closing the body completely. If the body is already closed, embroider eyes with satin stitches or sew tiny felt circles.
- Mouth: Then, embroider a simple smile with black or dark brown thread. A tiny V-shaped mouth looks especially sweet.
- Assembly:
- Secure the stem firmly: sew the small base tube to the heart first, then attach the long segment. Because handling can loosen stitches, reinforce with a second round of tiny whip stitches.
- Hide joins: Finally, conceal any visible knots or wire entry points beneath a swirl appliqué or a small embroidered leaf vein.
Beginner Tip: Pin everything lightly before sewing. This prevents last-minute adjustments and keeps the layout clean.
Special Features for (Crochet OPE NoMi Pattern)
- Plump Heart Shape: Proportions are cute and balanced, with full upper lobes and a tidy point.
- Textured Swirls: Either surface slip stitching or appliquéd chains creates bold, readable patterning.
- Poseable Stem: A hidden wire core lets the stem curl gracefully and stay upright.
- Gift-Ready Size: Compact dimensions make it perfect for desk décor, backpack charms, or ornament displays.
- Customizable Style: Choose classic red, moody maroon, or playful pastels; each palette tells a different story.
Sizing Tips
- With worsted yarn and a 3.25 mm hook, the finished heart typically measures 8–10 cm tall (without stem).
- With sport-weight yarn and a 2.75–3.0 mm hook, expect 6–7 cm.
- With chunky yarn and a 4.0–4.5 mm hook, sizes can reach 12–14 cm.
- Adjust stuffing as size changes; larger hearts need firmer packing to keep the point crisp.
- Additionally, a thinner hook tightens the fabric and slightly reduces size, while a thicker hook softens the fabric and slightly increases size.
Finishing Tips for (Crochet OPE NoMi Pattern)
- Neat Seams: Use small, even whip stitches when attaching the stem and appliqués. Consequently, joins disappear into the fabric.
- Invisible Decreases: Employ invisible single crochet decreases to avoid bumps along the heart’s sides.
- Stuffing Strategy: Add fiberfill in layers; massage gently to smooth lumps. Before closing, check the silhouette from all angles.
- Clean Look: If using glue for appliqués, apply sparingly and remove any residue with a cotton swab once dry. Instead of tugging, dab lightly to avoid lifting stitches.
- Secure Ends: Weave yarn tails into the body with several changes of direction, then trim. Because the fabric is dense, tails stay hidden.
Common Mistakes to Avoid for (Crochet OPE NoMi Pattern)
- Loose Gauge: Stitches that are too loose allow stuffing to peek through. Use a smaller hook or tightenthe tension slightly.
- Rushing the Join: When connecting the two lobes, gaps can form. Therefore, keep the stitches snug and check alignment before continuing.
- Uneven Stuffing: Overstuffing one lobe flattens the other. Instead, add a little to each side in turns.
- Floppy Stem: Without wire or firm stuffing, the stem may droop. Consequently, insert a small wire core or pack more filling.
- Messy Swirls: Overlapping appliqués randomly can look chaotic. Plan swirls with pins first, starting at the top and working down.
- Glue Overflow: Excess glue spreads onto ridges. Apply in thin lines and pat gently; afterward, clean edges once dry.
Variations & Customization Ideas for (Crochet OPE NoMi Pattern)
- Color Play: Classic crimson fruit with green stem looks bold; however, deep burgundy or magenta adds drama. Pastel pink with mint stem gives a dreamy vibe. For extra pop, work the swirls in a slightly lighter or darker shade than the body.
- Metallic Accents: Add a single strand of metallic thread to swirl appliqués for a subtle sparkle, especially for ornaments.
- Size Options: Create a tiny keychain version with sport-weight yarn and a 2.75 mm hook; alternatively, make a huggable plush with chunky yarn and a 4.5 mm hook.
- Kawaii Face: Add safety eyes and a tiny embroidered smile. For blush, softly brush a little pink fabric pastel or embroider tiny ovals.
- Hanging Loop: Slip a keychain ring through the stem base or sew a small loop on top for ornaments and bag charms.
- Accessory Fun: Attach a mini tag, a felt heart, or a tiny hat charm near the stem. Keep embellishments light to maintain balance.
- Display Ideas: Arrange several fruits in a bowl, hang mini versions on a branch display, or line a shelf with different colorways.
Tutor Suggestions for (Crochet OPE NoMi Pattern)
- Read the Fabric: Instead of relying only on counts, watch the fabric. If the heart looks too narrow, add one straight round; if too rounded, start decreasing earlier.
- Perfect Tension: Practice single crochets in a small swatch first. Because amigurumi loves consistent tension, a quick warm-up helps.
- Marker Magic: Use stitch markers to note the valley at the top, the side centers, and the decrease points. Consequently, shaping stays symmetrical.
- Slow and Steady: When attaching the stem and swirls, work slowly. Meanwhile, check placement every few stitches for a polished finish.
- Gentle Blocking: If the swirls curl, lightly steam with a garment steamer while gently pressing with fingers. Do not touch acrylic directly with a hot iron; steam at a distance.
- Wire Wisdom: Round off wire ends; then, add a bit of stuffing inside the stem before insertion. As a result, the wire stays centered and secure.
- Breaks Matter: Take short breaks during assembly. Later, fresh eyes spot tiny misalignments and improve the final look.
- Confidence Boost: Every fruit looks a little different; that uniqueness is part of the handmade charm. Therefore, celebrate small variations and keep exploring new colorways.
Final Thoughts for (Crochet OPE NoMi Pattern)
This Exceptional Crochet OPE OPE No Mi Amigurumi Pattern Toy balances simple construction with eye-catching details. First, a clean heart silhouette sets the foundation; next, a poseable stem adds personality; finally, swirling motifs elevate the texture. Because the project works up quickly and offers room to play, it invites beginners to practice essential amigurumi skills while creating a gift-ready collectible. Consequently, one fruit often leads to another experiment with colors, sizes, and expressions to build a cheerful basket of handmade treasures.