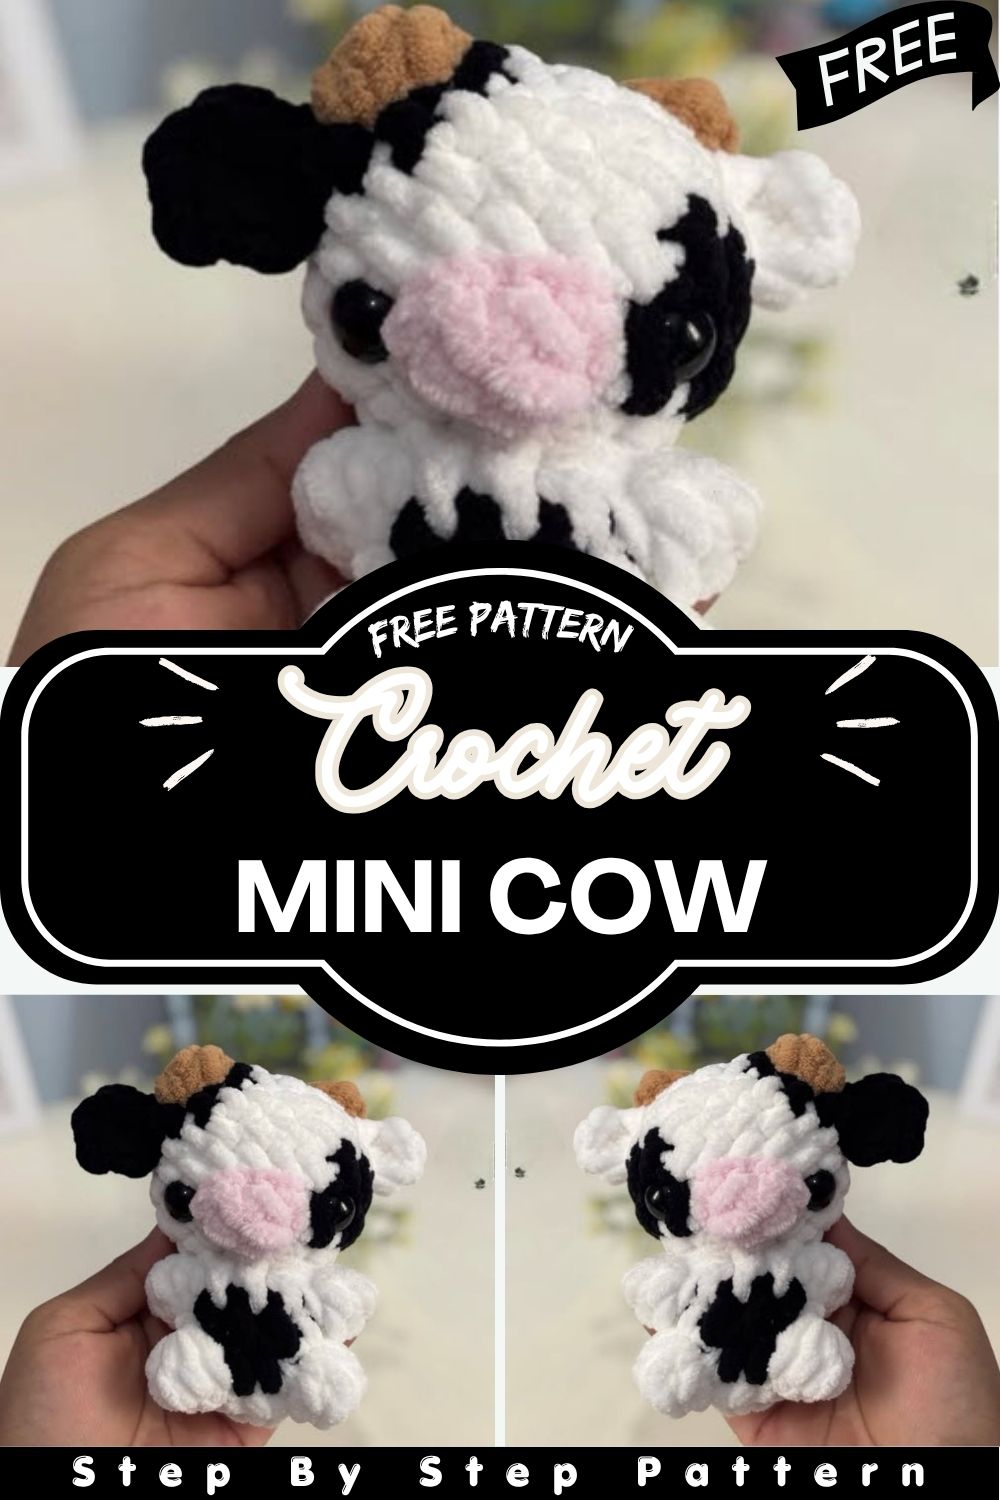
Adorable Crochet Mini Cow Amigurumi in Just One Afternoon Free Beginner Pattern
Meet your new favorite crochet project a tiny, Crochet Mini Cow Amigurumi keychain! This beginner-friendly pattern works up in under two hours. It fits right in your pocket.
This Crochet Mini Cow Amigurumi is one of those projects that instantly wins hearts. Whether you are brand new to amigurumi or simply love making small, charming accessories, this little spotted friend is guaranteed to bring a smile. Standing at roughly 7 centimeters tall when finished, she is perfectly sized to hang from a bag, zipper, or set of keys. The design uses a false X-stitch base with fun bobble texture details that give the cow her signature fluffy look and the best part is that the whole thing comes together faster than you might expect.
Skill Level
Beginner-friendly. If you know basic single crochet and magic rings, you are ready. No advanced skills needed at all.
Materials You Will Need
- Chunky chenille yarn — White (main color)
- Chunky chenille yarn — Black (color #60, for spots)
- Chunky chenille yarn — Camel (color #55, for ear and nose details)
- Chunky chenille yarn — Baby Pink (color #31, for optional blush)
- 5mm crochet hook
- 10mm safety eyes — 1 pair
- Polyfill stuffing
- Stitch markers
- Yarn needle
- Scissors
- Brand used: Alize Softy / Alize Komfy or any similar bulky chenille yarn
Abbreviations Used
- R / r — Round
- am — Magic ring
- sc — Single crochet
- inc — Increase
- dec — Decrease
- Bob — Bobble stitch (5 double crochets together)
- mini Bob — Mini bobble stitch (3 double crochets together)
- hdc — Half double crochet
- sl st — Slip stitch
- Flo — Front loop only
The Pattern — Step by Step
Work in white yarn unless a color change is mentioned.
Head and Body
R1: 6 sc into magic ring. R2: 6 increases — 12 stitches total. R3: 3 sc, Bob, sc, 2 sc in black, Bob, 4 sc — 12 stitches. R4: 5 sc, 3 sc in black, 4 sc — 12 stitches. R5: 3 sc, Bob, 5 sc, Bob, 2 sc — 12 stitches. R6: (2 sc, dec) repeat 3 times — 9 stitches. R7: 9 increases through front loop only — 18 stitches. R8: 5 sc, inc, 3 sc in black, 2 sc, inc, 5 sc, inc — 21 stitches. R9: 7 sc, 3 sc in black, 11 sc — 21 stitches. R10: 21 sc — no changes. R11: 14 sc, 3 sc in black, 4 sc — 21 stitches. R12: (sc, dec) x2, mini Bob in camel, dec, (sc, dec), sc, dec in black, mini Bob in camel, dec in black, (sc, dec) — 14 stitches.
Start stuffing your cow firmly here.
R13: 7 decreases — 7 stitches total.
Cut yarn and close. Weave in the end securely.
Attach safety eyes between rounds 8 and 9. Leave about 5 sc of space between them.
Nose
Chain 3.
In the second chain from hook, work 1 sc and 1 hdc. Then work 1 sc.
Cut yarn. Sew it centered between the safety eyes.
Ears
Work 6 sc into a magic ring.
Slip stitch to close.
Cut yarn and leave a tail for sewing.
Fold the ear in half.
Pass the tail through the first two stitches to shape it.
Sew ears just below the top of the head.
Customization and Variations
- Move or resize spots by adding or skipping bobble stitches. Every cow turns out unique.
- Use brown instead of black for a chocolate-spotted look. Gray works great for a Holstein style.
- Add small pink blush circles on the cheeks using surface slip stitches.
- Try a 4mm hook with thinner yarn for a micro version. Great for earrings or charm bracelets.
- Attach a keyring through the top after finishing. Instant keychain ready to go.
- Make several cows in different colors. Perfect for gift sets or craft fair bundles.
- Add one or two extra plain rounds between R10 and R11 for a rounder, fuller body.
Common Mistakes to Avoid
- Not using stitch markers – Mark your first stitch every round. Chenille yarn is hard to read.
- Stuffing too late – Add polyfill at round 12. Waiting until the end makes shaping very difficult.
- Loose safety eyes – Press the washer firmly until it clicks. Loose eyes fall out over time.
- Uneven bobbles -Keep tension steady. This helps bobbles sit flat and puffy, not sunken.
- Skipping front loops in R7 – This step creates the ridge between head and body. Do not skip it.
- Cutting yarn too short – Leave at least 15 to 20 cm of tail. You need it for sewing and weaving.
Finishing Tips
- Weave all ends deep into the body using a blunt needle. This keeps them hidden and secure.
- Sew the nose with gentle tension. It should sit flat and centered without pulling the fabric.
- If the cow looks lopsided, hold it over steam for a few seconds. Reshape with your fingers while warm.
- Pinch and fluff the bobble stitches after finishing. This makes them pop out nicely.
- Reinforce the top closing hole before adding a keyring. A few extra loops of yarn do the job well.
- Check both ears before tying off. Same height, same angle symmetry matters for a neat finish.
Gifting Ideas
- Add a keyring and gift it as a handmade keychain. Works for birthdays, holidays, or just because.
- Place it in a small gift bag with a candle or handwritten note for a personal touch.
- Make a set of farm animals with the same yarn. A sweet gift for kids or crochet lovers.
- Tie one onto a tote bag or backpack zipper. A fun charm that always gets attention.
- Gift a finished cow with a printed copy of this pattern. Perfect for a crocheting friend.
- Sell them at craft markets or online. They are quick to make and popular with all ages.
Conclusion
Your Crochet Mini Cow Amigurumi is done and ready to go! She is small but full of charm and detail.
From her spotted bobble texture to her tiny folded ears, every part of her feels handmade and special. Keep her, gift her, or make a whole collection she will always stand out.
If you share her on social media, tag the original designer. It helps them keep creating free patterns for everyone.