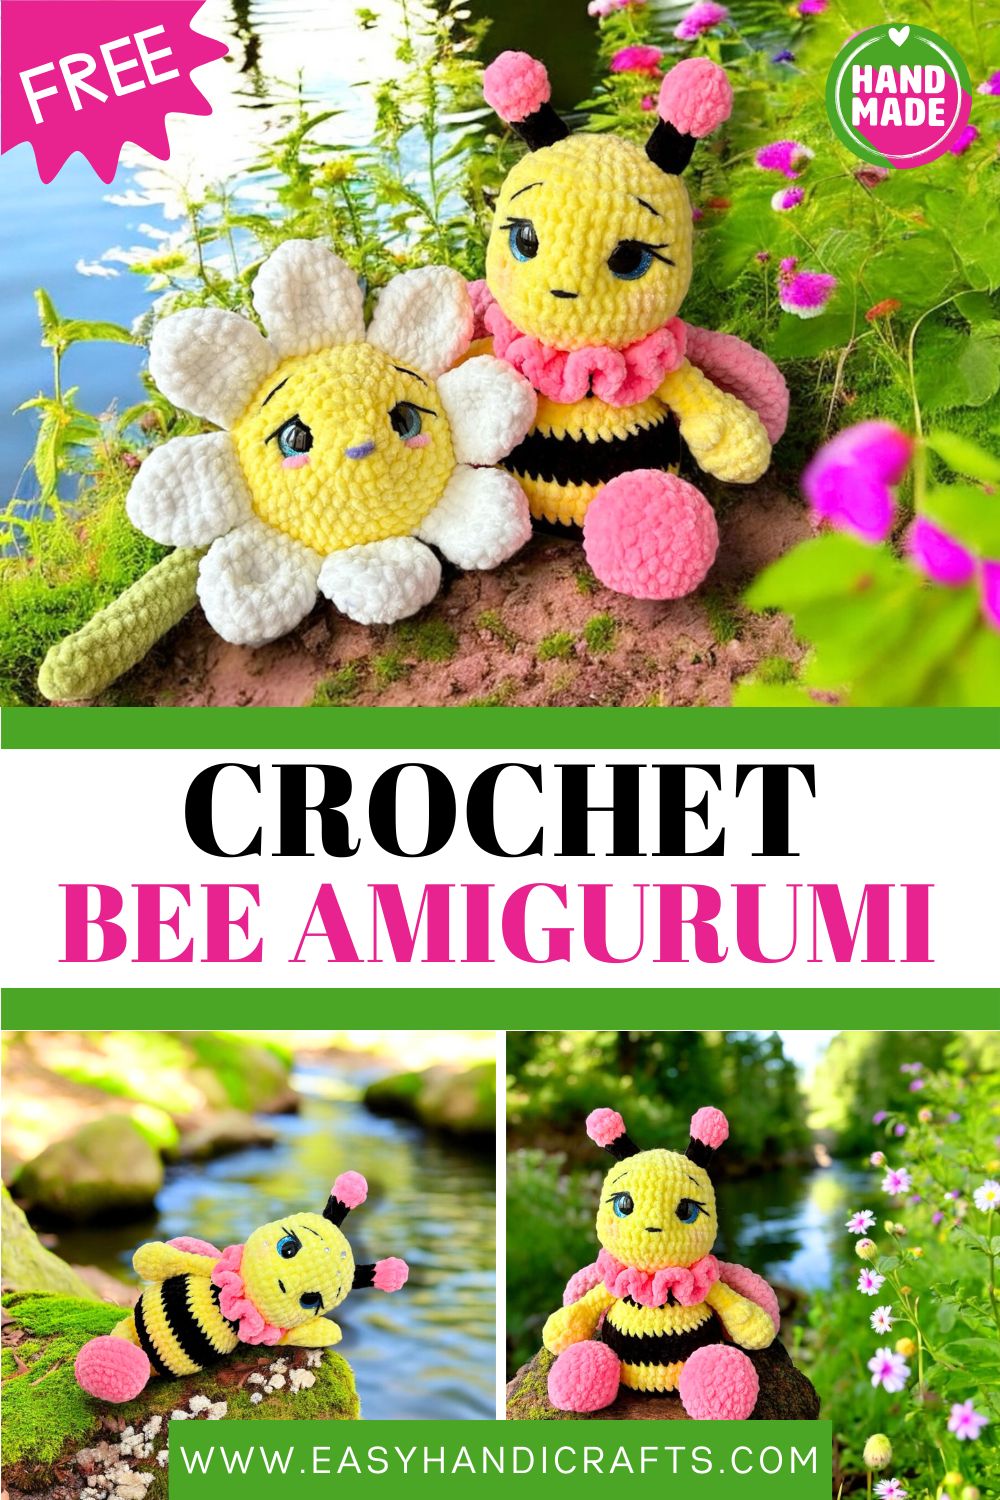
Fabulous Crochet Honey Bee Amigurumi Pattern
Round, squishy, and impossibly cute, this little Crochet Honey Bee Amigurumi wins everyone over. Velvet yarn, rosy cheeks, and a pink ruffle collar make it the plushie you’ll want to make again.
The Crochet Honey Bee Amigurumi proves simple shapes can pack big personality. Worked in cozy chenille yarn, it finishes soft, round, and squishy. Bright yellow-and-black stripes, big blue eyes, and playful pink details give it real charm. Quick to make and endlessly cute, it works as a joyful handmade gift, a nursery accent, or the happiest little buddy on any shelf.
Skill Level
Confident beginners will feel right at home here. Most of the bee uses simple single crochet, increases, and decreases. The only fiddly bits are the stripe color changes and neat finishing on the antennae.
Pattern Overview
Here’s a quick map of the pieces that bring this little bee to life:
- Round head and body. The body is one plump shape worked in continuous rounds, with yellow and black stripes building up as you change colors. It carries the safety eyes and the cute embroidered face.
- Pointy antennae. Two slim black antennae topped with fluffy pink balls sit on the head and give the bee its signature buzz.
- Little wings. A pair of soft wings attach to the back, light and rounded so they don’t weigh the body down.
- Pink hands and feet. Small pink puffs at the front read as paws, adding to the rounded, cuddly look.
- The ruffle collar. A pink ruffled scrunchie-style band wraps the neck and gives the bee its standout charm.
Most pieces are quick, so the project comes together in an evening or two.
Special Techniques
A few simple techniques carry this whole design, and none of them are scary.
Stripe color changes are the star here. To keep the line between yellow and black crisp, switch colors on the last stitch of the round before, so the new shade starts clean. Carry the unused yarn loosely up the inside, or cut and rejoin if you prefer tidy edges.
The yarn under method (instead of yarn over) tightens your single crochet so the chenille fabric stays dense and the stuffing never peeks through. Chenille can be slippery to count, so this small change makes a big difference.
Finally, the ruffle collar uses extra stitches worked into a row to create gathers. More stitches packed into a short space force the fabric to bunch, giving you that pretty scrunched frill around the neck.
Materials
To make your honey bee, gather:
- Yellow velvet/chenille yarn (head, body, wings)
- Black velvet/chenille yarn (stripes, antennae)
- Pink velvet/chenille yarn (cheeks, antennae tips, collar, hands, feet)
- A crochet hook to suit your yarn (a 3–4mm hook works well with chenille)
- Safety eyes (around 10–12mm; blue suits the look in the photo)
- Polyester stuffing
- Black embroidery thread for the mouth and lashes
- A pink fiber or thread for the blush cheeks
- A yarn needle for sewing and weaving in ends
Abbreviations
- sc — single crochet
- inc — increase
- dec — decrease
- mr — magic ring
- ch — chain
- sl st — slip stitch
- blo — back loops only
- flo — front loops only
- fo — fasten off
Notes Before You Start
- Work in continuous rounds (no joining) unless a section tells you otherwise.
- Use the yarn under method for tighter, neater chenille stitches.
- Keep a stitch marker in the first stitch of each round so you never lose your place.
- This is a free pattern shared for personal use. Please don’t copy or redistribute it.
- You may sell your finished bees, but please credit the original designer at www.easyhandicrafts.com.
The Pattern
add your pattern steps here
Paste your real round-by-round instructions in this section for example: Head & Body, Antennae (x2), Wings (x2), Hands/Feet, and the Ruffle Collar with the exact stitch counts (R1: 6sc in mr, R2: 6inc, and so on). I’ve left this open so the published steps match your actual design instead of guessed numbers.
Assembly
Once all the pieces are ready, bringing your bee together is the fun part:
- Finish the face first. Set the safety eyes before stuffing, then embroider the lashes and a tiny mouth. Add soft pink blush under each eye for that sweet expression.
- Stuff the body firmly. A well-stuffed body holds the round shape and keeps the stripes looking smooth and even.
- Attach the antennae. Sew them to the top of the head, spaced evenly, with the pink puffs pointing up and slightly out.
- Add the wings. Position them on the upper back and stitch them on so they sit symmetrically.
- Place the collar, hands, and feet. Wrap the pink ruffle around the neck and tack it down, then sew the little pink puffs to the front for the hands and feet.
Common Mistakes
A few small slips can trip you up, so watch for these:
- Muddy color changes. If your stripes look messy, switch colors on the very last pull-through of the previous round. Clean changes equal crisp stripes.
- Counting errors in chenille. Velvet yarn hides stitches, so count out loud or use markers. A miscount early on throws off the whole shape.
- Under-stuffing. A soft, floppy body loses its cute roundness. Stuff firmly, but stop before the stitches stretch and gap.
- Lopsided antennae or wings. Pin every add-on first and check from the front before you sew. It’s far easier to adjust pins than picked-out stitches.
- Loose magic ring. Pull that starting ring tight, or a little hole will open at the top of the head.
Important Remarks
A few final pointers to keep your make smooth and fair:
- Tension matters most. Chenille forgives a lot but loves consistency. Keep an even hand so the body shape stays balanced.
- Make it your own. Swap the pink for any accent shade, or try a softer pastel yellow for a gentler look. The bee suits almost any palette.
- Mind the eyes for little ones. If this is a gift for a baby, skip the safety eyes and embroider the eyes instead for a child-safe finish.
- Respect the designer. This free pattern is for personal use only. Don’t copy or redistribute the instructions. Selling finished plushies is welcome, just credit www.easyhandicrafts.com in your photos.
Conclusion
And there you have it one charming Crochet Honey Bee Amigurumi ready to brighten any shelf, nursery, or gift box. The joy of a small plushie like this is how quickly it pays you back; in just a couple of evenings, a few balls of velvet yarn become a soft friend with real character. Don’t worry if your first bee leans a little crooked that’s the handmade charm, and every bee buzzes its own way. So grab your hook, pick your happiest yellow, and give it a try. If you make one, I’d love to see it. Share your finished bee, credit the pattern, and keep that yarn moving. Happy stitching, friend!