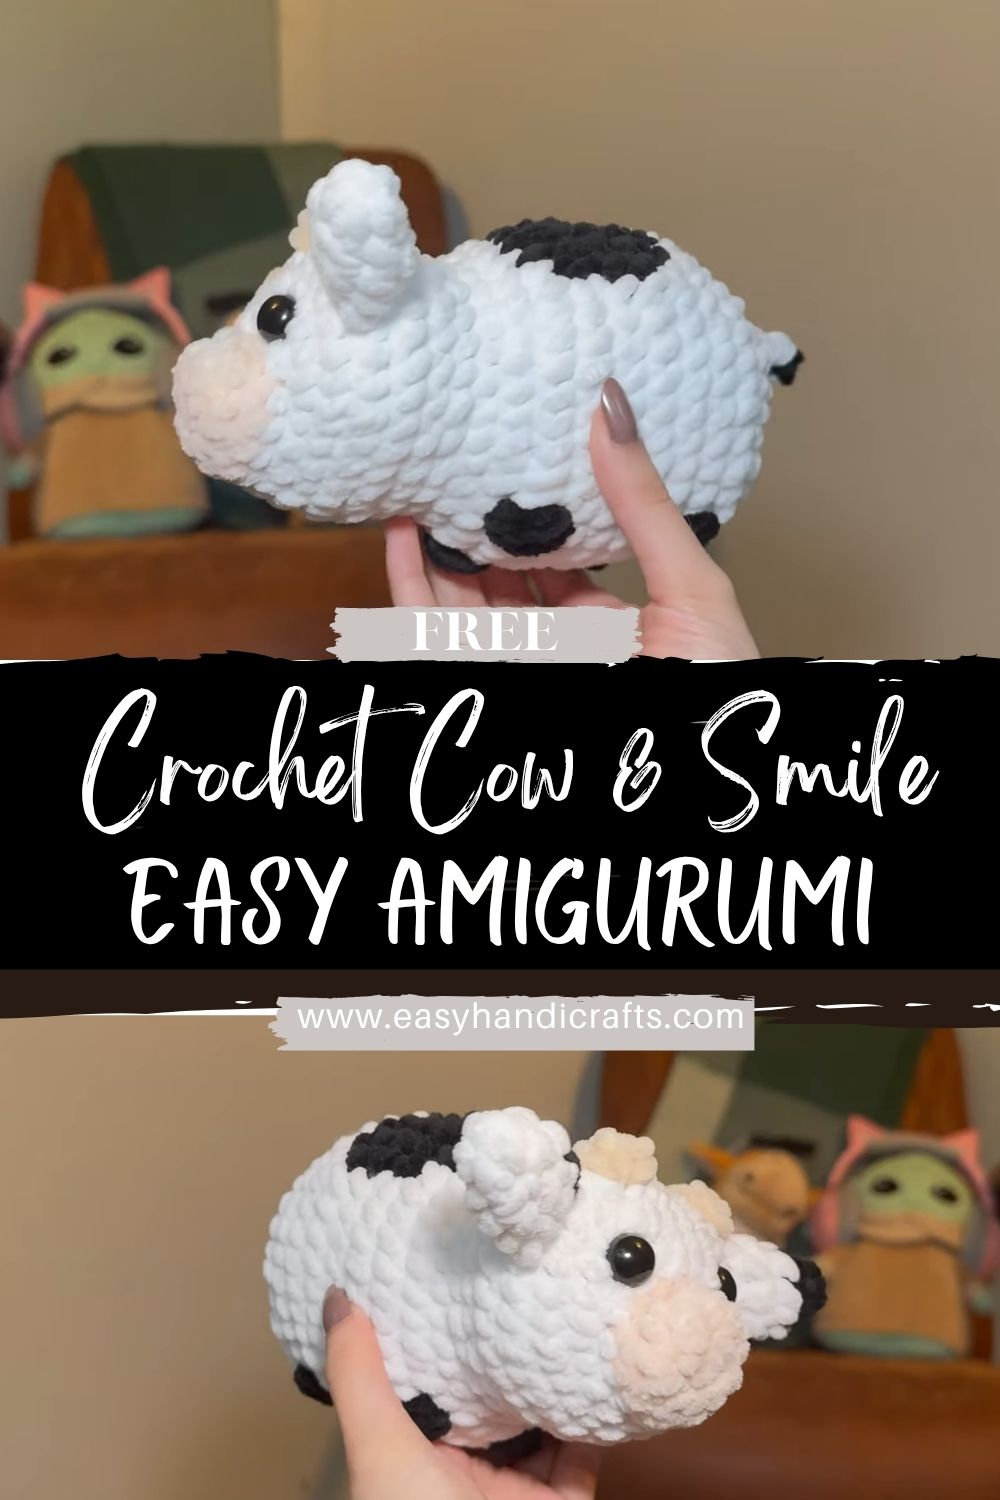
Precious Crochet Cow & Smile Easy Amigurumi Beginners Pattern
Want a cute plush you can finish fast without sewing lots of pieces together? This no-sew crochet cow tutorial shows you how to make a chubby amigurumi cow using simple stitches and beginner-friendly steps. It’s a quick, adorable beginner crochet tutorial that’s perfect for gifts, markets, or a tiny desk buddy.
Amigurumi crochet is the craft of making small stuffed toys using crochet, usually worked in continuous rounds to create smooth, 3D shapes. Amigurumi projects are popular because they’re cute, customizable, and surprisingly beginner-friendly once you learn the basic stitches.
- Less effort (no fiddly assembly)
- Faster results (great for quick makes and markets)
- Cleaner look (fewer seams)
- Beginner-friendly construction that builds confidence
This amigurumi cow pattern is inspired by a step-by-step YouTube tutorial style: clear rounds, simple shaping, and minimal finishing. It uses mostly single crochet, increases, decreases, and continuous rounds, making it ideal for beginners and for anyone who wants a cute project that works up quickly.
Materials Required
Use the following supplies (adjust yarn weight/hook size to your preference):
Yarn
- White yarn (main body)
- Black yarn (spots, hooves, tail)
- Pink yarn (optional nose/muzzle detail or blush)
Tools
- Crochet hook: 4 mm–6 mm (match your yarn; smaller hook = tighter stitches)
- Safety eyes: 6 mm–10 mm
- Fiberfill stuffing
- Stitch marker
- Yarn needle
- Scissors
Optional: embroidery thread for tiny details, keychain hardware if turning into a charm.
Crochet Basics (Beginner Guide)
Here are the basic stitches you’ll use in this beginner-friendly no-sew cow:
- Magic Ring (MR): starts a tight circle for amigurumi
- Single Crochet (SC): the main stitch for tight plush fabric
- Increase (INC): 2 SC in the same stitch (adds stitches)
- Decrease (DEC): combine 2 stitches into 1 (shapes smaller)
Tip: invisible decrease looks neat. - Slip Stitch (SL ST): used for small joins and finishing
- Continuous rounds: you keep crocheting in a spiral, using a stitch marker to track rounds
Most no-sew cow patterns are quick and beginner-friendly because they rely on basic stitches and simple round shaping.
Step-by-Step Crochet Pattern (Very Detailed)
Pattern Notes (Read First)
- Written in US terms
- Work in continuous rounds
- Use a stitch marker in the first stitch of each round
- Stitch counts are in ( )
- This pattern makes a small chubby cow plush (size varies by yarn/hook)
Step 1: Start with the Body
Use white yarn.
Round 1: MR, 6 SC into the ring (6)
(You can start with 8 SC for a slightly bigger cow, but 6 is easiest for beginners.)
Round 2: INC around (12)
Round 3: (SC, INC) repeat around (18)
Round 4: (2 SC, INC) repeat around (24)
Round 5: (3 SC, INC) repeat around (30)
Round 6: (4 SC, INC) repeat around (36)
You should now have a wide circle that begins to “cup” and form the plush base.
Step 2: Shape the Cow Body (Chubby Round Form)
Rounds 7–12: SC in each stitch around (36 each round)
This section builds the chubby height.
Add safety eyes (before closing)
Place eyes between Rounds 9–10, about 6–8 stitches apart (adjust for your preferred cute expression). If you want a baby-cute look, place them slightly wider.
Begin stuffing
Start stuffing after Round 12:
- Add stuffing in small pieces
- Push stuffing into the sides to keep a round shape
- Aim for firm but not stretched
Now decrease to close:
Round 13: (4 SC, DEC) repeat around (30)
Round 14: (3 SC, DEC) repeat around (24)
Round 15: (2 SC, DEC) repeat around (18)
Add more stuffing and shape the body into a neat ball.
Round 16: (SC, DEC) repeat around (12)
Stop here for the no-sew legs method (next step). You’ll finish closing after the legs are formed.
Step 3: Create Legs (No-Sew Method)
This is the key “no-sew” trick: you’ll crochet four small legs directly into the opening and then close up around them. The legs are tiny “tubes” made from stitches grouped across the remaining opening.
Prep: Identify 4 leg sections
At the end of Round 16 you have 12 stitches. You’ll divide them into:
- 4 legs × 3 stitches each = 12 stitches total
Keep your stitch marker at the start of the round so spacing stays even.
Leg 1 (over 3 stitches)
Switch to black yarn for hooves.
- SC into next 3 stitches (you now have a small 3-stitch segment).
- Chain 1, turn work so you can crochet back around that mini segment.
- Crochet a tiny tube for the leg:
- Round A: SC in each of the 3 stitches (3)
- Round B: SC in each of the 3 stitches (3)
- Fasten off black (or continue if you prefer).
- Optional: switch back to white for one round above hoof (for a “sock” look), but many cows look cutest with solid black hooves.
Leg 2–4
Repeat the same process for each next group of 3 stitches around the opening:
- Leg 2: next 3 stitches
- Leg 3: next 3 stitches
- Leg 4: last 3 stitches
Tip for beginners: If the leg method feels confusing, pause and lay the opening flat. You should see four evenly spaced “sections.” Keep the legs short—short legs make the cow look extra chubby.
Close the top (between legs)
Once legs are formed, you may have small gaps. Use your yarn needle and white yarn tail to neatly snug up any opening
If needed, finish the top closure by weaving through remaining loops and pulling tight (depending on how your leg join formed).
Step 4: Add Cow Spots
Use black yarn (or brown).
Option A: Quick embroidered spots (easiest)
- Use black yarn to stitch irregular blob shapes directly onto the body.
- Make 1–3 spots. Keep them random for a cute “cow print” look.
Option B: Crochet tiny spot patches
Make 2–3 small circles/ovals:
- MR, 6 SC (6), sl st to close, fasten off
Sew or stitch them on with minimal stitching.
Beginner tip: Embroidered spots are the fastest and most “no-sew” friendly.
Step 5: Make Ears & Horns
These are small and quick. You can stitch them with just a few sewing passes.
Ears (Make 2, white or black accents optional)
Use white yarn.
Round 1: MR, 6 SC (6)
Round 2: (SC, INC) repeat around (9)
Round 3: SC around (9)
Fasten off, leave a tail. Flatten slightly.
Attach to the top sides of the head area.
Horns (Make 2)
Use white yarn (or a light beige if you have it).
Round 1: MR, 4 SC (4)
Round 2: SC around (4)
Round 3: SC around (4)
Fasten off, leave a tail, lightly stuff (optional).
Attach between the ears, slightly forward.
Minimal-stitch tip: Sew the horns and ears with just a few tight stitches since they’re small, they hold well without heavy stitching.
Step 6: Face Details
Safety eyes
Already inserted earlier (recommended placement: Rounds 9–10).
Nose + mouth (embroidery)
Use black yarn.
- Embroider a small nose (tiny oval or triangle)
- Add a short line down and a small smile
Optional pink details
- Add pink blush under the eyes with a few stitches
- Or embroider a tiny pink muzzle highlight
Step 7: Tail
Use black yarn.
Option A (fast chain tail):
- Chain 8–12
- SL ST back along the chain for a thicker cord (optional)
- Fasten off, leave a tail and attach to the back
Option B (tiny tube tail):
- MR 4 SC (4), SC around for 2 rounds, fasten off
Attach tail centered on the back.
Step 8: Final Assembly & Finishing
- Check stuffing: add a bit more if needed, especially near the top
- Shape the cow: roll it gently between your palms to round it out
- Ensure symmetry:
- eyes level
- ears/horns even
- legs evenly spaced so it stands/sits nicely
- Weave in all ends securely.
Your no-sew chubby cow is done!
Design Tips & Customisation
Make your crochet cow unique:
- Try different cow colors: brown, pink strawberry cow, pastels, or high-contrast black/white
- Turn it into a keychain: add a small loop on top (chain 12–15 and secure)
- Add accessories:
- tiny bow
- mini bell collar
- little flower crown
- Use plush/velvet yarn for a fluffy effect (size up hook as needed and keep stitches tight)
Uses of Crochet Cow
This no-sew amigurumi cow is perfect for:
- Handmade gifts (birthdays, baby showers, holidays)
- Baby toys (use embroidered eyes for safety)
- Market selling items (fast to make, popular theme)
- Room decor (nursery or desk buddy)
- Keychains / bag charms
Pro Tips for Beginners
- Always use a stitch marker in continuous rounds
- Keep tension tight and even (amigurumi looks best dense)
- Stuff gradually doesn’t wait until the very end
- Count stitches each round to avoid drifting shaping
- Practice color changes (carry yarn neatly or fasten off cleanly)
- If you’re following the YouTube tutorial, slow playback to 0.75x and pause after each round
Conclusion
This No-Sew Crochet Cow Tutorial (Beginner-Friendly Amigurumi Pattern) is a cute, fast project that avoids complicated sewing and uses simple stitches in continuous rounds. It’s perfect for beginners, market prep, quick gifts, and anyone who wants a chubby cow plushie they can finish in one sitting. Try it in classic black-and-white or customize it with pastel yarn and accessories to make it your own.