Crochet Fox and Bunny Dolls Amigurumi Pattern
Create an inspired amigurumi couple featuring a fox and bunny crochet doll pair with oversized heads, sweet faces, and charming outfits. This easy beginner crochet tutorial walks you through a cute handmade character plush set, step by step, that’s perfect for gifting or collecting.
Inspired amigurumi couple dolls are adorable crochet characters that capture a “fandom feel” without copying exact designs, think recognisable styling, cosy proportions, and collectable charm. Fox- and bunny-themed crochet characters are especially popular because they’re instantly expressive: foxes feel playful and clever, while bunnies read as gentle and sweet.
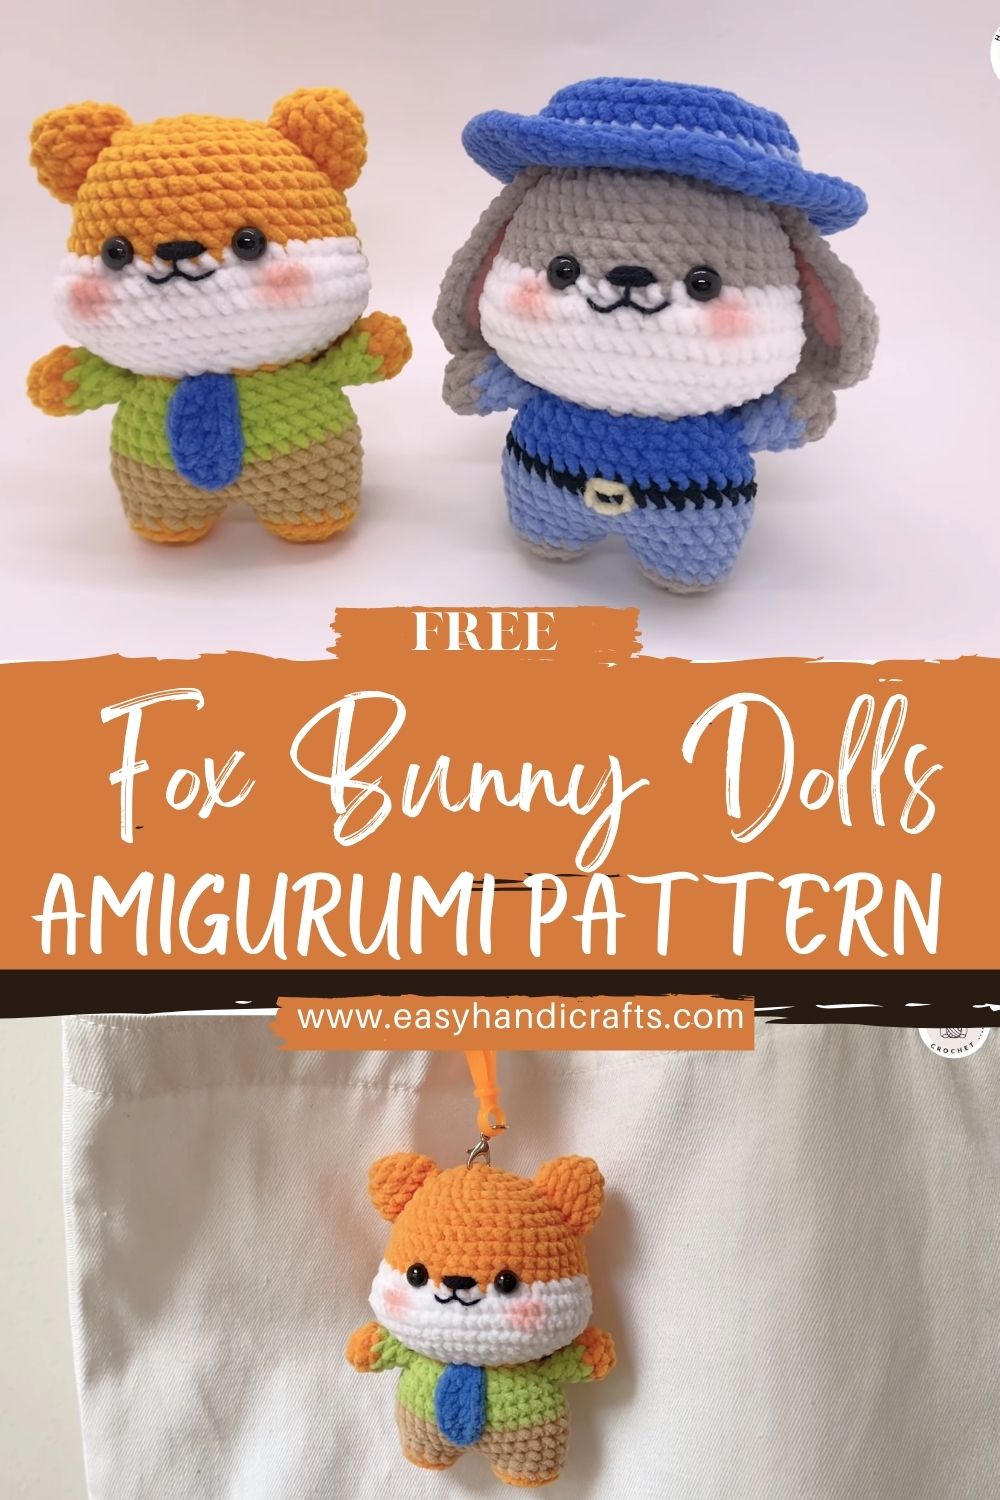
To bring the characters to life, the fox-inspired crochet doll wears character-style clothing with a necktie, while the bunny-inspired crochet doll includes a belt and a wide-brim hat. The pattern is written for advanced beginners through easy intermediates with simple stitches, clear shaping, and approachable accessories that elevate the final look.
MATERIALS NEEDED
Yarn (soft velvet or chenille recommended)
- Orange (fox-inspired head/ears accents) – main character colour
- White (muzzle/lower face, fox ear inner, small accents) – contrast + expression
- Greyy (bunny-inspired head/body) – main bunny base
- Blue (bunny outfit + fox tie) – clothing contrast
- Green (fox shirt) – outfit colour block
- Beige (hat or belt accents) – warm accessory tone
- Black (tiny details if using yarn; or use embroidery thread) – facial + belt/tie accents
- Pink (blush cheeks) – soft character warmth
Tools & notions
- Crochet hook: 3.5–4.5 mm (choose to match your yarn; use a smaller hook than the yarn suggests for tight stitches)
- Fiberfill stuffing – firm, smooth shaping
- Safety eyes: 8–10 mm (or size you prefer for “cute” proportions)
- Yarn needle – sewing parts and weaving ends
- Stitch marker – keep track of rounds
- Scissors – tidy finishing
- Black embroidery thread – embroidered nose, smile, and small details
- Felt/fabric accents (optional) – hat band, tiny patches, cheek circles
- Optional blush/pastel – add rosy cheeks (cosmetic blush works well)
CROCHET ABBREVIATIONS / TERMS (beginner-friendly)
- MR (Magic Ring): an adjustable loop you crochet into, then pull tight to close the centre.
- sc (Single Crochet): the basic amigurumi stitch; creates a tight fabric.
- inc (Increase): work 2 sc in the same stitch to add stitches and widen the shape.
- dec (Decrease): reduce stitches to narrow the shape. Usually invisible decrease in amigurumi: insert hook in front loop of next st, then front loop of next st, yarn over and pull through both loops, yarn over and pull through.
- sl st (Slip Stitch): join or move to another point without adding height.
- ch (Chain): a foundational stitch used for straps, brims, and small details.
- BLO (Back Loop Only): crochet only into the back loop of a stitch; creates a ridge (great for clothing edges).
- FLO (Front Loop Only): crochet only into the front loop; also creates a ridge and helps with shaping layers.
- hdc (Half Double Crochet): taller than sc; useful for gentle shaping (like hat brims).
- dc (Double Crochet): taller stitch; useful for wide brims and decorative pieces.
FINISHED SIZE & SKILL LEVEL
- Approx. finished size: 14–18 cm (5.5–7 in) tall, depending on yarn/hook and stuffing firmness
- Skill level: Advanced beginner → easy intermediate
- Estimated time: ~3–5 hours per doll (basic body + head)
- Note: Outfits and accessories (tie, belt, hat) can add 1–2+ hours each, depending on detail
DESIGN OVERVIEW
These dolls are built with classic amigurumi proportions: a big, rounded head for maximum cuteness and a compact body with short legs for a stable, “collectable” silhouette. The muzzle/lower face is added separately in a contrasting colour to create a raised, expressive look. Tiny arms are stitched on at the sides, and the character feel comes from the outfit’s colour, blocking, and accessories—especially the fox-inspired tie and the bunny-inspired belt + wide-brim hat.
All these elements—oversized head, simple limbs, carefully placed face—create dolls that look friendly, giftable, and full of personality without being complicated to crochet.
COLOR & CHARACTER VARIATION IDEAS
Try any of these fun options (without using copyrighted character names).
- arm orange fox-inspired doll with a green shirt and blue tie
- Soft grey bunny-inspired doll with a blue uniform and matching hat
- Pastel version: peach fox + cream muzzle; pale grey bunny + baby blue outfit
- Seasonal outfits:
- Autumn scarf + tiny leaf applique
- Winter hat + mini cape
- Spring bow + flower accessory
- Mini keychain versions: use lighter yarn (cotton) + smaller hook (2.25–2.75 mm)
- Custom accessories: scarf, badge, bow, flower, tiny satchel, or a little heart held in the arms
STEP-BY-STEP CROCHET PATTERN
Below is a complete pattern for one base doll, followed by options for a fox-inspired and a bunny-inspired crochet doll (ears, outfits, and accessories differ). Use continuous spirals unless stated otherwise. Place a stitch marker in the first stitch of each round.
Gauge note (important): Tighter is better for amigurumi. If you see gaps, go down a hook size.
REQUIRED PATTERN FORMAT
All pattern sections follow:
Round 1: … (stitch count)
Round 2: … (stitch count)
…and so on.
HEAD SECTION (rounded amigurumi head)
Head tutorial correction note: Begin with 8 sc in MR (not 6). This helps keep a rounder, smoother sphere with chenille/velvet yarn.
Use main head colour:
- Fox-inspired doll: Orange
- Bunny-inspired doll: Greyy
Round 1: 8 sc in MR (8)
Round 2: inc x8 (16)
Round 3: (sc, inc) x8 (24)
Round 4: (2 sc, inc) x8 (32)
Round 5: (3 sc, inc) x8 (40)
Round 6: (4 sc, inc) x8 (48)
Round 7: (5 sc, inc) x8 (56)
Rounds 8–13: sc around (56)
Round 14: (5 sc, dec) x8 (48)
Round 15: (4 sc, dec) x8 (40)
Round 16: (3 sc, dec) x8 (32)
Safety eye placement (before closing):
- Place eyes between Rounds 11 and 12, about 8–9 stitches apart (adjust for expression).
- If using a raised muzzle, keep eyes slightly wider for a gentle look.
Round 17: (2 sc, dec) x8 (24)
Stuffing note: Start stuffing firmly now; keep stuffing smooth (no lumps).
Round 18: (sc, dec) x8 (16)
Round 19: dec x8 (8)
Fasten off, close the hole, weave in ends.
What it should look like: a smooth, rounded sphere—slightly oversized compared to the body.
MUZZLE / FACE SECTION (white lower face)
Use White. This creates the soft “lower face” area under the eyes.
Round 1: 6 sc in MR (6)
Round 2: inc x6 (12)
Round 3: (sc, inc) x6 (18)
Round 4: (2 sc, inc) x6 (24)
Round 5: sc around (24)
Fasten off, leaving a long tail for sewing.
Shape note: This should be a shallow, oval- or round-shaped pad. If you want an extra dimension, add a pinch of stuffing just before fully sewing.
Placement: Centre the muzzle under the eyes, with the top edge sitting about 1–2 rounds below the eye line.
EARS SECTION
A) Fox Ears (make 2)
Outer ear colour: Orange
Inner ear colour (optional): White (surface stitch or sew in felt)
Round 1: 4 sc in MR (4)
Round 2: (sc, inc) x2 (6)
Round 3: (2 sc, inc) x2 (8)
Round 4: sc around (8)
Round 5: (3 sc, inc) x2 (10)
Round 6: sc around (10)
Fasten off,f leaving a sewing tail.
Shaping tip: Pinch the bottom flat and add 1–2 small whip stitches to hold a slight fold—this makes a cute rounded triangle.
Attachment angle: Place ears on top of the head around Rounds 4–6, angled slightly outward.
B) Bunny Ears (make 2)
UsGreyay (optionally add a pink/white inner-ear panel later, with felt or surface stitching).
Round 1: 6 sc in MR (6)
Round 2: (sc, inc) x3 (9)
Round 3: sc around (9)
Round 4: (2 sc, inc) x3 (12)
Rounds 5–10: sc around (12)
Round 11: (2 sc, dec) x3 (9)
Rounds 12–14: sc around (9)
Fasten off, leaving a long tail.
Shape note: These should be long and soft. Don’t overstuff—most bunny ears look best unstuffed or with just a tiny pinch at the base.
Attachment angle: Sew to the top of the head around Rounds 3–5, letting them droop slightly to the sides or backward.
Symmetry tip: Count the same number of stitches from the centre top of the head for each ear; pin before sewing.
BODY SECTION (compact torso with outfit colour changes)
The body is crocheted bottom-up with built-in legs (simple and sturdy). You’ll change colours for pants/shirt/outfit.
Base body (generic):
- Fox-inspired doll: Pants color = Black, Shirt = Green
- Bunny-inspired doll: Outfit = Blue (you can do all-blue, or blue top with darker blue pants)
Legs + Lower Body (start at first leg)
Use pants colour (Black for fox; Blue/darker tone for bunny).
Round 1: 6 sc in MR (6)
Round 2: inc x6 (12)
Round 3: sc around (12)
Round 4: (2 sc, dec) x3 (9)
Round 5: sc around (9)
Fasten off for Leg 1.
Make Leg 2 the same, but do not fasten off.
Join legs
With Leg 2 still on hook:
Round 6: ch 3, join to Leg 1 with sc in any stitch, sc around Leg 1 (9), sc in each ch (3), sc around Leg 2 (9), sc in each ch (3) (24)
Round 7: sc around (24)
Round 8: (2 sc, dec) x6 (18)
Round 9: sc around (18) Colour change to shirt/upper outfit
Change to Green (fox shirt) or Blue (bunny uniform).
Round 10: sc around (18)
Round 11: (2 sc, inc) x6 (24)
Rounds 12–14: sc around (24)
Round 15: (2 sc, dec) x6 (18)
Round 16: sc around (18)
Stuffing note: Stuff the body firmly, especially the lower half,lf so it can sit/stand nicely.
Round 17: (sc, dec) x6 (12)
Fasten, leaving a long sewing tail for attaching the head.
Balance tip: Keep the body slightly firm (not squishy). A firmer base helps the doll sit neatly and display well.
ARMS, LEGS, AND OPTIONAL TAIL
Arms (make 2)
Use shirt/outcolourolor (Green for fox, Blue for bunny) or a neutral.
Round 1: 6 sc in MR (6)
Round 2: sc around (6)
Round 3: sc around (6)
Round 4: (sc, dec) x2 (4)
Rounds 5–6: sc around (4)
Fasten off, leaving a tail. Lightly stuff the hand end only (optional).
Placement: Sew arms to the sides of the body around Rounds 12–13 of the body (just under the head).
Legs
Already formed as part of the body. If you prefer separate legs, you can crochet two small tubes and sew them on, but the integrated legs above are easiest and sturdier for beginners.
Optional Fox Tail (make 1)
Use Orange, with a white tip.
Round 1: 6 sc in MR (6)
Round 2: (sc, inc) x3 (9)
Rounds 3–5: sc around (9)
Change to White.
Round 6: sc around (9)
Round 7: (sc, dec) x3 (6)
Stuff lightly. Fasten off, leaving a tail for sewing.
Placement: Sew to the back of the fox-inspired doll, centred just above the pants line.
OUTFIT DETAILS
A) Fox-Inspired Shirt / Outfit Shaping (optional hem detail)
If you want a shirt edge, add a small BLO round at the beginning of the shirt.
Optional shirt hem (at Round 10 of body):
Work Round 10 in BLO to create a ridge (18).
Then continue as written.
You can also surface-stitch a tiny “collar” with white yarn or felt triangles, but it’s optional.
B) Tie (fox-inspired)
Use Blue (tie) and a tiny accent of Black (optional).
Tie strip:
Round 1: ch 6, starting in 2nd ch from hook: sc 5 (5)
Work in rows (not rounds):
Row 2: ch 1, turn, sc 5 (5)
Row 3: ch 1, turn, sc 5 (5)
Fasten off, leave tail.
Tie knot (tiny):
ch 3, sl st back across to form a tiny bar. Fasten off.
Assembly: Sew a knot at the top of the strip, then sew the tie to the centre front of the shirt.
Pro tip: For a neat look, lightly tack the tie at 2–3 points so it lies flat.
C) Belt (bunny-inspired)
Use Beige (belt) + Black (buckle) or dark blue buckle.
Belt band:
ch to wrap around the waist (typically ch 22–26, depending on your tension), then:
- sl st to form a ring (don’t twist),
- sc around the chainring evenly (aim for 22–26 sc).
Fasten off.
Buckle (tiny rectangle):
ch 5, sc in 2nd ch from hook and across = 4 sc.
Row 2: ch 1, turn, sc 4.
Fasten off and sew to the centre front.
Placement: Sew the belt right at the waist transition (where the legs meet the torso).
D) Wide-Brim Hat (bunny-inspired)
Use Beige (or grey or blue to match). Work in continuous rounds; the hat is built top-down.
Round 1: 6 sc in MR (6)
Round 2: inc x6 (12)
Round 3: (sc, inc) x6 (18)
Round 4: (2 sc, inc) x6 (24)
Round 5: (3 sc, inc) x6 (30)
Round 6: (4 sc, inc) x6 (36)
Round 7: sc around (36)
Round 8: sc around (36)
Round 9 (define edge): BLO sc around (36)
Round 10: sc around (36)
Round 11 (brim increase): (5 sc, inc) x6 (42)
Round 12 (wider brim): (6 sc, inc) x6 (48)
Round 13: hdc around (48)
Fasten off, weave in ends.
Brim curl troubleshooting:
- If the brim curls up tightly, add another increase round (e.g., (7 sc, inc) x 6).
- If brim flops too much, use sc instead of hdc on the last round or go down a hook size.
Optional hat band: surface stitch a blue band around Round 10.
FACIAL DETAILS (expression makes the doll)
Safety eyes
- Insert eyes between Rounds 11–12 of the head.
- Spacing: 8–9 stitches apart for a sweet look; 10 stitches for a calmer expression; 7 stitches for extra “cute/compact.”
Nose + smile (embroider with black thread)
- Sew the muzzle onto the head first (it helps you centre features).
- Embroider a small triangle or rounded nose near the top centre of the muzzle.
- Stitch a short vertical line down (optional), then a curved smile to each side.
Blush cheeks
- Add blush just beside the muzzle, slightly below eye level.
- Keep it subtle; too low can look like “spos,” too high can crowd the eyes.
ASSEMBLY INSTRUCTIONS (order matters)
- Muzzle first: Pin the muzzle, centred under the eyes; sew around the edges. Add a tiny bit of stuffing under the muzzle before fully closing if you want a raised look.
- Facial embroidery: Add the nose and smile after the muzzle is attached.
- Ears: Pin ears in place and check symmetry from the front. Sew securely.
- Fox ears: slightly outward tilt.
- Bunny ears: let them droop for softness.
- Attach head to body: Sew the head to the body using the long tail from the body. Stitch all around, going through both loops for strength. Add extra stuffing at the neck if needed before closing.
- Arms: Pin arms evenly; sew at the same height on both sides.
- Accessories:
- Fox-inspired doll: sew the tie centred on the shirt.
- Bunny-inspired doll: sew a belt at the waist; place a hat on the head (tack it with a few stitches so it’s removable, or secure it as you prefer).
- Final balance check: Sit the doll on a flat surface; adjust arm placement or add a touch more stuffing in the base if it tips.
BEGINNER TIPS
- Count stitches every round, and small errors show up quickly on spheres.
- Use a stitch marker in the first stitch of each round.
- Keep tension even; tight stitches prevent stuffing from showing.
- Stuff gradually as you go—don’t wait until the end.
- Pin pieces before sewing, then check from the front and sides.
- Step back and look at the face placement before locking in knots.
COMMON MISTAKES TO AVOID
- Wrong stitch counts: causes lopsided heads/bodies.
- Uneven head shaping: usually from missed increases/decreases.
- Overstuffing: can stretch stitches and distort the face.
- Crooked ears: always pin and measure placement before sewing.
- Misaligned eyes: place both eyes first, then attach the backs once you’re sure.
- Loose accessories: tack belts/ties/hats in multiple small stitches.
- Incorrect outfit colour change, place colour swap on the back of the body.
- Hat brim curling too tightly/loosely: adjust hook size or add/remove an additional round.
USES FOR THESE CROCHET DOLLS
- Handmade gift for crochet lovers
- Inspired fan art decor (without using copyrighted names)
- Desk companion or monitor buddy
- Shelf display in a craft room or studio
- Couple gift (anniversary, wedding shower, Valentine’ s-style)
- Collectible amigurumi set
- Nursery or playroom decor
- Craft fair or handmade shop product (price to include accessory time)
CARE INSTRUCTIONS
- Spot clean preferred; gentle hand wash if needed
- Use mild detergent only
- Press a towel to remove water, do not wring
- Air dry flat and reshape the ears and hat brim while drying
- Avoid rough machine washing/drying (especially with chenille/velvet yarn)
- Store in a clean, dry place away from snagging items
CONCLUSION
This fox-and-bunny-inspired amigurumi couple is a cosy, character-rich crochet project that combines beginner-friendly shaping with just enough outfit details to feel special. With their oversized heads, sweet embroidered smiles, blush cheeks, and signature accessories (the fox-inspired tie and the bunny-inspired belt and hat), they’re perfectly giftable and display-worthy. Try experimenting with outfit colours, eye spacing, and tiny accessories to create your own variations, and if you can, make the full fox-inspired crochet doll and the bunny-inspired crochet doll as a matching set for maximum charm.