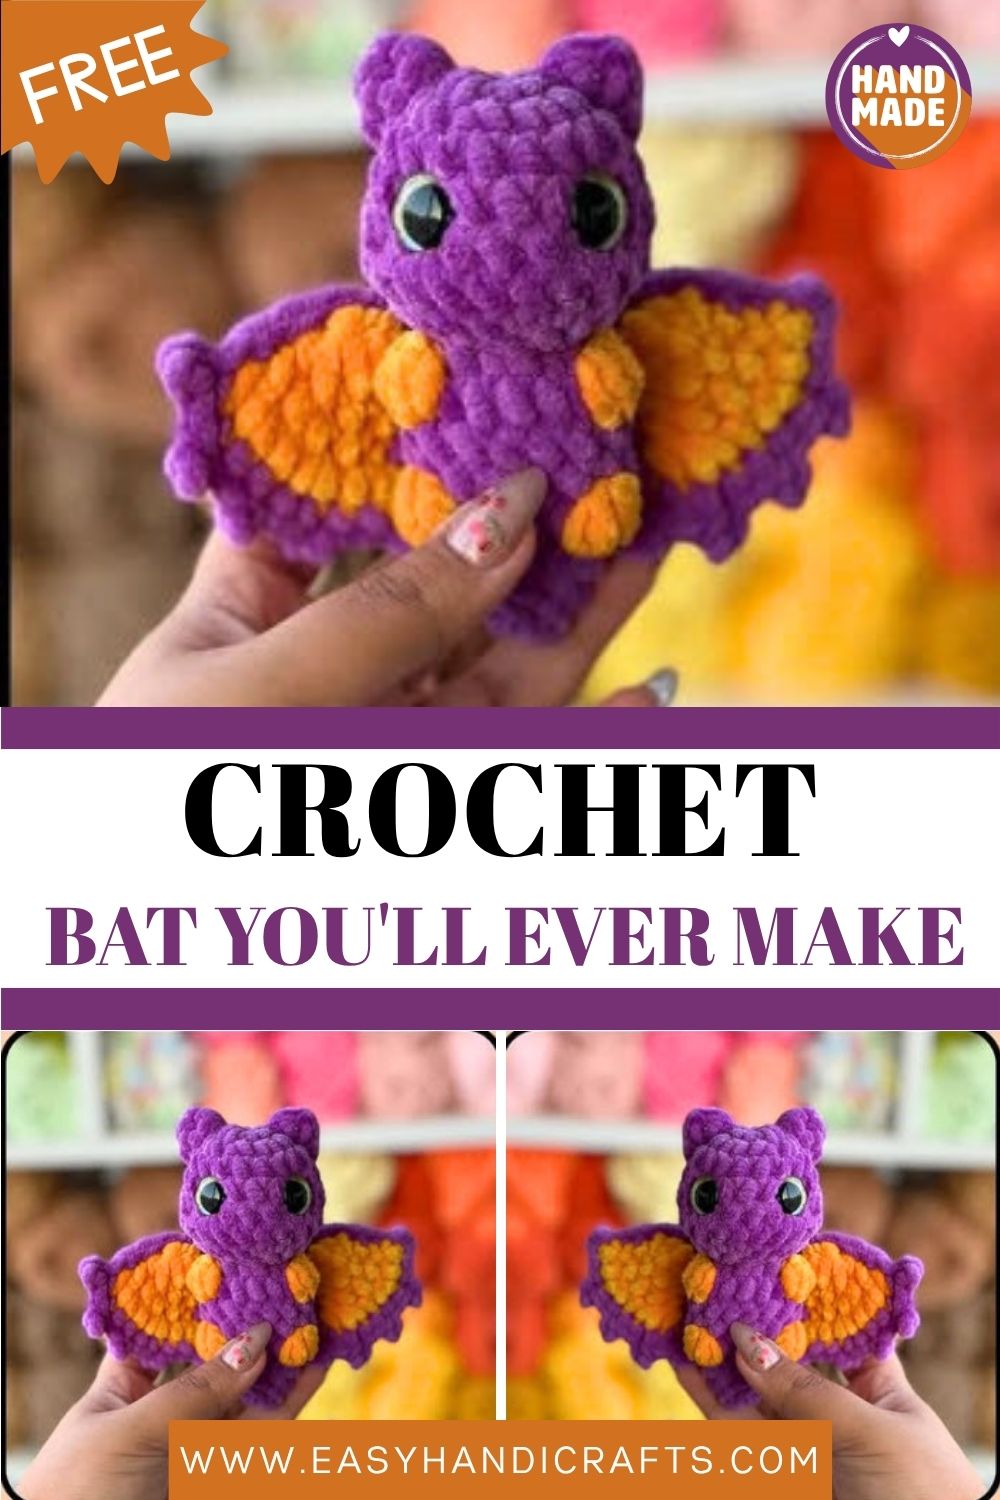
Cutest Crochet Bat You’ll Ever Make Amigurumi Pattern
Looking for a little Halloween magic? Meet Cutest Crochet Bat, a tiny, big-eyed crochet buddy with serious spooky charm. He stitches up fast, sews together in minutes, and lands between creepy and adorable. Grab your hook and let’s make him.
Oscar is a fun, low-sew amigurumi with a round head, a chubby little body, and two pointed wings. The head and body crochet together as one piece, so finishing stays quick and beginner-friendly on the seaming side. Bobble stitches add a bumpy texture across his tummy, while picot edges give the wings that classic bat shape. He’s fast, cute, full of personality, and perfect for Halloween decor or a handmade gift.
Skill Level
This is an intermediate Cutest Crochet Bat pattern, friend. You should feel comfortable with magic rings, increases, decreases, and a bobble stitch. The shaping is simple, but the bobbles and picots need a little patience and practice.
Pattern Overview
Before you grab your hook, here’s a quick map of what you’re making and how it all comes together:
- One-piece head and body – you start at the head, add the eyes, then keep going straight down into the body. No separate seaming for the main shape.
- Two wings -made flat-ish from a magic ring, then folded and edged with picots for that classic bat-wing look.
- Two little ears – surface-worked right into the head, so there’s nothing extra to stuff or sew on.
- Bobble-stitch detailing – small bumps across the body give Oscar a fun, slightly creepy-cute texture.
- Continuous rounds – the whole thing is worked in a spiral, so keep a stitch marker handy to track where each round starts.
Honestly, the only real sewing is attaching the two wings. Everything else is crocheted or worked directly into the body.
Special Techniques
A couple of stitches in this pattern go beyond the basics, so let’s break them down:
- Bobble stitch (Bo4dc): This is a 4-double-crochet bobble worked into a single stitch, then closed together at the top. It creates those raised little bumps on Oscar’s body. Keep your tension a touch loose so the bobble pops forward instead of pulling tight.
- Picot: Chain 2, then slip stitch into the second chain from your hook. That tiny loop is what gives the wing edges their scalloped, pointed finish.
- Front-loop close-off: At the very end of the body, you thread your yarn tail through the front loops of the last stitches and pull tight, like cinching a drawstring. It closes the bottom neatly with no gap.
Take these slowly the first time. Once the rhythm clicks, they go fast.
Materials
You can use any type of yarn for this pattern. Just be sure to adjust your stitches according to the yarn you choose, since a thinner yarn will make a smaller bat.
- Yarn of your choice (I used size 6 super bulky yarn)
- Crochet hook — 5 mm
- Safety eyes — 14 mm
- Fiber filling
- Stitch marker
- Scissors
- Yarn needle
Abbreviations
This Cutest Crochet Bat pattern is worked in continuous rounds and written in US terminology. Here are the short forms you’ll see throughout:
- MR — Magic ring
- SC — Single crochet
- DEC — Decrease (invisible)
- INC — Increase
- FO — Fasten off
- SLST — Slip stitch
- CH — Chain
- STS — Stitches
- BO — Bobble stitch (Bo4dc)
- ( ) — Number of stitches at the end of each round
Notes Before You Start
A few small things make the whole make smoother:
- You may need a stitch marker to keep track of your stitch count, since the rounds are continuous.
- Align the eyes with the arms and legs according to the thickness and the yarn you use.
- The head and the body are crocheted together, starting with the head.
Head and Body
Using your body color, make a magic ring and work down from the head:
- R1: 8 sc into MR (8)
- R2: 8 inc (16)
- R3: 16 sc around (16)
- R4: (3 sc, inc) x 4 (20)
- R5–6: 20 sc around for 2 rounds (20)
- R7: (3 sc, dec) x 4 (16)
Now insert your safety eyes between rounds 4–5, about 5 stitches apart. Stuff the head firmly before it closes up too much.
- R8: dec x 8 (8)
- R9: 8 inc (16)
- R10: 4 sc, Bo4dc, 5 sc, Bo4dc, 5 sc (16)
- R11–12: 16 sc around for 2 rounds (16)
- R13: 5 sc, Bo4dc, 4 sc, Bo4dc, 5 sc (16)
Start stuffing the body as you go from here, so it stays even.
- R14: (2 sc, dec) x 4 (12)
- R15: (3 sc, dec) x 2, 2 sc (10)
- R16: 2 sc, dec, 3 sc, dec, sc (8)
- R17: dec x 4 (4)
Fasten off and leave a tail. Use a yarn needle to thread through the front loops of the remaining stitches, pull tight to close, and weave in the end.
Wings (Make 2)
Using your second color, make a magic ring:
- R1: 6 sc into MR (6)
- R2: (2 sc, inc) x 2 (8)
- R3: (3 sc, inc) x 2 (10)
- R4: (4 sc, inc) x 2 (12)
- R5: (sc, inc) x 6 (18)
Leave the wings unstuffed they should stay flat. Change to your second color, then cut and fasten off the body color. Fold the wing in half and work across both sides to close: (Picot, 2 sc) x 4. Picot, then slip stitch into the next stitch. Continue working along the other edges, make about 8–9 sts, and slip stitch into the next stitch. Fasten off and weave in the ends.
Assembly
This is the only sewing part, and it’s quick:
- Position the wings: Sew the wings between rounds 10–14 on the body, one on each side.
- Mind the spacing: Keep the distance between the arms and the wings around 2 stitches, and the distance between the two wings about 5 stitches across the back.
- Secure neatly: Use the leftover tails to stitch each wing down, then weave in the ends so nothing shows.
Ears (Make 2)
Using the body color, insert your hook between rounds 3–4, about 2 stitches apart from the eyes. Chain 1, then sc in the same stitch. Work (dc, chain 1, dc, sc) into the next stitch, between rounds 1–2. Slip stitch into the same stitch and weave in the ends.
Picot reminder: Ch 2, then slip stitch into the second chain from your hook.
Common Mistakes (and How to Fix Them)
A few snags trip people up, so watch out for these:
- Losing your round count: Continuous rounds blur together fast. Move your stitch marker every single round, and you’ll never lose your place.
- Eyes placed too late: Once you stuff and close the head, the eyes are locked in. Set them between rounds 4–5 before stuffing.
- Tight bobbles: Pulling your bobble stitches too tight flattens them. Keep that section relaxed so the bumps stand out.
- Over-stuffing: Too much filling distorts the shaping and shows through the stitches. Add it in small bits and check the form as you go.
- Skipping the gauge check: Different yarn means a different size. Adjust your stitch count if you swap weights.
Important Remarks
Please keep these in mind before sharing your make:
- Respect the design: Do not copy, sell, or redistribute this pattern.
- Selling finished bats is fine: You can sell and post the finished product, but please credit me as the designer.
- Need help? Feel free to reach out I’m happy to answer questions.
- Want more? Check my Instagram for future projects and new patterns.
Conclusion
So there’s Cutest Crochet Bat proof that a spooky little friend doesn’t need hours or fancy seaming. With just a magic ring, a few bobbles, and two cute wings, you’ve got a Halloween buddy ready for the shelf. The best part about a small make like this is how fast it rewards you. In one cozy afternoon, you go from a single ball of yarn to a soft little bat with real personality. Don’t stress if your first one looks a bit wonky; that’s the handmade charm, and every bat ends up with its own character. Make a whole colony in different yarn colors if you like they look adorable lined up together.