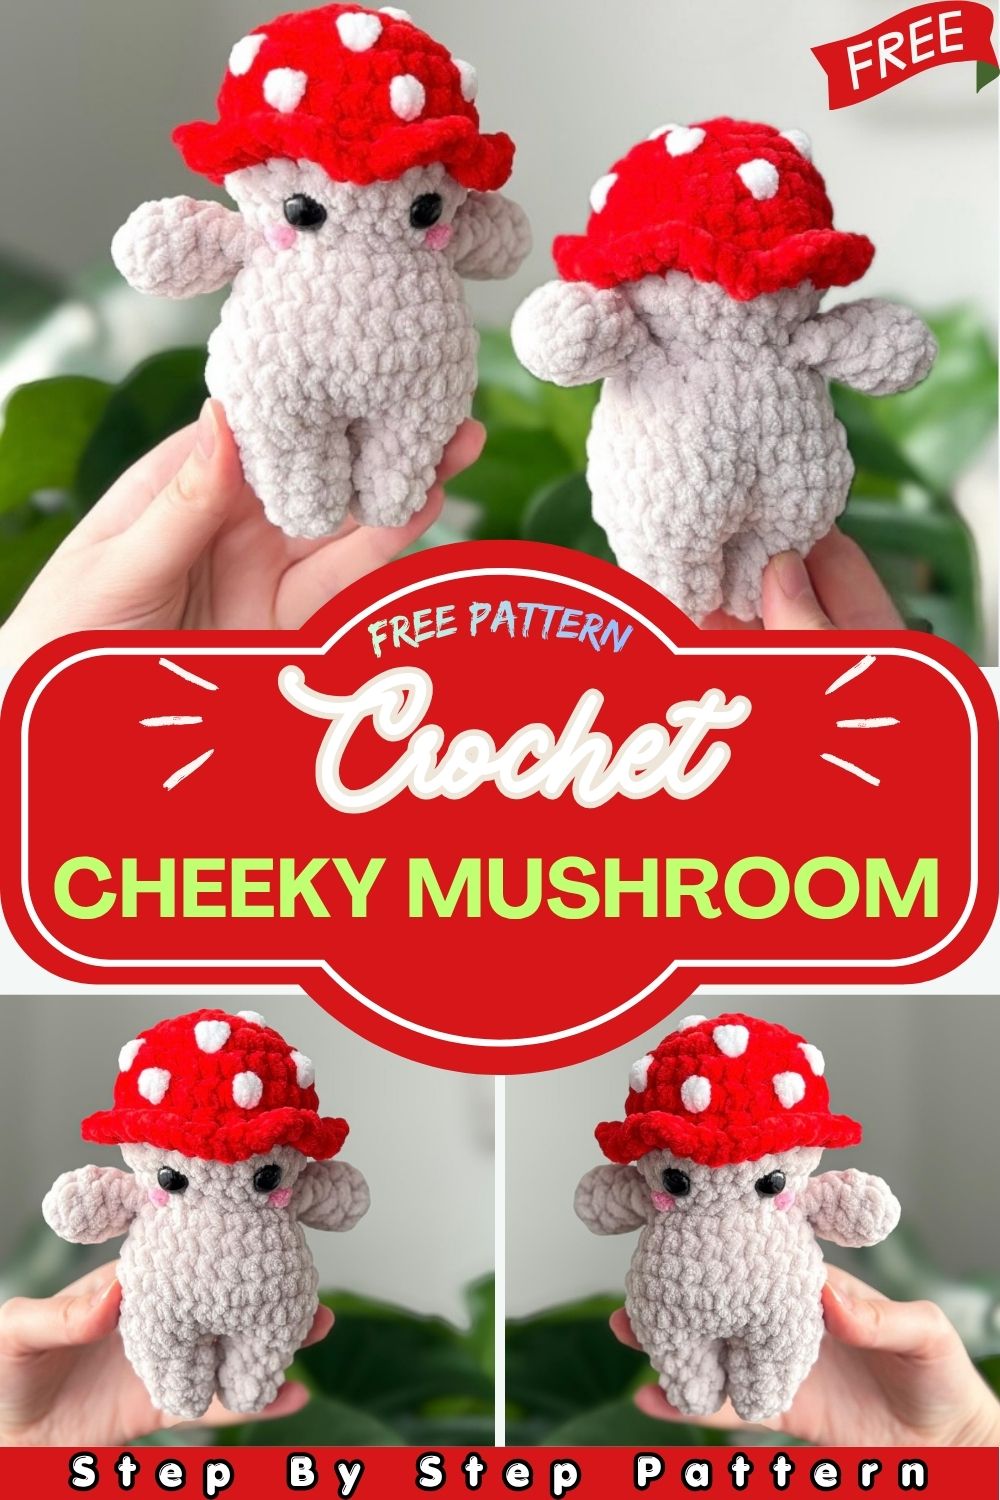
Cute Crochet Mushroom Plushie – Handmade Amigurumi Mushroom Doll
Bring charm and coziness to your collection with this cute crochet mushroom plushie. Handmade with soft yarn and detailed stitching, this adorable amigurumi mushroom doll is perfect for gifting, room décor, or adding a kawaii touch to your handmade toy collection.
This handmade crochet mushroom plushie is crafted with love using premium soft yarn, featuring a charming red mushroom cap with white polka dots and a cute plush body. Ideal for kids, collectors, and cozy aesthetic lovers, this crochet mushroom doll adds warmth and personality to any space.
SUPPLIES
- Hook: 5 mm
- Super bulky chenille yarn (size 6) in:
- Red
- White
- Beige
- Pink
- Safety Eyes: 12 mm
- Scissors
- Polyester stuffing
- Stitch markers
- Sewing needle
ABBREVIATIONS
- Ch = Chain
- Rnd = Round
- st(s) = Stitch(es)
- MR = Magic Ring (or ch 2 and work into 2nd chain from hook)
- Sc = Single Crochet
- Inc = Increase (2 sc in the same stitch)
- Dec = Invisible Decrease
- FLO = Front Loops Only
- BLO = Back Loops Only
- Sl st = Slip Stitch
- FO = Fasten Off
Invisible Decrease Technique
Insert hook through the front loops only of the next two stitches.
>Yarn over and pull through both loops. Yarn over again and pull through the remaining two loops. You will have one loop left on the hook.
Continue crocheting as normal.
Important Note
It is recommended to crochet the pattern exactly as written. The instructions are arranged in the correct order so every piece fits together properly during final assembly.
ARMS (MAKE 2)
Crochet in Beige Yarn
Rnd 1: 8 sc in MR (8)
Rnd 2–3: sc around (2 rounds) (8)
Rnd 4: (2 sc, dec) × 2 (6)
Rnd 5: sc around (6)
Finishing Arms:
Stuff the arms lightly.
Fold arms in half and work 3 sc through both layers to close the opening. Cut a short tail.
Arms will be attached to the body later.
Make sure to sc through stitches on both sides.
MUSHROOM CAP
Crochet in Red Yarn
Rnd 1: 7 sc in MR (7)
Rnd 2: inc around (14)
Rnd 3: (1 sc, inc) × 7 (21)
Rnd 4: (2 sc, inc) × 7 (28)
Rnd 5–6: sc around (2 rounds) (28)
Rnd 7: in FLO: inc around (56)
Eye Placement Note:
Leave 4 stitches between the eyes.
Mark the first BLO stitch with a stitch marker.
Slip stitch and weave in ends.
HEAD + BODY
Make a slip stitch with beige yarn in the visible BLO stitches of Rnd 6.
Rnd 8: in BLO of Rnd 6: (5 sc, dec) × 4 (24)
Rnd 9: sc around (24)
Rnd 10: (2 sc, dec) × 6 (18)
Rnd 11: (1 sc, dec) × 6 (12)
Arms Attachment Note:
You may need to adjust arm placement with 1–2 sc for even alignment.
Sc through both arm stitches and FLO of the head.
Rnd 12 (FLO):
ARMS with 3 inc, 4 inc, ARMS with 3 inc, 2 inc (24)
Face Details:
Insert safety eyes between Rnd 9–10, approx. 4 stitches apart.
Sew blush under eyes.
Stuff the head.
BODY
Rnd 13–14: sc around (2 rounds) (24)
Rnd 15: (3 sc, inc) × 6 (30)
Rnd 16: sc around (30)
Rnd 17: (3 sc, dec) × 6 (24)
Stuff the body.
Rnd 18: (1 sc, dec) × 8 (16)
LEGS (MAKE 2)
Preparation
Fold the body in half to form two legs.
Use stitch markers to separate them:
- White marker = center line
- Each side = one leg section
You will have 7 stitches per leg section.
Start with the right leg (where the yarn is currently attached, marked with an orange stitch marker).
RIGHT LEG
Rnd 1: sc around, do not crochet into stitches marked with white stitch marker (7)
Rnd 2–3: sc around (2 rounds) (7)
Stuffing:
Stuff both the leg and body firmly.
Rnd 4: 3 dec, 1 sc (4)
Finishing:
Fasten off (FO) and weave in the end.
LEFT LEG
Make a slip stitch in the stitch next to the white stitch marker.
Rnd 1: sc around, skip stitches marked with white stitch marker (7)
Rnd 2–3: sc around (2 rounds) (7)
Stuffing:
Finish stuffing both legs and body.
Rnd 4: 3 dec, 1 sc (4)
Finishing:
Fasten off (FO) and leave a long tail for sewing.
Assembly (Legs)
Sew the gap between both legs.
If legs are still far apart, sew them closer together for better shaping.
Body Shaping (Optional)
Using the same yarn tail:
- Insert the needle from the bottom center
- Bring yarn up 3–4 rounds on the back of the body
- Repeat the same path a few times to secure shaping
This creates a natural bum shape.
MUSHROOM SPOTS
Crochet in White Yarn
Use the pictures below as a guide.
Cut a long piece of white yarn and thread it onto a needle.
Steps:
- Choose a stitch on the mushroom cap (about 1 stitch wide)
- Insert the needle through that stitch
- Bring it down one stitch below and insert it back into the starting point
- Repeat this process through the same stitch 3–4 times to form a small spot
Continue:
Repeat the same method to add random spots all over the mushroom cap until you are happy with the design.
Conclusion
If you love cute handmade crochet toys, this amigurumi mushroom plushie is the perfect choice. Its soft texture, adorable design, and handcrafted charm make it an ideal décor piece, collectible, or thoughtful gift for plushie lovers. Add this crochet mushroom doll to your collection for a cozy and whimsical touch.