Free Crochet Orange Rattle Pattern for Baby Toys
Bright colors and gentle sounds catch a baby’s attention fast, and that’s exactly why this Free Crochet Orange Rattle pattern has become such a favorite among makers. Small handmade toys like this one make thoughtful baby shower gifts, and parents love knowing every stitch was made with care.
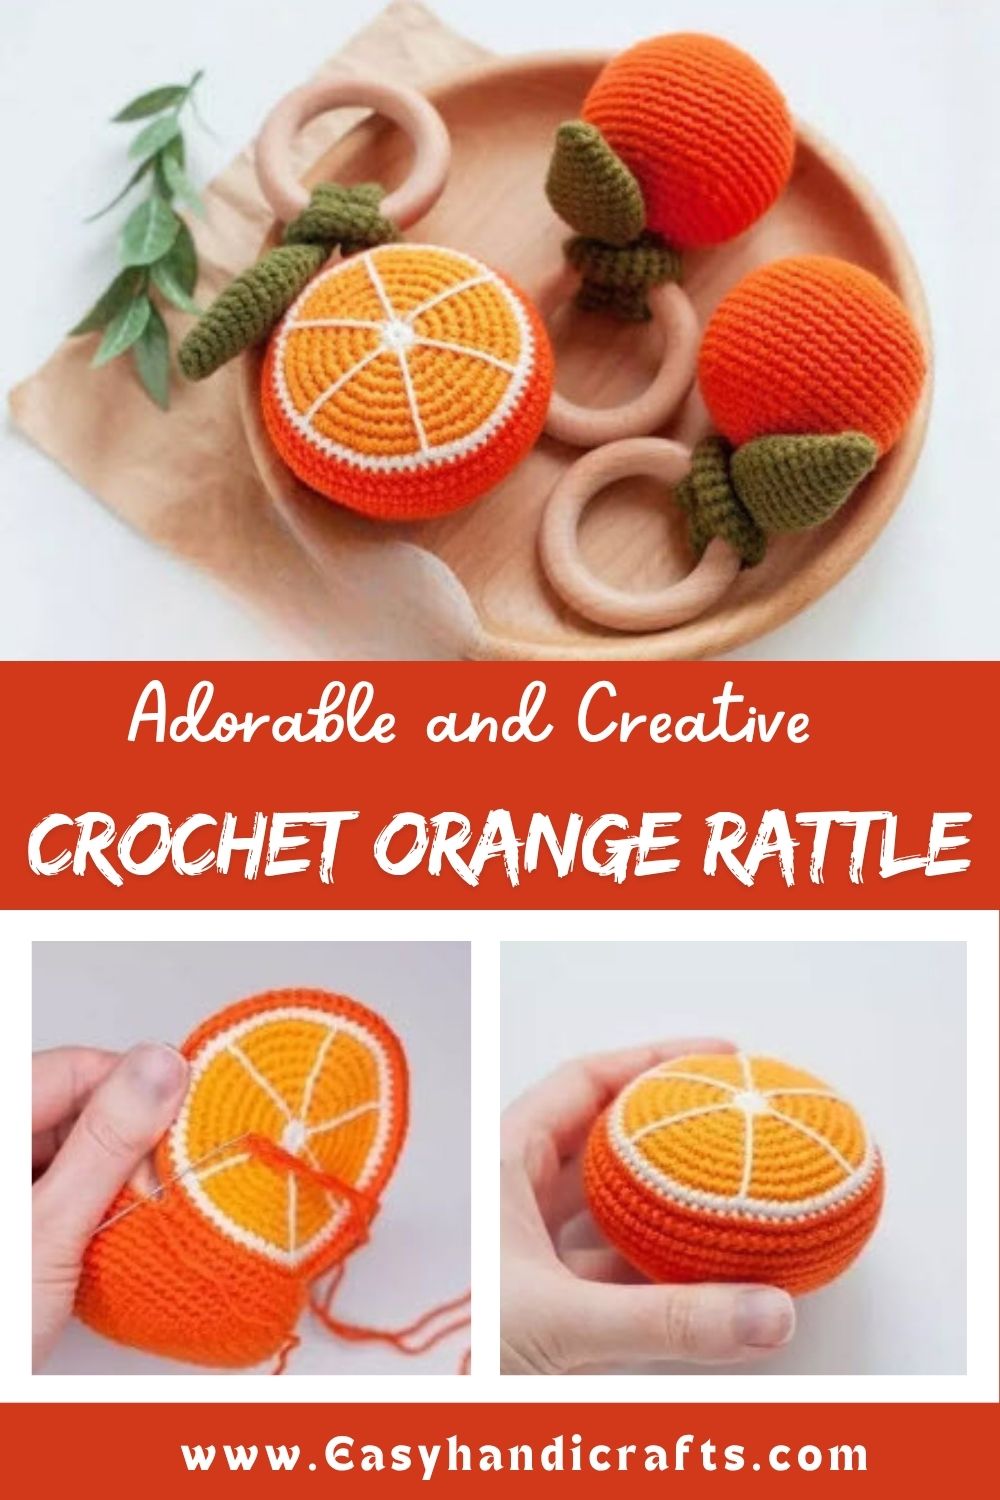
A crochet orange rattle combines a soft, huggable orange-fruit shape with a gentle internal rattle sound, giving babies a toy that’s both visually stimulating and fun to shake. Bold orange tones support early color recognition, and the rounded shape fits comfortably in tiny hands.
The pattern works well as a solo gift or paired with other fruit-themed rattles. Small size and lightweight design make it easy for infants to grip and explore during playtime.
Skill Level
Beginner to Intermediate. Basic single crochet stitches, simple increases and decreases, and a bit of shaping make this project approachable for newer crocheters, though comfort with basic crochet stitches helps the process go smoothly.
Materials and Tools Needed
Gathering the right supplies before starting keeps the project running without interruptions.
- YarnArt JEANS (55% cotton, 45% acrylic, 160m/50g) in olive green, for the leaf and stem
- Alize Cotton Gold (55% cotton, 45% acrylic, 330m/50g) in pumpkin orange, for half the orange
- Alize Cotton Gold in white or milk white, for the orange segments
- Alize Cotton Baby Soft (50% cotton, 50% acrylic, 170m/100g) in orange, for the orange peel
- Crochet hook to match your yarn (a 2.5mm hook works well with this yarn combination)
- Sewing needle for finishing details
- Wooden ring, 2.2–2.4 inches (5.5–6 cm) in diameter
- Safety pins for holding pieces in place while assembling
- Scissors
- Synthetic stuffing, such as holofiber
- A small rattle insert
Key Techniques and Concepts
Trust me, a few core techniques make this pattern come together beautifully.
- Magic circle start – Creates a tight, gap-free center for each piece of the orange.
- Increase and decrease rounds – Shape the round orange form without puckering.
- Color changes between yarns – Switching from white to pumpkin orange, then to a deeper orange, gives the fruit its layered, realistic look.
- Firm stuffing before closing – Packing the body tightly before sewing the last rounds keeps the round shape from sagging.
- Safe rattle placement – Positioning the rattle insert deep inside the stuffing, right before the final decrease rounds, keeps the sound muffled and secure.
- Ring assembly – Attaching the finished orange and stem to a wooden ring gives the rattle a comfortable grip for tiny hands.
Stitch Legend
Before diving into the rounds, here’s a quick key to the abbreviations used below.
- CH – chain
- MC – magic circle
- SC – single crochet
- INC – increase (2 stitches in one stitch)
- DEC – decrease (2 stitches crocheted together)
- Numbers in parentheses show the total stitch count at the end of each round
- X – repeat the instruction the stated number of times
Step-by-Step Instructions
Step 1: Crochet Half of the Orange
Start with white or milk white yarn and work 8 SC in a magic circle (8). Switch to pumpkin orange yarn and increase steadily over the next several rounds: 8 INC (16), then (INC, 1 SC) x8 (24), (2 SC, INC) x8 (32), (3 SC, INC) x8 (40). Continue shaping with 2 SC, (INC, 4 SC) x7, INC, 2 SC (48), then 1 SC, (INC, 5 SC) x7, INC, 4 SC (56), and (INC, 6 SC) x8 (64).
Change to white or milk white yarn for one round of 64 SC, then switch to orange yarn for another round of 64 SC. Cut the thread and tuck the tail inside.
Step 2: Crochet the Peel of the Orange Half
Using orange yarn, start with 6 SC in a magic circle and increase gradually: 6 INC (12), (INC, 1 SC) x6 (18), (INC, 2 SC) x6 (24), (INC, 3 SC) x6 (30), (INC, 4 SC) x6 (36), (INC, 5 SC) x6 (42), (INC, 6 SC) x6 (48), (INC, 7 SC) x6 (54), (INC, 8 SC) x6 (60).
Work [(INC, 9 SC) x2, 10 SC] x2 to reach 64 stitches, then crochet 6 even rounds of 64 SC. Fasten off and hide the yarn tail inside the peel.
Step 3: Crochet the Round Orange Body
Using orange yarn again, build the round shape the same way: 6 SC in a magic circle, then 6 INC (12), (INC, 1 SC) x6 (18), (INC, 2 SC) x6 (24), (INC, 3 SC) x6 (30), (INC, 4 SC) x6 (36), (INC, 5 SC) x6 (42), and (INC, 6 SC) x6 (48).
Work 10 even rounds of 48 SC, then begin decreasing: (DEC, 6 SC) x6 (42), followed by (DEC, 5 SC) x6 (36). At this stage, stuff the piece firmly and insert the rattle in the center before continuing.
Keep decreasing with (DEC, 4 SC) x6 (30), (DEC, 3 SC) x6 (24), (DEC, 2 SC) x6 (18), (DEC, 1 SC) x6 (12), and finish with 6 DEC (6). Fasten off, close the opening, and hide the yarn tail inside.
Step 4: Crochet the Stem and Assemble
For the stem, work 6 SC in a magic circle, then increase with (2 SC, INC) x2 (8), (3 SC, INC) x2 (10), (4 SC, INC) x2 (12), (5 SC, INC) x2 (14), (6 SC, INC) x2 (16), and (7 SC, INC) x2 (18). Crochet 3 even rounds of 18 SC.
Decrease with (7 SC, DEC) x2 (16), (6 SC, DEC) x2 (14), (5 SC, DEC) x2 (12), and finish with (SC, DEC) x4 (8). Sew the stem onto the orange, then secure the orange and stem onto the wooden ring as your assembly guide shows.
Step 5: Crochet the Leaf
The leaf follows the same shaping as the stem: 6 SC in a magic circle, then (2 SC, INC) x2 (8), (3 SC, INC) x2 (10), (4 SC, INC) x2 (12), (5 SC, INC) x2 (14), (6 SC, INC) x2 (16), and (7 SC, INC) x2 (18). Work 3 even rounds of 18 SC.
Decrease with (7 SC, DEC) x2 (16), (6 SC, DEC) x2 (14), (5 SC, DEC) x2 (12), and (SC, DEC) x4 (8). The exact round count may shift slightly depending on your ring size and stitch tension, so check the fit against the ring as you go, then attach the leaf beside the stem to finish the rattle.
Helpful Tips for Beginners
- Use a smaller hook, around 2.5mm, for tight stitches that keep stuffing from showing through.
- Count stitches at the end of every round to catch mistakes early.
- Real talk, testing your rattle insert’s sound before sewing it in saves frustration later.
- Check the stem length against your wooden ring often while crocheting, since ring sizes vary slightly between brands.
Common Mistakes to Avoid
- Skipping stitch counts, which leads to lopsided shaping across the three orange pieces.
- Under-stuffing before closing the final rounds, which leaves the rattle floppy and shapeless.
- Attaching the stem to the ring before checking the fit, which can leave gaps or an uneven grip.
- Leaving loose yarn ends unwoven, creating a fragile finish.
- Using a rattle insert that’s too large for the body, making the seams strain.
Customization Ideas
- Swap the orange colorway for other fruit shapes, like lemons or apples, on a matching wooden ring.
- Try a slightly larger or smaller wooden ring to change the overall grip size.
- Use a softer cotton blend if the baby’s skin is sensitive to acrylic mixes.
- Low-key upgrade: add a tiny crinkle fabric insert alongside the rattle for extra sensory feedback.
Frequently Asked Questions
Is this pattern safe for newborns?
Not gonna lie, always follow baby safety standards, including securely enclosed inserts and no small detachable parts, and check age recommendations for rattle toys before gifting.
What yarn works best for baby toys?
Cotton yarn is often preferred for baby items because it’s soft, breathable, and holds shape well after repeated washing.
How long does this Free Crochet Orange Rattle project take to complete?
Most crocheters finish the orange rattle in two to three hours, depending on stitch speed and experience level.
Can I machine wash the finished rattle?
Hand washing is safer for protecting the rattle insert and stitching; air dry fully before returning it to a baby.
What size hook should I use?
A 2.5mm hook works well with the lighter cotton-acrylic yarns used in this pattern, giving tight, secure stitches.
Can I make this without a Free Crochet Orange Rattle insert?
For real, yes simply stuff the body fully for a soft plush toy without sound if a rattle isn’t available.
Conclusion
A Free Crochet Orange Rattle pattern brings together color, texture, and gentle sound in one adorable baby toy. It’s a rewarding project for beginner and intermediate crocheters alike, combining simple stitches with meaningful results. Whether made as a personal keepsake or a thoughtful shower gift, this pattern offers plenty of room for customization and creativity. Give this pattern a try, experiment with colors, and enjoy watching a baby’s face light up over a handmade toy made just for them.